
The critical path of any project marks the longest way through your project, identifying the tasks that cannot slip if you expect to finish your project on schedule. And if you’re looking for ways to shorten the length of your project, look for ways to shorten the critical path. The critical path of your project can change as the project progresses. How? Tasks on the critical path might finish early, making what was the critical path shorter than some other path through your project. Or tasks on some other path through the project might be delayed, moving those tasks onto the critical path. So knowing which tasks can make or break your project’s on-time completion is, well, critical!
Tasks that appear on the critical path are called critical tasks. Project treats a task as a critical task if it meets any of the following criteria:
In a project scheduled from a start date, any task that has an As Late As Possible (ALAP) constraint or has a predecessor task with an ALAP constraint.
In a project scheduled from a finish date, any task that has an As Soon As Possible (ASAP) constraint.
Any task that has a finish date that is the same as or later than its deadline date.
Any task that has a Must Start On or Must Finish On date constraint.
Any task that has no slack (also called float).
Note
Project calculates a task’s slack by calculating the difference between the task’s early finish and late finish dates; when these two dates are the same, the difference equals zero and Project identifies the task as a critical task. You can change the default difference from zero to another number. For more information on slack, see 5.
You can view the critical path in a variety of ways from any task-oriented view. Perhaps the easiest way is to display the Detail Gantt view (on the View menu, point to More Views, click Detail Gantt, and click Apply). In the Detail Gantt view, critical tasks appear in red, while non-critical tasks appear in blue. Because this book doesn’t show the figures in color, I’ve applied a pattern to the Gantt bars of critical tasks in the Detail Gantt view shown in 8-6.
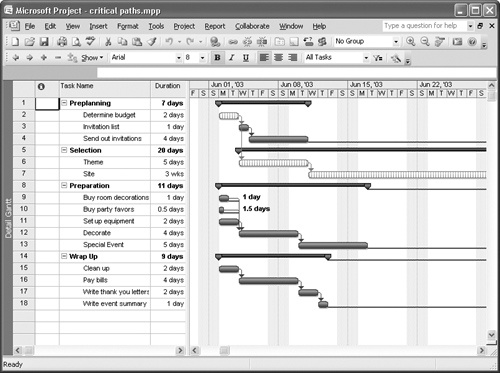
Figure 8-6. The Detail Gantt view uses red and blue to distinguish between critical and non-critical tasks; I added a pattern to critical tasks to make them easily visible in the figure.
You’ll find the same kind of behavior in the both the Tracking Gantt view and the Network Diagram; that is, critical tasks appear in red by default.
You also can filter a view to display only critical tasks. In 8-7, I displayed the Gantt Chart view, and in the Filter list, clicked Critical. Notice that Task ID numbers appear to be missing in the leftmost column of the view. The missing IDs belong to non-critical tasks that don’t appear when I filter to display only critical tasks.
In any task-oriented view that contains a table, you can group tasks into two groups: critical and non-critical. On the Project menu, point to Group By, and click Critical. Project then organizes your tasks into two groups: non-critical tasks followed by critical tasks.
Tip
You also can use the Group list to select a grouping; it appears on the Standard toolbar just above the Filter list highlighted in 8-7.
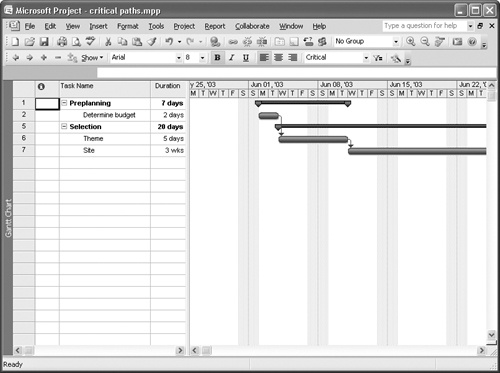
Your project can have multiple critical paths. Using Project’s Display Multiple Critical Paths option, you can view the critical path within each network of tasks. 8-6, shown earlier, contains four networks of tasks: Preplanning, Selection, Preparation, and Wrap Up. As you can see, the critical path for the project spans across the first two networks of tasks. In 8-8, I’ve opted to view the critical path of each network. As you can see, the tasks within each network are all critical to their respective networks except the first two tasks in the Preparation network.

Figure 8-8. If you display multiple critical paths, Project shows you the critical path within each network of tasks.
To display multiple critical paths, on the Tools menu, click Options, and in the Options dialog box, click the Calculation tab. Then select the Calculate Multiple Critical Paths check box (see 8-9).
