Budget resources are, well, exactly what their name implies. They are resources you set up to budget for work or costs during a project. Using a budget resource, you can compare amounts you want to budget for Work, Material, and Cost resources to the amounts you actually assign to those resources, helping you see where you stand after you make resource assignments.
To use budget resources, you create them and assign them to the project summary task to allocate your budget across the entire project. When you create budget resources, you typically set up budget categories that are meaningful to you. In my example, I’ll set up two budget categories: Labor/Materials and Costs. Later in this process, I’ll assign each non-budget resource on my Resource Sheet to one of these budget resources.
Be aware that Project contains two budget fields you can use to establish budget values: Budget Work and Budget Cost. And Project tracks both Work resources and Material resources in the Budget Work field. If you want, you can segregate Work and Material resources for purposes of examining their costs separately; I simply opted to combine them in this example. The point is you can create any budget resources you want to help you compare budgeted amounts to amounts assigned.
Note
When you create budget resources, you don’t assign rates to them; see the section "Establishing the Value of Budget Resources" later in this chapter for details on how you establish budget amounts.
To create a budget resource, follow these steps:
On the View menu, click Resource Sheet to display the Resource Sheet view.
In the Resource Name column, type the name of the budget resource; I called mine Budget-Labor/Materials.
In the Type column, click the type of resource that corresponds to the type of resource the budget resource will track, but don’t bother filling out any other fields for the budget resource. For example, click Work or Material for a budget resource that will track work or materials. For a budget resource that will track costs, click Cost.
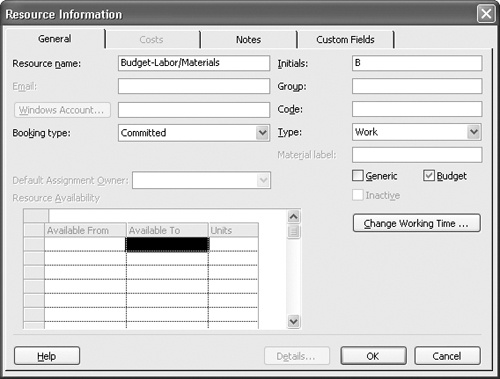
Double-click the budget resource to display the Resource Information dialog box and select the General tab.
Select the Budget check box to establish the resource as a budget resource and click OK.
Next, assign your budget resources to the project summary task. Switch to the Gantt Chart view, and if the project summary task isn’t visible, display it by opening the Tools menu and clicking Options; then click the View tab. Then select the Show Project Summary Task check box. Finally, using the steps in the "Assigning Resources to Tasks" section in 3, select the project summary task and assign the budget resources to it.
After you create budget resources, you need to assign each resource—both budget resources and non-budget resources—to a budget category that represents the type of cost each resource will incur. To make this assignment, you use a custom field. In the steps below, I’m going to create a custom field called Budget Category with a lookup list so that when you make the assignment, you select from the list. This ensures that you assign only the allowed values to each resource. After creating the custom field, I’ll show you how to assign a budget category to each resource.
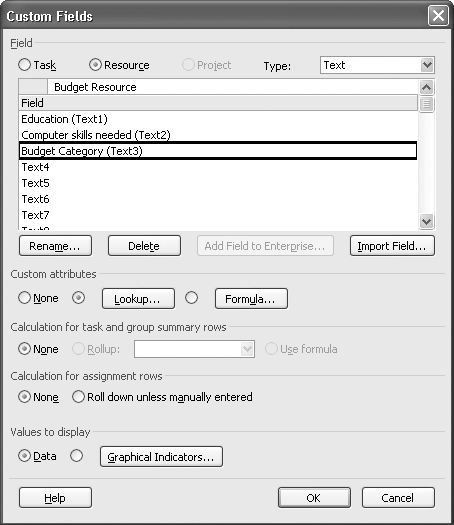
On the Tools menu, point to Customize, and click Fields to display the Custom Fields dialog box:
In the Type list, click Text.
Note
The type that you choose determines the characters or values that you can include in a lookup list. If you choose Text, you can include only alphanumeric characters. If you choose Date, Start, or Finish, you must include date-formatted numbers. If you choose Number or Cost, you can include only numbers. If you choose Flag, you can include only Yes or No.
Select an available text field—one that isn’t already being used—and click the Rename button to provide a meaningful name for the custom field. Then click OK to redisplay the Customize Fields dialog box.
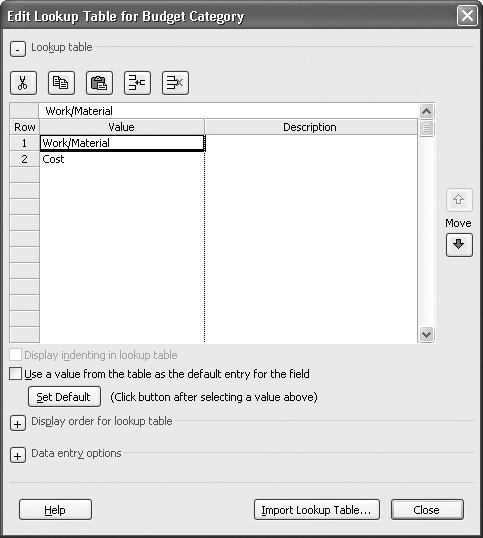
Click the Lookup button to display the Edit Lookup Table dialog box.
In the Value column, type each of the labels that should appear in the list.
Click Close to save the value list and redisplay the Customize Fields dialog box.
Click OK to redisplay your project.
You’re now ready to assign resources to budget categories. Switch to the Resource Sheet view (on the View menu, click Resource Sheet) and insert a column for the Budget Category custom field you just created. Click the column heading that you want to appear to the right of the Budget Category column, and then on the Insert menu, click Column. In the Field Name box, type the first few letters of the custom field you created, and then select it from the list that appears. Click OK, and Project displays the column on the Resource Sheet view (see 7-6).
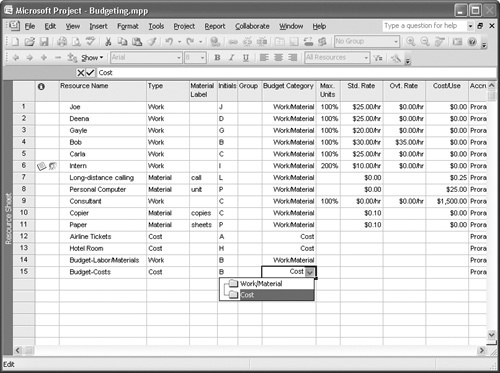
Click in the Budget Category column for each resource and use the list to select the appropriate category for that particular resource.
You use the Resource Usage view to assign budget values to the budget resources using the Budget Cost and Budget Work fields. To add the budget amounts as a total for your project, you add these two fields to the view as columns. To budget the amounts in a specific timeframe of your project, you use the timephased portion of the view to assign the budget values.
To establish overall project budget values for your budget resources, without regard to when those budget values are in effect, follow these steps:
On the View menu, click Resource Usage.
Click in the Work column. (When inserting columns, project places columns to the left of the selected column.)
On the Insert menu, click Column to display the Column Definition dialog box.
In the Field Name box, type a few letters of the name of the Budget Cost field. Project displays the field in the list that begins with the letters you type.
Select the Budget Cost field and click OK.
Repeat steps 3 through 5 to insert the Budget Work column.
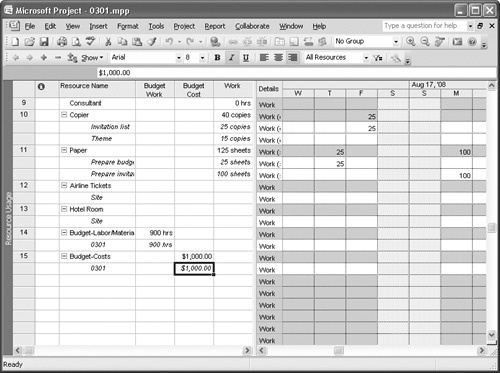
Find the budget resources in the Resource Name column and select the task below them—the one that represents the project summary task.
In the appropriate column—Budget Work or Budget Cost—supply the amount that you want to budget:
If you prefer, you can assign budget values for time periods throughout your project. You still display the Budget Work and Budget Cost columns to help you track the totals that you assign, and you still make the budget value assignments on the project summary task. But you don’t type the amounts into the Budget Work or Budget Cost columns. Instead, you add rows to the Details portion of the Resource Usage view and enter the amounts on these rows for the project summary task (see 7-7).
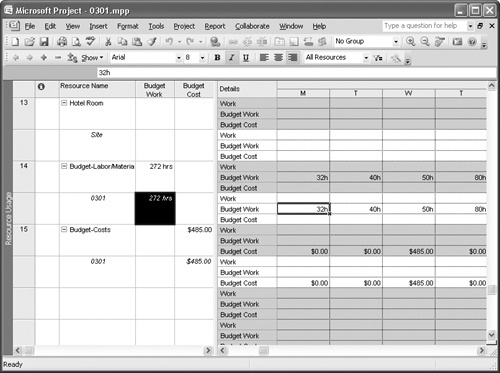
Figure 7-7. Enter values on the Budget Work and Budget Cost rows for the project summary task. Watch the Budget Work and Budget Cost columns update to display totals assigned.
To display these rows in the Details section, on the Format menu, click Detail Styles to display the Detail Styles dialog box (see 7-8). In the Available Fields column, find and click the Budget Work field, and then click the Show button. Repeat this process for the Budget Work field and click OK.

Then in the Details portion, on the appropriate dates, type the values for which you want to budget. Remember, when you enter values for Budget Work, you’re entering values for both Work and Material resources.
To view the amount you have budgeted and compare it to the planned amount you have assigned to tasks in your project, on the View menu, click Resource Usage. By default, Project displays the Usage table. Earlier in this chapter, in the section "Establishing the Value of Budget Resources," I added the Budget Work and Budget Cost columns. To make the comparison easy to understand, you might want to add the Cost column using the same technique.
Let’s group the sheet portion of the Resource Usage view by the Budget Category field to easily compare budgeted costs to costs assigned, and budgeted work to work assigned. On the Project menu, point to Group By, and click Customize Group By. Project displays the Customize Group By dialog box (see 7-9).
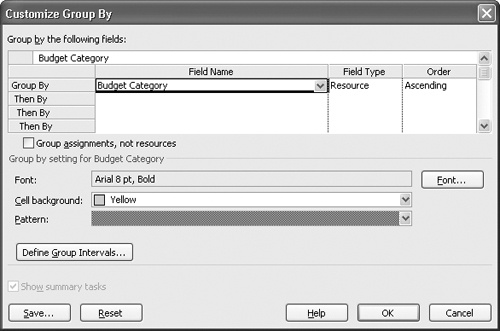
In the Field Name column, type a few letters of the Budget Category field name, and then select it from the list. Click OK, and Project groups the resources in your project based on the Budget Category (see 7-10).
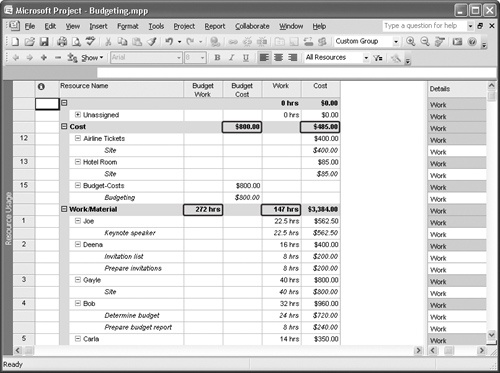
For the Cost budget category, compare the Budget Cost value with the planned Cost value; the details of what makes up the Cost value appear below it in the Cost column. Similarly, you can compare the Budget Cost for Work and Material resources with the planned amounts you have assigned.
Remember, we’re in the planning stage here, so the amounts on-screen aren’t actual amounts of work done or costs incurred; instead they are planned amounts of work and cost assigned in the project.