Distinguishing between human and non-human resources is fairly straightforward and easy: if it breathes, it’s human. However, although you still want to account for all the resources you’ll use on your project, when you set up resources in Project, you don’t make the distinction quite that directly.
Project lets you define three types of resources: Work, Material, and Cost. Work resources are usually people. Costs for Work resources are always calculated based on some increment of time. You can think of Material resources as resources consumed during your project. Costs for Material resources are calculated based on some unit of measurement other than time. Cost resources don’t have a unit of measure that allows you to calculate cost easily. People—Work resources—typically cost money per hour. Photocopies—Material resources—cost money per copy. Airline Tickets—Cost resources—are typically treated as a total cost.
The gray area appears when you consider resources such as long-distance phone calls, which cost money per minute. Obviously, long-distance phone calls aren’t people (using my previous loose definition for Work resources concerning breathing). But in Project, long-distance phone calls, for which you pay by the minute, are considered Work resources because Project reserves costs for all time-related unit measurements for Work resources. So when setting up your resource, your rule of thumb for choosing between a Work resource and a Material resource is to determine by the unit measurement associated with the resource. If you incur costs for the resource per second, minute, hour, day, week, month, or year, set it up as a Work resource. If you use some other measurement, such as per copy or per gallon, set it up as a Material resource.
Note
If your organization allocates the cost for long-distance charges using a flat rate, such as $.25 per call, you can set up long-distance phone calls as a Material resource. As a rule of thumb, try to set up only labor resources as Work resources whenever possible.
A Cost resource, the third type of resource available in Project, is a resource for which the cost you incur doesn’t depend on the amount of work or the duration of a task. Airline tickets and hotel expenses for a trip needed to complete a task are Cost resources. You’ll find more information about these expenses in 7.
Note
You also can assign a fixed cost to a task and a cost per use to a resource, but assigning these types of costs doesn’t depend on establishing a particular resource type. I’ll talk about using these costs in the section "Assigning Resource Costs" later in this chapter.
If you are using Project Standard or Project Professional without Project Server, you can set up the resources available to you for the project using the Resource Sheet view.
Note
If your organization shares resources among projects, the information that follows still applies to you, but you might also want to take advantage of resource pooling. See 13, for more information before you set up resources in your project.
You can create any of the three types of resources using the same basic approach:
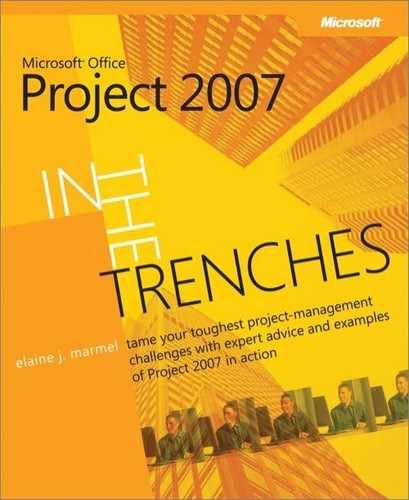
On the View menu, click Resource Sheet to display the Resource Sheet view shown here:
If you don’t see the Entry table shown in the above graphic, on the View Menu, point to Table, and then click Entry.
In the Resource Name column, type the resource’s name.
In the Type column, select a resource type (Work, Material, Cost).
For a Material resource, use the Material Label column to type the unit in which you measure the resource.
For Work and Material resources, type their standard rate (per unit of measure) in the Std. Rate column. For Work resources, if an overtime rate applies, type it in the Ovt. Rate column. The Overtime Rate field is not available for Material resources, which makes sense because there is no way of distinguishing how many units (based on the Material unit of measure) would be considered regular and how many would be overtime.
Project fills in the Initials column and the Max. Units column automatically, assumes standard overtime rates, and sets cost per use rates at $0. Project also sets all resource costs to accrue on a prorated basis and assigns the calendar used by the project to each resource. You can make changes to most of these fields, depending on the type of resource you define. For example, for a Cost resource, you can change the initials and the way Project accrues costs, but you can’t change the Max. Units field, any of the rate fields, or the Base Calendar field. For Material resources, you can change all of the fields except for ones that relate to working time, such as the Max Units field, the Ovt. Rate field, and the Base Calendar field. For Work resources, you can change any of the fields.
Tip
You can create generic resources, like the Intern resource you see in the graphic in step 1. You use generic resources when you don’t know the exact person who’s going to perform the job. Instead, you name the resource using a job title or description. In the Project Server environment, you can select the Generic check box in the Resource Information dialog box and use the Enterprise Global Resource Pool (discussed in the following section) and the Resource Substitution wizard to help you find people who meet the qualifications of the generic resource.
If your organization uses Project Server, you can take advantage of the Enterprise Resource Pool, which provides a list of all resources that are owned by your organization. Instead of creating resources in your project as described in the preceding section, you can select resources for a project using the Team Builder feature and the Enterprise Resource Pool.
Booking Types
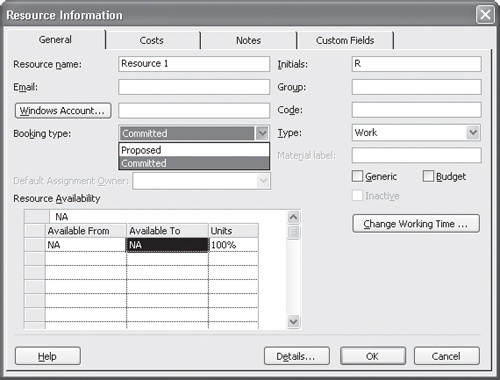
If you’re setting up resources in a project that will eventually end up in the Project Server database, you can use the Booking Type list in the Resource Information dialog box shown in the graphic below to describe a resource’s assignment to all tasks in your project. If you click Committed in the Booking Type list, you officially assign the resource to the project. If you click Proposed, you indicate that the resource is not yet officially assigned to the project. If you then load your project into the Project Server database, any Proposed resource’s calendar isn’t affected by your project. If another project manager chooses to commit the resource to a different project for the same timeframe, Project will permit it and not identify the resource as being overallocated.
To assign resources to a project using the Enterprise Resource Pool, log on to Project Server and open the project to which you want to assign resources. Then on the Tools menu, click Build Team From Enterprise to display the Build Team dialog box (see 3-2).

Figure 3-2. This dialog box helps you select resources from the Enterprise Resource Pool for your project.
By default, Project displays all resources in the Enterprise Resource Pool, but you can limit the resources that you see by applying filters using the Existing Filters list. You also can create custom filters by clicking the plus sign (+) beside the Customize Filters field. And you can use the Show Resource Availability section to filter for resources that are available on a set of dates.
Once you select resources and click OK, the resources you selected appear on the Resource Sheet of your project. You’re now ready to assign resources to tasks.