Tasks that appear on the critical path are called critical tasks. By default, Project 2007 defines critical tasks as tasks without slack (also called float). Project calculates a task’s slack by calculating the difference between early finish and late finish dates; when these two dates are the same, the difference is zero, the task has no slack, and Project identifies the task as a critical task.
When a task has slack, you can afford to delay the task up to the amount of slack it has without placing the task on the critical path of your project. Generally speaking, if you delay a task that has slack, you won’t delay your project unless you delay the task beyond the amount of slack it has and don’t make up for this delay elsewhere.
Project tracks both free slack and total slack. Free slack is the amount of time you can delay a task without delaying its successor task. You can use the Free Slack field to help you determine if you can delay a task without impacting your schedule. If a task has free slack, you can allow resources working on it more time to complete the task. Or you might consider reassigning a resource from a task with free slack to a critical task to help ensure that your project stays on schedule.
Total slack is the amount of time you can delay a task without delaying the project finish date. When the total slack value is positive, it represents the amount of time that you can delay the task without affecting the project finish date. If the total slack is negative, you’re looking at the amount of time you need to save to avoid delaying the project finish date. Negative slack is usually caused by a constraint placed on the task.
So how do you find slack in your project? The easiest way is to use the Detail Gantt view. By default, Project displays critical task Gantt bars in red in this view, but because this book isn’t in color, I’ve changed the appearance of critical task Gantt bars to use a crosshatch pattern so that you can identify them (see 5-26).

Critical tasks, by definition, have no slack. Next to the Gantt bars of non-critical tasks that have free slack, lines appear that represent the task’s free slack, and the numbers beside those bars tell you the amount of free slack associated with the task.
You also can add the Free Slack and Total Slack fields to any task-oriented table view. Right-click the heading of the column that you want to appear to the right of the Free Slack column, and then on the Insert menu, click Column. In the Column Definition dialog box, in the Field Name list, click Free Slack.
When you click OK, Project adds a column to the table that shows you how much free slack you have for each task in the project (see 5-27). You can add the Total Slack field using the same technique.
Figure 5-27. You can add the Free Slack and Total Slack fields to any task-oriented table to view slack associated with each task.
Some other fields might help you in your analysis of slack in your project, and you can add them to a task-oriented table view the same way you add the Free Slack and Total Slack fields:
The Start Slack field shows the duration Project calculates between the early start date and the late start date. Correspondingly, the Finish Slack field shows the duration Project calculates between the early finish date and the late finish date. The smaller value—Start Slack or Finish Slack—is the free slack value that Project calculates for the task.
The Early Start field shows the earliest date that a task could possibly begin if all of its predecessor and successor tasks also begin on their early start dates, considering constraints and leveling delays. Initially, Project sets the early start date equal to the task’s scheduled start date, which is the project start date, and then recalculates the early start date as you link the task to predecessors and successors and apply constraints.
The Early Finish field shows the earliest date that a task could possibly finish if all of its predecessor and successor tasks also finish on their early finish dates, considering constraints and leveling delays. Initially, Project sets the early finish date equal to the task’s scheduled finish date, which is the task’s scheduled start date plus its duration, and then recalculates the early finish date as you link the task to predecessors and successors and apply constraints.
The Late Start field shows the latest date that a task could possibly begin without delaying the project if all of its predecessor and successor tasks also begin and end on their late start dates and late finish dates, considering constraints and leveling delays. Initially, Project sets the late start date equal to the project finish date minus the task’s duration, and then recalculates the late start date as you link the task to predecessors and successors and apply constraints.
The Late Finish field shows the latest date that a task could possibly end without delaying the project if all of its predecessor and successor tasks also start and end on their late start dates and late finish dates, considering constraints and leveling delays. Initially, Project sets the late finish date equal to the project finish date and then recalculates the late finish date as you link the task to predecessors and successors and apply constraints.
Project determines slack by calculating the difference between the early finish date and the late finish date. For critical path tasks the early finish date and late finish date are identical, so they have no slack.
A wise project manager builds slack into the tasks of a project to try to account for the little things that go wrong. And there are always little things that go wrong. Not long ago, Hurricane Ike shut down Houston. If project managers in Houston built slack into their tasks, their projects might not be delivered quite as late as they would be without slack built in. Of course, Hurricane Ike is an extreme case, but if your suppliers go on strike, you won’t get much work done until a new supply chain is established. With slack built into your project, that delay might become a tiny bump in the road instead of automatically making your project run past its scheduled end date.
That said, there’s no concrete rule about how to build slack into your project. Like much of project management, building slack into a project is more art than science.
Some people like to add slack by exaggerating the duration of each task in the project. In this case, the slack in the schedule isn’t visible to anyone, and even you might not know how much slack your tasks contain. This technique might really extend a project’s schedule. Think about it; if the project contains 30 tasks and you add one day to each task, you just extended the project by 30 days.
Some people like to add a "slack task" to the project or to each phase of the project. That is, they create a task with an innocuous name like Phase I Finish-Up and assign it a duration of, say, five days. If other tasks in the phase slip, you can safely reduce the duration of this "non-task" without hurting your schedule. Project doesn’t associate any slack with this task, so again you won’t see any values in the Free Slack or Total Slack fields for this task.
If you schedule your project from its finish date, you can add breathing room by setting a deadline date on the last task in the project. You’ll have a deadline indicator on the project schedule, but again Project won’t display any slack values in the Free Slack or Total Slack fields. If you miss the deadline, you still have more time to complete the project, and Project simply displays an indicator in the Indicators column that tells you that the deadline date passed before the task was completed.
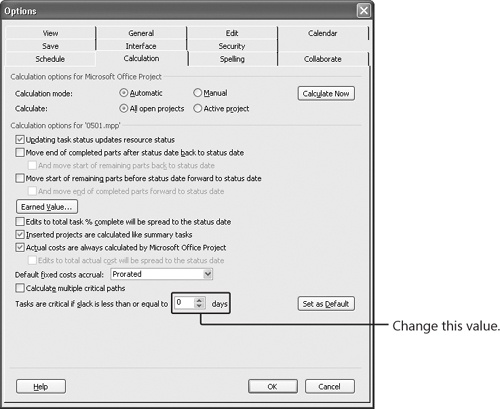
Another approach you can use is to increase the amount of slack a task must have to be considered critical. Using this approach, tasks become critical sooner, so more tasks appear on the critical path. If you’re paying close attention to the critical path like you should, you’ll become aware of approaching difficulties for a task earlier because you’ll be watching those critical tasks. And in reality, you’ll have some breathing room because you made some of these tasks critical before they really are critical. You can use the Calculation tab of the Options dialog box; on the Tools menu, click Options, and then click the Calculation tab (see 5-28). In the Tasks Are Critical If Slack Is Less Than Or Equal To box, change the value from 0 to the number of slack days you want to add to each task. So for example, if you set the value to 1, a task becomes critical when it has one day or less of slack.
In 5-29, I set the value equal to three days; if you compare this figure with 5-26, you’ll see that more tasks now appear on the critical path.

Figure 5-29. By increasing the amount of slack associated with critical tasks, I added more tasks to the critical path.
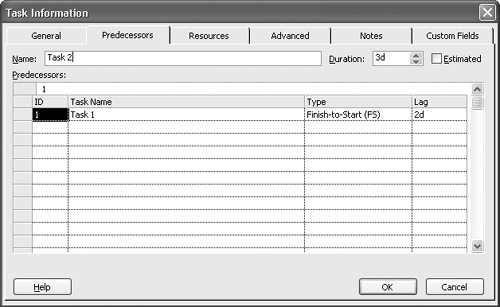
In cases where you want to build slack into only some tasks, you can use lag time, which is a delay between two linked tasks. In 5-30, I set a finish-to-start dependency between all three tasks, and then I set a two-day delay from the finish of Task 1 to the start of Task 2. Although all three tasks are on the critical path, I actually have two extra days to finish Task 1 before I delay the project. Lag time doesn’t appear as slack in the Free Slack or Total Slack fields.
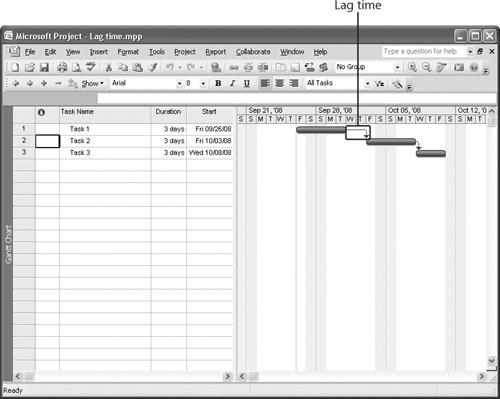
Figure 5-30. Adding lag time delays the start of a task that has a finish-to-start relationship with its predecessor.
To add lag time, double-click the successor task—in my example, Task 2—and click the Predecessors tab. In the Lag column, enter a positive value either in days or as a percentage of the duration of the predecessor task (see 5-31).