
Custom fields are one of Project’s most powerful features—using them, you can track, view, and report on a wide variety of information that Project stores but either doesn’t make visible to you by default or doesn’t present in quite the way you want. When would you use a custom field? You can use custom fields, for example, when you want to:
In 7, for example, I present an example of creating a resource-oriented custom field to track budget resource information. Before you dive in and start defining custom fields, there are a few concepts that are important to understand.
How do custom fields differ from fields? As I described earlier in this chapter in the section "Adding a Field to a Table," fields are the elements Project uses to store information you enter into your project. Every column heading in every table associated with any view represents a field in Project. In dialog boxes, the text boxes you fill, the check boxes you select, the option buttons you click, and the selections you make from list boxes are stored in fields. You display fields using the Column Definition dialog box; on the Insert menu, click Column to display this dialog box (see 4-19). Every item in the Field Name list is a field in which Project stores information about your project.
Note
To be technically accurate here, when you make selections in, for example, the Options dialog box, Project stores your choices in fields, but you can’t display these fields on views, and you won’t find those fields in the Column Definition dialog box. However, the choices you make in the Resource Information, Assignment Information, and Task Information dialog boxes are all stored in fields that you can display on views.
Project stores task-related data in task fields and displays task-related data on task-oriented views. Similarly, Project stores resource-related data in resource fields and displays resource-related data on resource-oriented views.
Note
Assignment data matches resources to tasks; you can best view assignment data in either the Task Usage view or the Resource Usage view.
Custom fields are actually empty fields, waiting for you to define them. Once you define them, you display them in views the same way you display fields. When your custom fields are visible, you can store information in them. Since you display custom fields in views, it’s important to recognize that you’ll be able to create and use task-oriented custom fields only in tables on task-oriented views, including the Task Usage view. Similarly, you’ll be able to create and use resource-oriented custom fields only in tables on resource-oriented views, including the Resource Usage view.
Project organizes the custom fields using nine types, and you’ll find these same nine types of custom fields whether you create a resource custom field or a task custom field: Cost, Date, Duration, Finish, Flag, Number, Outline Code, Start, and Text.
Each of these types of custom fields has rules associated with the kind of information you can enter in the field—so selecting the correct type of field can affect the functionality of your custom field. For example, use a Text custom field to include alphanumeric characters in the field and any selection list you create for the field. If you create a Date, Start, or Finish custom field, you can include only valid dates in the field and in any selection list you create for the field. If you create a Duration custom field, you can include duration or work values in the field and in any selection list you create for the field. If you create a Flag custom field, you can include only Yes or No in the field and in any selection list you create for the field. If you create a Number or Cost custom field, you can include only numbers in the field and in any selection list you create for the field.
Note
Outline codes are a special breed of custom field; you can read more about them in 9.
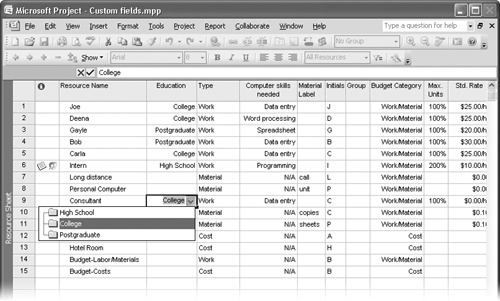
Suppose that the education level of your resources plays a role in whether you assign them to certain tasks. You can create a custom field called something like "Education" and create a list of accepted entries for that custom field. After you create the field, you can establish a value for each resource and then display the field as you make assignments. For this example, I’ll create a Text custom field using these steps:
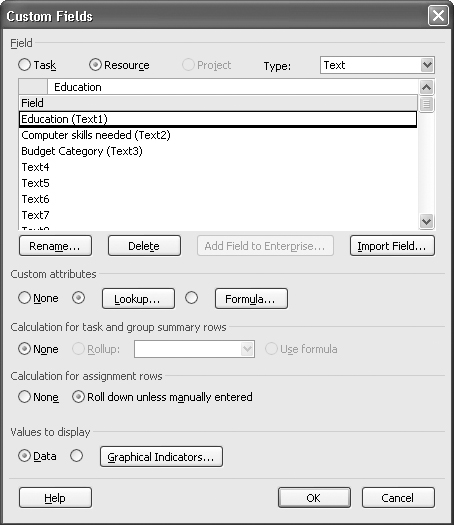
On the Tools menu, point to Customize, and click Fields to display the Custom Fields dialog box:
In the Field section, select Task or Resource to specify whether the custom field you want to create will contain task or resource information—I chose Resource for this example.
Open the Type list to select the type of custom field you want to create—I chose Text for this example.
Click Rename and type a new name for the field so that you’ll recognize it when you want to add it to a view. You can’t use any name that Project is already using.
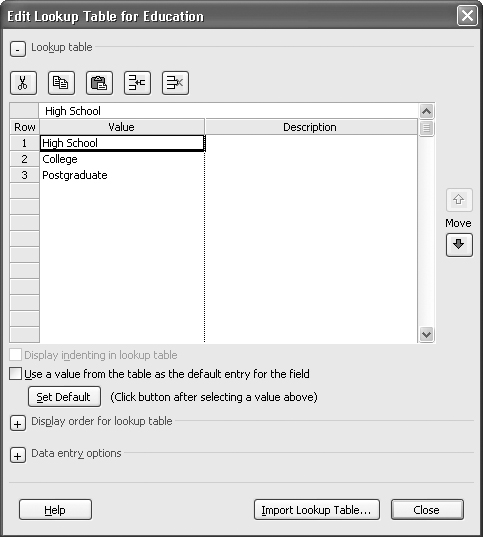
To create a selection list that you can use to enter data consistently, click the Lookup button. Project displays the Edit Lookup Table window:
In the Value column, type the names of the elements you want to appear in the list; remember, if you are creating a type of custom field other than text, you need to enter the kind of elements appropriate for that list.
Click Close to redisplay the Custom Fields dialog box.
Click OK.
You’re now ready to enter information into the custom field you just created. Start by displaying it as a column in a sheet view. If you defined a task custom field, display any task-oriented view containing a table. If you defined a resource custom field, display any resource-oriented view containing a table and follow these steps:
Click the title of the column that you want to appear to the right of the custom field. Project selects the column.
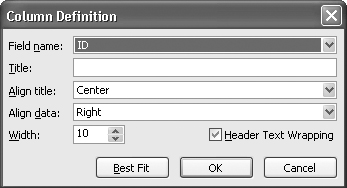
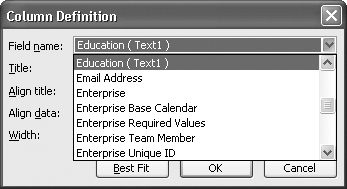
On the Insert menu, click Column to display the Column Definition dialog box:
Open the Field Name list box and select the custom field that you defined, using the name that you supplied when you defined the field.
Click OK. The custom field appears on screen:
Click any entry in the custom field’s column; Project displays a list box arrow.
Open the list box to display the value list that you created.
For each row of the table, select values from the list, or simply type them.
Note
When you created the custom field, if you didn’t allow any values in the field except the ones you supplied in the list, you can enter only values in the list. If you try to enter a value that doesn’t exist in the list, Project displays an error message instructing you to use a value from the list.
Sometimes a visual cue is more helpful in a table than staring at the numbers. You can set up formulas in custom fields and use them to flag you when certain conditions arise. For example, suppose that you want to know when fixed costs on any task exceed a certain dollar value. You can set up a custom field containing a formula that refers to the Fixed Cost field and then, to make spotting overages easy, assign a graphical indicator to the field. Follow these steps:
On the Tools menu, point to Customize, and click Fields. Project displays the Customize Fields dialog box.
For this example, select Task and Cost.
Click the Rename button and type the new name for the custom field; in this example, I named the field Monitor Cost and clicked OK to redisplay the Customize Fields dialog box.
Click the Formula button to display the Formula dialog box:
Create a formula in the text box by selecting fields or functions. To select a field, click the Field button; Project displays a list of field categories. Select the appropriate field category, and Project displays a list of the available fields. To select a function, click the Function button and follow the same process. For this example, I simply identified the field I want my custom field to monitor. If you need to make a calculation, use the operators that appear above the Field and Function buttons.
Click OK. Project warns you that it will discard any information that was previously stored in the custom field you selected and will replace the information with the calculated values based on the formula.
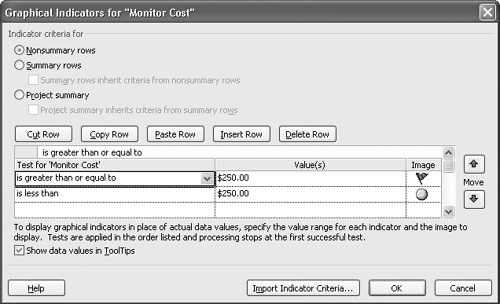
In the Customize Fields box, click the Graphical Indicators button. Project displays the Graphical Indicators dialog box:
Choose the type of row to which you want to assign an indicator: Nonsummary Rows, Summary Rows, or Project Summary.
In the Test For section, set up the tests that you want Project to use based on the formula’s result, and select a graphic indicator for each test. In the Value(s) column, you can compare the custom field’s formula result to the value of another field or to a numeric value. In my example, if a task’s fixed cost is greater than or equal to $250, I want to see a red flag. However, if the task’s fixed cost is less than $250, things will be fine, so I want to see a green dot.
Click OK to redisplay the Customize Fields dialog box.
Click OK again to redisplay your project in a view where the custom field is available.
If necessary, display the column for the custom field as described earlier in the section "Understanding Custom Fields."

When you display the custom field, it will contain an indicator (see 4-20).
