
Every game needs some element that denotes the player's presence and point of interaction with the game's virtual world. This element could be a car in a racing game, a worm in a maze game, hands and a weapon in an FPS, or an animated character in an adventure or role-playing game. We will use the latter, an animated character, to denote our player's avatar and location in the game using a third person-perspective camera to showcase the character's movement, around the real world map. This should give our players a good immersive game experience that will make our game fun to play.
Unlike the previous chapters where we spent some time discussing the background and the terminology, in this chapter, we will dive right into Unity and start to add the player avatar. In this entire chapter, we will discuss new game development concepts and cover the following topics:
- Importing standard Unity assets
- 3D animated characters
- Third-person controller and camera positioning
- Free look camera
- Cross-platform input
- Creating a character controller
- Updating component scripts
- Using an iClone character
We will continue developing from where we left off in the last chapter. So, open up the FoodyGO project in Unity and let's get started. If you have jumped ahead from a previous chapter, open the downloaded Chapter_3_Start project with the book's source code.
Game development is a complex undertaking that requires a keen understanding of the hardware platform, graphics rendering, and managing game assets. Unity makes all that substantially easier by building a cross-platform game engine that abstracts many of those complex details away from the developer. However, since no two games are exactly alike, Unity also supports extensibility through importing assets and plugins. Assets may include everything from scripts and shaders to 3D models, textures, and sound. The ability to quickly extend a game through assets is a powerful feature in Unity and is something we will cover extensively in this chapter.
Let's get started by importing some of the standard Unity assets into our game project. Unity provides a number of standard or reference assets that developers can freely use in their game. Using these standard assets is often a great way to quickly start development. However, due to particular elements of game, design or visual esthetics need to be rewritten or replaced. For now, we will follow the same pattern and start with the standard assets, but we will likely need to rewrite or replace some elements later.
Perform the following instructions to import the standard assets we will use in this chapter:
- Open the project in Unity and make sure that the Map scene is loaded. Again, if you have moved ahead from another chapter, open the
Chapter_2_Endfolder from the downloaded source code as a project in Unity. - Select the menu item Assets | Import Package | Cameras. After a short time, the package will be downloaded, and you will see the Import Unity Package dialog, as shown in the following screenshot:
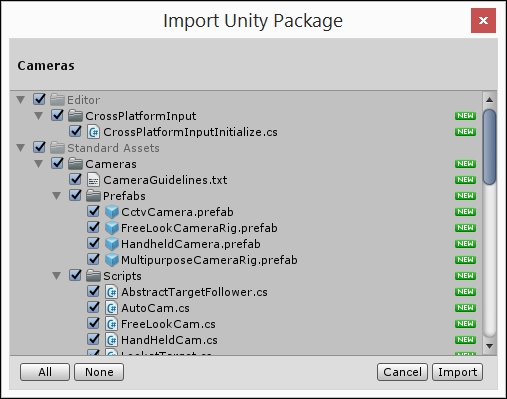
Importing the camera's Unity standard asset
- Ensure that all the items are selected and then click on the Import button. After the asset package finishes importing, you will see a new folder called Standard Assets in your
Assetsfolder in the Project window. If you open the new folder, you may also notice that CrossPlatformInput was also added. That is typical of Unity and other assets and is something to be aware of. For now, let's not worry about it. - Now, let's import the Characters asset by selecting the menu item Assets | Import Package | Characters. After a short time, the package will be downloaded, and you will see the Import Unity Package dialog, as follows:
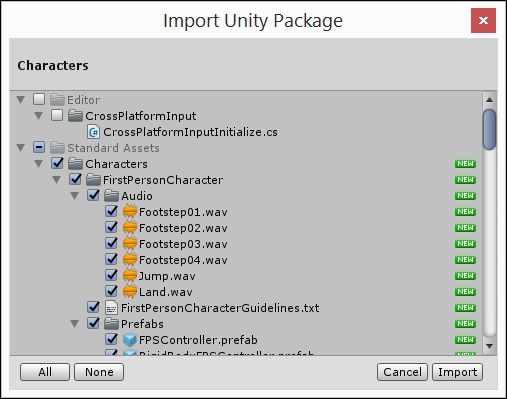
Importing the character's Unity standard asset
- Note that the CrossPlatformInput assets is automatically deselected. The Unity editor recognizes that the project has already imported the standard cross-platform assets. Click on the Import button on the dialog to install the Characters assets.
- Finally, let's import the CrossPlatformInput assets by selecting the menu item Assets | Import Package | CrossPlatformInput. After a few seconds, the Import Unity Package dialog will open. Note that the only thing left to import is some fonts. Click on the Import button to load the remaining assets into the project.
Good, we should now have all the standard assets we need in the project for the functionality we plan to build in this chapter. Ensure that you open the various new asset folders in the Project window and just familiarize yourself with what new items have been loaded. Assets are a great way to quickly add functionality to your game but can also carry with them many unneeded items that can cause project bloat. We will look for ways to manage that asset bloat, later in this chapter. In the next section, we will start to add those new assets to the game.
Generally, as we develop a game, we will drop placeholder assets to test out game functionality and make sure that the design and vision will work. Following this principle, we will use the Ethan standard asset character for now to get our player movement prototyped. Then, we will look to replace that prototype asset with a more visually pleasing character later.
Perform the following instructions to add the sample Ethan character to the game scene:
- In the Project window, open the
Assets/Standard Assets/Characters/Third Person Character/Prefabsfolder and select the ThirdPersonController. Drag the prefab into the Hierarchy window and drop it on top of the Map scene. This will add the controller to the scene and place the sample Ethan character in the world center, as follows: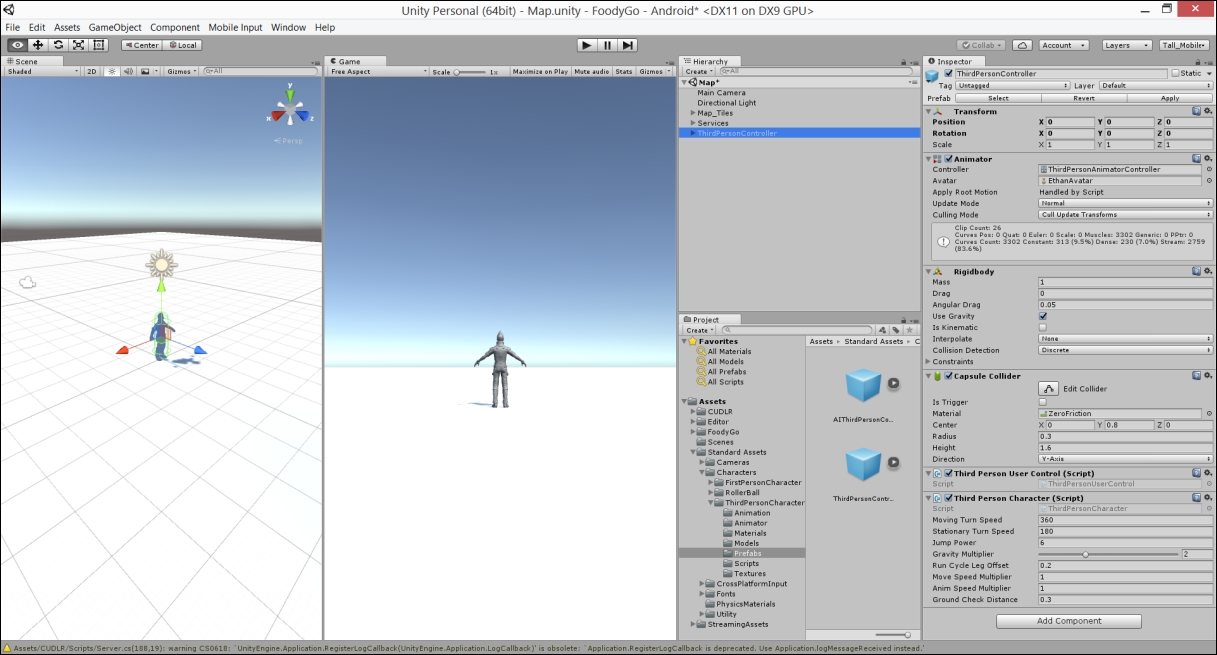
ThirdPersonController loaded in the scene with Ethan character
- Select the ThirdPersonController in the Hierarchy window and then rename it to
Playerin the Inspector window. This new object will represent the player in the game. It is a convention to name the player objectPlayer. Also, many standard scripts will automatically connect to the game object named Player. - Hit the Play button to run the game in the editor. Notice, as the game runs, the character becomes animated but is just standing there. If you try to make the character move or jump, it does nothing. Not to worry, this is expected and is because we are using cross-platform input. We will cover input shortly.
- Press the Play button again to stop the game.
Well, that was certainly easy. We now have a fully rigged and animated 3D character in our scene. Also, the whole process took only a few steps. That is the power of using assets to prototype; but as you will see, we still have quite a bit of work to do. In the next section, we will change the camera our game uses in order to better visualize the player and the game world.
Probably one of the most critical elements in any game is the camera. The camera is the player's eyes into the virtual game world we create as game developers. In the early days of computer gaming, the camera was generally fixed, but could sometimes pan or move about the scene. Then came the first-person camera and the third-person camera, which tracked the player's movements but in different perspectives.
Today, the game camera has evolved into a cinematic tool and will often change perspective based on the player's actions or movement. For our purpose, we will stick to a simple third-person free look camera for our map scene. Later in the book, we will also look at enhancing the look of our game by adding certain camera effects and filters.
Perform the following instructions to replace the current Main Camera into a Free Look follow camera:
- In the Project window, open the Assets/Standard Assets/Cameras/Prefabs folder and drag the FreeLookCameraRig prefab into the Hierarchy window and drop it onto the Player game object.
- Note how the Game window view changed to just behind the player character. That is because the FreeLookCameraRig is designed to track our player game object. Look in the Inspector window at the Free Look Cam script component. You will see a checkbox called Auto Target Player. When this option is selected, the script will search the scene for a game object named Player and attach itself automatically. The following screenshot shows the Free Look Cam component as seen in the Inspector window:/

The Free Look Cam component with Auto Target Player enabled
- Select the Main Camera object in the Hierarchy window and press Delete. This will delete that camera from the scene, as we no longer need it.
- Press the Play button to start running the game. The game still does not allow any interaction but the view is much better. Let's add some input controls to the game.
- In the Project window, open the Assets/Standard Assets/CrossPlatformInput/Prefabs and drag the DualTouchControls prefab into the Hierarchy window on top of the Map scene and drop it. This will add the dual touch control interface as an overlay, which you will see in the Game window.
- From the menu, select Mobile Input | Enable to confirm that the mobile input controls are enabled.
- Press Play to start running the game. You will now be able to move the camera and character around the scene by right-clicking (press Ctrl and click on Mac) and holding in the various overlay panels. Here is how your Game window should look now:

Game window with the Dual Touch control interface added
- Build and deploy the game to your mobile device using the procedure mentioned in Chapter 2, Mapping the Player's Location. You should now be able to move the camera and character freely around the scene by touching the overlay panels.
Great, with very little effort, we now have a character that can move around the scene with a free look follow camera. Some game developers would be ecstatic at this point. Unfortunately, for us, there are a couple of problems with the current input controls and the way the character moves. We will fix these issues in the next section.
Before we get into fixing the input issues, let's understand what cross-platform input is. Cross-platform input creates an abstraction of the input controls, keys, and buttons, which can then be mapped to physical device controls specific to the device when the game is deployed.
For instance, you developed a game for the PC, Mac, and mobile phone. Instead of programmatically checking whether the player fired by left-clicking on a PC, mouse clicked on a Mac or tapping the screen on a phone, you would check whether the player hit the fire control. Then, the fire control would be defined specific to the device. This would then allow you to easily run your game across platforms or even add additional platforms later. The following is the diagram that shows how this input mapping works:

Various input controls mapped into cross-platform input
In the next section, we will show more specific examples of how the cross-platform input functions can be used in scripts.
As we have mentioned before, the standard assets are great for prototyping functionality, but they have limitations you can quickly bump up against. If you look at the current scene on a mobile device, you will notice a few issues:
- The character in our game should not move from direct player input but rather as a result of the player moving their device. Therefore, we don't need touch input for character movement.
- The jump button is not needed, and we can hide or remove it.
- A player will only be moving the camera or selecting objects and menus by touch, which means we can hide this overlay altogether.
Let's get started fixing these issues by cleaning up the game interface. We want to remove the movement and jump controls and hide the touch pad overlay. The following are the instructions to clean up the movement controls and interface:
- Select and expand the DualTouchControls game object in the Hierarchy window. You should see something like this:

DualTouchControls expanded
- Select the MoveTouchpad game object and press the Delete key to delete the object. You will get a prompt informing you that you will break the prefab instance. This is fine, so click on the Continue button, as shown in the following dialog:

The dialog prompt asking whether you want to break the prefab
- Select the Jump game object and press the Delete key to delete the object. Note that both those overlays are now gone in the Game window.
- Select the TurnAndLookTouchpad game object. In the Inspector window, click on the Anchor Presets box to expand the menu. What we want to do is make the TurnAndLookTouchpad object fill the entire game screen. That will allow the player to swipe anywhere on the screen to move the camera. The manual process of doing this is complex, but fortunately Unity has a shortcut.
- With the Anchor Presets menu open, press and hold the Alt key (the option key on a Mac). Note that the menu options switch from just setting the object's anchor to setting the anchor and position. Press and hold the Alt key (the option key on a Mac) and choose the bottom-right option as shown in the right-hand side of the screenshot:

Anchor presets menu, selecting the fill option
- With the stretch-stretch position or fill option chosen, you should now see the TurnAndLookTouchpad fill the Game window. Not to worry, if you are confused over what we did and why. We will get into the details of what we just did later when we add the player menus in Chapter 6, Storing the Catch.
- Ensure that the TurnAndLookTouchpad is selected, and in the Inspector window under the Image component, click on the white box beside the Color property. When the color dialog opens, set the Hex Color to
#FFFFFF00. That will make the overlay all but disappear, except for the text.Hex color is the hexadecimal number that represents a color. In hex, a color can easily be identified by each of its primary components, namely red, green, blue, and alpha shown as follows:
#RRGGBBAA.Each of the component's value range from 00-FF in hexadecimal or 0-255 in decimal.
Alpha represents the opacity, with FF being fully opaque and 00 being fully transparent.
#FF0000FFwould be red,#000000FFwould be black, and#FFFFFF00would be transparent white. - Select and expand the TurnAndLookTouchpad. Select the Text object and press the Delete key to delete the object.
- Run the game in the editor and deploy it to your device. Notice that now only the camera is controlled by swiping.
Great, cleaning up of the movement controls and interface helped us fix a couple of items on our list. Now, in order to fix the player character's movement, we will need to create our own controller scripts. Unlike most games, we actually don't want the player to directly control their character. Instead, the player needs to physically move their device in order to move around the virtual world. Unfortunately, that also means we will need to modify some of the previous scripts we already imported and set up. That really is just the process of development and especially game development. We will attempt to minimize rewrites as we move through this book, but it is important you understand that it is part of the development process.
We will start by creating a new compass and GPS controller script. This script will move the player on the map by tracking the device's GPS and compass. Perform the following instructions to create this script:
- Expand the
Assets/FoodyGO/Scriptsfolder in the Project window. Select the Scripts folder and create a new folder by selecting menu item Assets | Create | Folder. Rename this folderControllers. - Select the new Controllers folder and select menu item Assets | Create | C# Script to create a new script. Rename this script
CharacterGPSCompassController; It's a verbose name but also descriptive. - Double-click on the new script to open it in MonoDevelop or the editor of your choice. You should see the following default code listing, for the new script:
using UnityEngine; using System.Collections; public class CharacterGPSCompassController : MonoBehaviour { // Use this for initialization void Start () { } // Update is called once per frame void Update () { } } - We will start simple and just handle the compass part of the controller. Using the device's compass, we will be able to always orient the player in the direction the device is pointing, while they are not moving. When the player moves, we will always orient the player toward the direction of travel. Add the following line of code inside the
Start()method:Input.compass.enabled = true;
- The
Start()method is for initialization, and that line of code essentially turns the device's compass on for reading a heading. Now that the compass is on, add the following code to acquire the heading in theUpdate()method, as follows:void Update() { // Orient an object to point to magnetic north and adjust for map reversal var heading = 180 + Input.compass.magneticHeading; var rotation = Quaternion.AngleAxis(heading, Vector3.up); transform.rotation = rotation; } - The first line of code in the
Update()is a comment, telling us why and what the next couple of lines are for. When we write comments, we don't just want to explain what we are doing but also why we are doing it. Often, the reason why will be more important. Get into the habit of writing comments in your code. Commenting is never a wasted effort. - The next line of code sets a variable called
heading, with the value of the compass magnetic north offset by 180. We add 180 degrees to the compass reading in order to orient the character to align with the tile maps north. The tile map, as you may recall, is reversed in order to simplfy the math. - The following line may look strange, especially if you don't know what a quaternion is. A quaternion is a number system that extends the space of complex numbers. This sounds like quite a mouthful, especially if you, as of yet, don't possess an advanced level of math. Without getting too far off topic, for now, think of a quaternion as a helper that allows us to easily define a rotation anywhere in 3D space. This means the call
Quaternion.AngleAxis(heading, Vector3.up)is defining a rotation around the world up or y axis. That value is being stored in a local variable calledrotation. The following is a diagram you can use to remember what each axis and corresponding vector is called using the left-handed coordinate system Unity uses: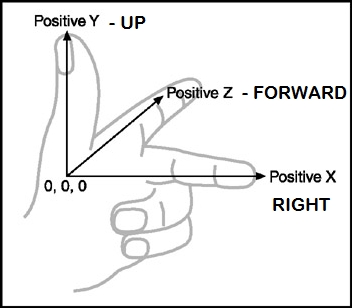
Left-handed coordinate system explained
- The last line of code sets the
transform.rotationto the value ofrotationcalculated with a quaternion helper. After you enter the last line of code, ensure that you save the file in MonoDevelop or the code editor of your choice. Then, go back to Unity and wait for a couple of seconds while the new script gets compiled into the game. Unity has a great auto compilation feature that will recompile the entire project whenever a file has been changed. - Select the CharacterGPSCompassController script in the Project window. Then, drag and drop the file onto the Player game object. This will add the script to the
Player. - Select the Player game object in the Hierarchy window. In the Inspector window, select the gear icon beside the Third Person User Control (Script) component. From the context menu, select Remove Component to remove the script from the
Playersince we no longer want to control our character using the standard input script. - Build and deploy the game to your mobile device to test. Just like when we tested the GPS functionality, the compass will only return values when running on an actual device with a compass.
- Test the game by moving the device in various orientations. Notice how the character moves as the device rotates. One thing you may notice, however, is that movement is not fluid, and it is quite jumpy or bouncy. The jitter is caused by constantly updating the player with every new reading from the compass. If you have ever looked at a physical compass, you will see exactly the same thing. Of course, we don't want our character twitching, so let's take a look at how we can fix that.
- Open back up the CharacterGPSCompassController script in the
MonoDevelopeditor by double-clicking on it in the Project window. - Change the last line in the
Update()method fromtransform.rotation = rotation;to the following line of code:transform.rotation = Quaternion.Slerp(transform.rotation, rotation, Time.fixedTime*.001f);
- What this change does is smooth the transition from one heading change to another. Let's break this down so that we can understand the details of what is happening:
Quaternion.Slerp: This is a helper quaternion function to spherically interpolate from a current rotation into the new rotation. Don't get confused by the wording spherically interpolate. Essentially, all that it means is we are smoothing the rotation across a sphere by adding additional smoothing points. Lerp is linear interpolation between two data points. In the following diagram, qa is the start, qb is the end, and qint represents a calculated smoothing point: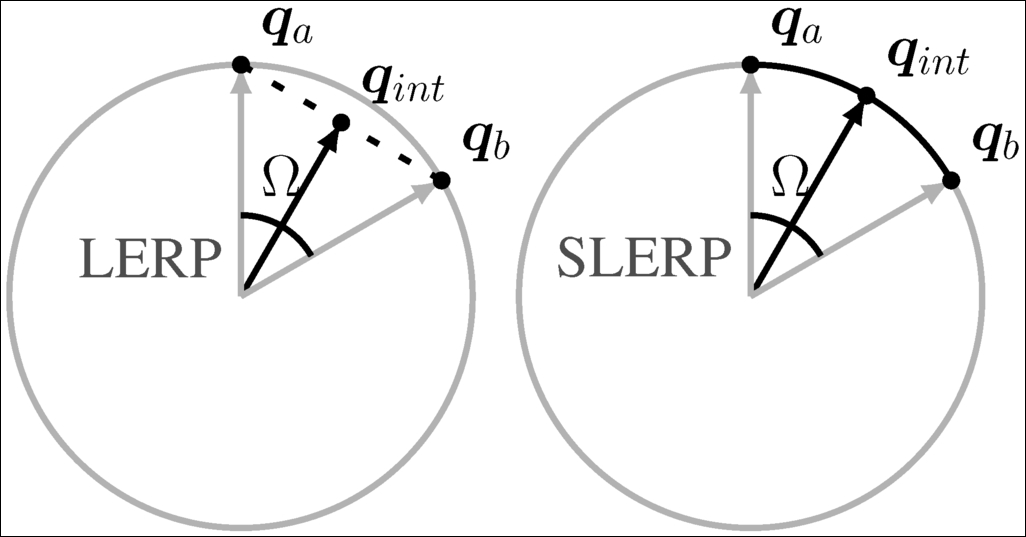
Shows how smoothing points are calculated when using LERP or SLERP
transform.rotation: This indicates the object's current rotation.rotation: This is the rotation we want to change to, that is, the value calculated in the preceding line.Time.fixedTime * .001f: This describes how much we want the rotation to change in one call.Time.fixedTimeis the amount of time one frame of the game should render in. We multiply that number by.001fin order to make the rotation change very small during each frame. Feel free to change this value to see the effect it has on smoothing the rotation.
- When you are done with editing the script, save the file. Then, go back to Unity and then wait for a few seconds for the scripts to recompile.
- Build and deploy the game again. Test the game and notice the difference in how smooth the character now slowly turns.
Good, we fixed a number of the interface issues and now have the character turning relative to the device's orientation. We accomplished that by modifying the standard assets we imported and writing a simple controller script. Unfortunately, we still have a lot of scripts to add and rewrite in order to get our character to walk or run over the map. Since we don't really have time-and I doubt you have the patience-to write and review the script changes line by line, we will instead import all the updated scripts and then review the important sections in more detail.
Let's import the updated scripts by performing the following steps:
- From the Assets menu, select Import Package | Custom Package...
- After the Import package dialog opens, navigate to the downloaded code folder
Chapter_3_Assetsand open Chapter3.unitypackage by selecting the file and clicking on Open. - The Import Unity Package dialog showing the files being imported will open. Note that some of the files are marked New, whereas others have a refresh symbol. This is Unity letting you know what files are being changed or added. Ensure that all the items are selected and click on Import.
- After everything is imported, you may notice new properties on a few game objects, but the game should still run as it did before. Give it a try by pressing Play and testing the game in the editor.
So, for the most part, those updated scripts will still run our game as expected. However, we still don't see our character moving around the map. In order to get our character moving, we will need to set some new properties on the scripts. However, before doing that, we should understand what was changed. Each of the following sections review a script component and the changes that have been done.
Here is a summary and review of the scripts we imported and updated:
- Controllers:
CharacterGPSCompassController: This script was updated to consume GPS readings from the GPS Location service.
- Mapping:
Geometry: This file is designated for custom spatial types. A new type called theMapEnvelopewas added.GoogleMapTile: This script is almost identical to our previous version; only a couple of lines were added.GoogleMapUtils: This is our library of spatial math functions. A couple of new functions were added in order to convert between map and game world scale.
- Services:
GPSLocationService: Numerous code changes were needed to support a new map drawing strategy. A way to simulate GPS readings was added to aide testing and development.
The first script we will look at is the GPS Location Service. Expand the Services object in the Hierarchy window and select the GPS service object. Review the object in the Inspector window and notice all the new properties and sections. Two new sections have been added to the GPS Location Service script. The first section is for map tile parameters and the second section is a new feature for simulating GPS data. We will review the purpose and properties of these two subsequent new sections.
Previously, whenever our GPS service acquired a new update from the device, that data would automatically be pushed to the map and the map would redraw itself. As you saw, that simple method worked, but it did suffer from a couple of problems. First, every time the service acquired a new location, the map would make several expensive calls to refresh itself. It didn't matter whether the device moved a meter or 100 meters. Second, if we want to show our character move across the map, then we can't refresh the map each time with every new location. Instead, we only want to refresh when the character reaches a tile boundary. Fortunately, we can solve both of these issues by allowing the GPS service to track the size of a map tile and then call a map refresh when a new GPS reading is outside the current center tile.
The following is a diagram showing how this will work:
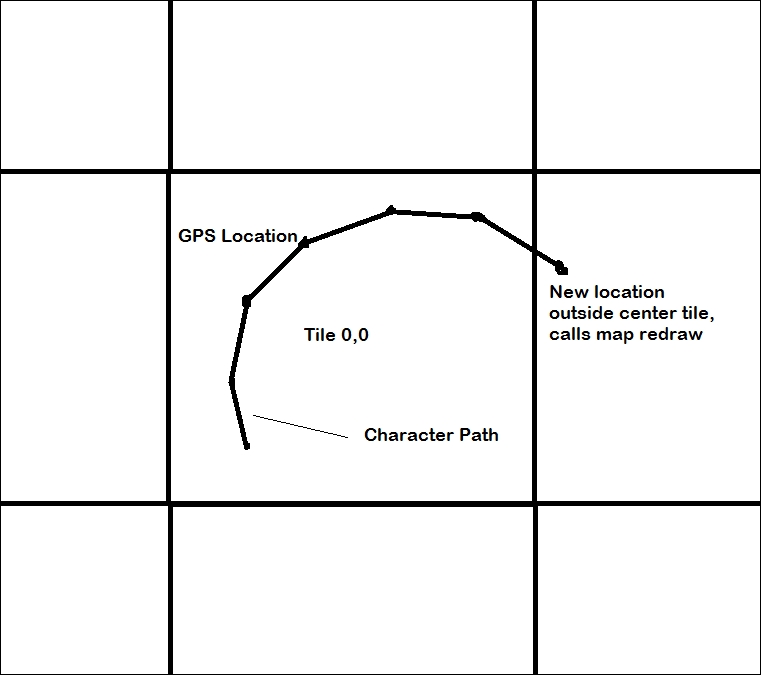
GPS tracked on map tile boundary
In order for the GPS Location Service to be able to keep track of the tile boundary, it needs to know how the tile is generated. This is why we need to pass the same parameters we used to construct the map tiles into the service. Here is a review of those parameters and what they should be set to for the game:
- Map tile scale: This indicates the scale of the map tiles. We set this to 30 for the current map.
- Map tile size pixels: This is the map tile image size being requested from Google. This was set to 640 pixels.
- Map tile zoom level: This is the zoom level or the scale of the map. We chose a value for 17 in order to neighborhood scale map.
The Google Static Maps API throttles the number of requests an IP address or a device can make every 5 seconds and every 24 hours. Currently, the limit is 1000 requests per 24 hours.
As you have probably already realized, testing the GPS service was going to be difficult. Sure, we set up CUDLR to allow us to view real-time updates while the application was running on the device, but that had limitations. Ideally, we want to be able to test the way our game objects consume the GPS service as it is running in the Unity editor. That way, we can see how the game will run, without having to move around the house or office every few seconds. We can accomplish this testing by generating simulated location readings from the GPS service.
The simulation service that was added to the GPS Location Service uses a simple origin offset approach to generating data points. This approach will allow us to define simple movement patterns, such as moving in a straight line or moving and turning. The following is a diagram that should help explain how the data points are calculated:

Offset data approach to simulate GPS readings
In the subsequent list, each of the GPS simulation properties are explained in more detail:
- Simulating: If checked, the GPS service will generate simulated data. Data simulation will not run on a mobile device. Check this option to turn on the GPS simulation.
- Start coordinates: This is the origin point for the simulation. Offset values will be accumulated against the origin. Use our test coordinates or some latitude or longitude coordinates that are more familiar to you.
- Rate: This is the rate in seconds at which new GPS readings will be simulated. A good value for this is 5 seconds.
- Simulation offsets: This is the offset table of array values that will be added and accumulated against the origin. These values are in latitude or longitude values, so keep these numbers small. A good starting value is around +- 0.0003. The offset values will continually loop. So, after the bottom value is added, the offset table will start at the top again.
In order to set the array type in Unity and configure the SimulationService, perform the following steps:
- Enter the number of values in the Size field. The list will then expand to allow you to enter each of the values. The following screenshot shows the new GPS Location Service filled in with the appropriate component properties:

Inspector view of GPS service object
- Select the Player game object in the Hierarchy window. In the Inspector window, you will note that a new property was added to the Character GPS Compass Controller script component. We now need to set the GPS Location Service in this script, just like we did for the map tiles. That makes sense, because the character controller also needs to consume updates from the GPS service. Here is a screenshot of the controller script:

Character GPS Compass Controller script
- With the Player object still selected, drag the GPS object from the Hierarchy window and drop it into the Gps Location Service field on the Character GPS Compass Controller component.
- Run the game in the editor by pressing the Play button.
Now, as the GPS data is being simulated, you will see the character move around the map. However, as you probably noticed, we now have a couple of other issues. The camera no longer remains at a fixed distance from the character, and the movement is too quick. Fortunately, these are simple fixes and can be done quickly by following the directions, as follows:
- In the Hierarchy window, expand the Player object and select the FreeLookCameraRig. The reason the camera is not following the
Playeris because it is tracking the game object but not the game object's transform. This is a subtle but important difference. We will need to set the target transform in the camera to be thePlayer. Here is a screenshot that shows the empty transform field in the Free Look Cam script component:
Free Look Cam script properties
- While the FreeLookCameraRig object is still selected in the Hierarchy window, drag the Player object to the Target field in the Free Look Cam script component. This will now force the camera to follow the character's transform.
- Select the Player object in the Hierarchy window. In the Inspector window, set the Move Speed Multiplier of the Third Person Character script component to 0.1, as shown in the next screenshot:
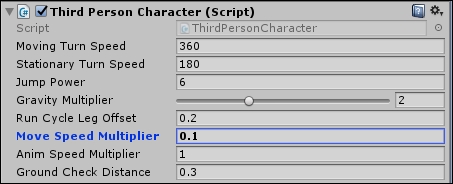
The Third Person Character script component
- The reason we set this to a small value is to account for our difference in map scale. The typical character controller will move a character at a speed close to walking. This is OK, when your game is at a 1:1 scale. Our game, however, is at a much grander scale. Calculating what this exact value is will depend on a number of factors. For now, we will estimate a value of 0.1 to reduce the character speed by one-tenth. We will add this as item we will discuss in Chapter 9, Finishing the Game.
- Press the Play button to run the game in the editor. As you can see, the character moves around the map as expected. Ensure that you try other offset values for the simulation points and rerun the game in the editor. Finally, build and deploy the game to your device and take the game out for a walk or drive.
This covers the updated properties to the GPS Location Service. We won't cover the specific script changes, as that will be left to the diligent reader to do so on their own.
If you remember from above that the only new property on the character compass GPS controller was a reference to the GPS Location Service. This was needed in order to update the player's position as new GPS readings are acquired. Since we began writing the character controller script from the beginning, let's review the code to see what has changed.
Locate the Character GPS Compass Controller script in the Project window under the Assets/FoodyGO/Scripts/Controllers folder. Double-click on the script to open it in MonoDevelop or the editor of your choice. After the script opens, take a few minutes to review the changes.
Now, let's go through each section of the script and understand the changes in more detail. Starting from the top, following are the top lines of the script:
using UnityEngine;
using UnityStandardAssets.Characters.ThirdPerson;
using packt.FoodyGO.Mapping;
using packt.FoodyGO.Services;

namespace packt.FoodyGO.Controllers
{
    public class CharacterGPSCompassController : MonoBehaviour
    {
        public GPSLocationService gpsLocationService;
        private double lastTimestamp;
        private ThirdPersonCharacter thirdPersonCharacter;
        private Vector3 target;
At the very top is the using, which is standard for a C# script. The top line is standard for all Unity scripts. The next few lines import the other types this script will use. Then, the start of the script definition begins with a namespace declaration. Defining a namespace is standard when writing a C# file in other development platforms, but it is a practice Unity does not require or enforce. Unity does this in order to support a variety of scripting languages. However, as you may painfully learn, not adhering to a namespace can cause all manner of naming conflicts. For the purpose of this book, we will adhere to the packt.FoodyGO namespace.
After the namespace declaration is the class definition followed by some new variables. A variable for the GPS Location Service was added and made public so that it could be changed in the Unity editor. Then, three new private variables were added. We will review the purpose for each of those variables below in the relevant code section.
Marking a variable marked private sets the variable for internal use only within the class. If you are an experienced C# developer, you may also be asking, why we are using a public variable when it should be a property accessor. A public variable can be modified in the Unity editor, but a private or property accessor is hidden. You can, of course, still use property accessors from other types, but in general, most Unity developers will avoid them, instead prefer to just use public or private.
Here is an example of a property accessor:
public double Timestamp
        {
            get
            {
                return timestamp;
            }
            set
            {
                timestamp = value;
            }
        }
The next section of the script we will look at is the Start method shown in the code listing:
// Use this for initialization
        void Start()
        {
            Input.compass.enabled = true;
            thirdPersonCharacter = GetComponent<ThirdPersonCharacter>();
            if (gpsLocationService != null)
            {
                gpsLocationService.OnMapRedraw += GpsLocationService_OnMapRedraw;
            }
        }
As you can see, we added a couple more lines after the Input.compass.enabled line we wrote earlier in the chapter. After turning on the compass, the next line gets a reference to the ThirdPersonCharacter component script and stores it into that private variable thirdPersonCharacter. The ThirdPersonCharacter script controls the movement and animations of our character. As you will see, we will use that reference to move the character later in the Update method.
The following line checks whether the gpsLocationService is not null. If the value is not null, as it shouldn't be, we consume a new event on the GPS service called OnMapRedraw. OnMapRedraw fires after the center map tile is recentered and redrawn. Remember from our explanation above that the GPS service now tracks when it needs to recenter the map. After the service initiates a redraw to the map tile, the map tile requests a new map image. After the image request returns and the map tile is changed, the map tile tells the GPS service that it has refreshed itself. The GPS Service will then broadcast the OnMapRedraw event to all its consumers to let them know that they also need to recenter themselves. If you are a little lost on how this all connects, hopefully the following diagram will help:

Flow of data and events from GPS service
The next couple of lines after the Start method are for subscribing to the OnMapRedraw event. The event is a void method that passes the event source in the GameObject g, parameter:
private void GpsLocationService_OnMapRedraw(GameObject g)
        {
            transform.position = Vector3.zero;
            target = Vector3.zero;
        }
When the OnMapRedraw fires, it tells the character controller it needs to reset its position back to the origin, as the map has finished redrawing. Inside the event handler, the Player transform position is to set to Vector3.zero; this is the same as setting the position to (0,0,0). Likewise, we do the same to the target variable. We will get to that variable shortly in the Update method.
Finally, we come to the last method and the real worker in our class, the Update method. The following is the code listing:
// Update is called once per frame
        void Update()
        {
            if (gpsLocationService != null &&
                gpsLocationService.IsServiceStarted &&
                gpsLocationService.PlayerTimestamp > lastTimestamp)
            {
                //convert GPS lat/long to world x/y
                var x = ((GoogleMapUtils.LonToX(gpsLocationService.Longitude)
                    - gpsLocationService.mapWorldCenter.x) * gpsLocationService.mapScale.x);
                var y = (GoogleMapUtils.LatToY(gpsLocationService.Latitude)
                    - gpsLocationService.mapWorldCenter.y) * gpsLocationService.mapScale.y;
                target = new Vector3(-x, 0, y);
            }

            //check if the character has reached the new point
            if (Vector3.Distance(target, transform.position) > .025f)
            {
                var move = target - transform.position;
                thirdPersonCharacter.Move(move, false, false);
            }
            else
            {
                //stop moving
                thirdPersonCharacter.Move(Vector3.zero, false, false);

                // Orient an object to point to magnetic north and adjust for map reversal
                var heading = 180 + Input.compass.magneticHeading;
                var rotation = Quaternion.AngleAxis(heading, Vector3.up);
                transform.rotation = Quaternion.Slerp(transform.rotation, rotation, Time.fixedTime * .001f);
            }
        }
As you can see, a number of lines of code were added to support the GPS movement of our character. The code may seem complex, but it is fairly straightforward if we take our time.
At the top of the method, you will see almost the same test we did in the Google Map Tile script to check whether the GPS service is set, is running, and sending new location data. Inside the if statement is a couple of complex calculations that use the GoogleMapUtils helper library to convert GPS latitude or longitude to x or y 2D world coordinates. This is then converted into 3D world coordinates in the next line and stored in that target variable. Ensure that you notice the negation on the x parameter. Remember that our map is flipped and positive x points to west and not east. The target variable stores the 3D world position we want our character to move to.
The next if/else statement checks whether the player has reached the target position. Normally, this test is done with a value of 0.1f. However, that is at a real-world 1:1 scale; again, for our purpose, we will use a much smaller number.
Inside the if statement, we know the character has not reached its destination and needs to continue moving. In order to make the character move, we need to pass the thirdPersonCharacter a move vector. The move vector is calculated by subtracting the character's current position, denoted by transform.position, from the target. The result is a vector that we then use to call the Move method on the thirdPersonCharacter. Internally, the ThirdPersonCharacter script will manage the animations and movement.
In the else section of theif statement, we know the character is not moving or at least shouldn't be. Therefore, we call the Move method on the thirdPersonCharacter again, this time with a zero vector in order to stop movement. After that, we check the compass heading and set that just as we did before. Note that we only set the compass heading if the character is not moving. After all, when the character moves, we want them facing in the direction of travel.
Well, that completes reviewing the CharacterGPSController script. This script is a good start for showing player movement around a map. However, as you play the game or allow others to play the game, you may notice some areas that may need improvement. Feel free to improve on this script as much as you like and make it your own.
Now that we have everything working as expected, let's take some time to visually improve our player's character. We certainly don't want our gray Ethan character to ship with our game. Of course, this game is about game development and not 3D modeling, so we will want to use something easily available. If you open up the Unity Asset Store and do a search for 3D characters, you will see plenty of assets available. Refine this search to just free assets and there is still a lot. So, what is the best option? When it comes down to it, the best option is what works for you and your team. Feel free to try other character assets.
For this book, we will use the base iClone characters, which are freely available from the asset store. This is an excellent resource and they deserve the five-star rating they had at the time of writing this book. The asset packages are concise and don't have any unnecessary content, a big plus for mobile games. Also, the character models are low in polygon count, which is import to mobile rendering.
Perform the following directions to import an iClone character and swap it for the Ethan character:
- Start by opening the Asset Store window by selecting menu item Window | Asset Store.
- After the window opens, enter
iclonein the search box and press Enter or the search icon. - When the search completes, at the top of the list should be the three base iClone characters Max, Izzy, and Winston, as follows:

Base iClone character options
- Now, at this point, you can choose the character you want to use for your version of FoodyGO. All of the characters will function the same, and there is only one minor setup difference. Feel free to select one character now and then come back later to add a different base character. Select a character to continue; this choice is entirely up to you.
- The characters asset listing will load in the window, and on the listing will be a button to download and import the asset. Click on the Download button. It may take a few minutes to download, so you know the drill, grab a coffee or your favorite beverage and wait for it to finish.
- After the asset is downloaded, you will see a Import Unity Package dialog prompting you to select what you want to import. Ensure that everything is selected and click on the Import button.
- When the import completes, you will see that a new folder is added to the Assets folder in the Project window. This new folder will be named according to your character selection, either
Max,Izzy, orWinston. - Expand the character-named folder and select the Prefab folder. You will see a prefab with your character's name on it. Select and drag the prefab from the Project window and drop it onto the Player object in the Hierarchy window.
- Select and expand the Player object in the Hierarchy window. Ensure that your new character is added to the Player object. Select the character object and reset the transform. You can reset the transform by clicking on the gear icon in the Transform component from the Inspector window. Then, select the Reset option from the context menu.
You should now see your character overlapping the Ethan character, as follows:

iClone character overlapping the Ethan character
Note
The 3D character is designed by Reallusion iClone Character Creator. To create more customized characters, please visit http://www.reallusion.com/iclone/character-creator/default.html for more details.
- While in the Inspector window, disable the Animator component by unchecking the checkbox beside the text Animator. Look at the Avatar field in the animator and remember the name that is populated there. This will be different for each character, so write it down if you need to.
- Go back to the Hierarchy window and select the EthanBody object under the Player and press the delete key to remove the object. Also, delete the EthanGlasses and EthanSkeleton.
- Select the Player object. Change the Avatar property of the Animator by clicking on the bullseye icon in the Inspector window. A Select Avatar dialog consisting of several names will open. Choose the name that matches what you wrote down in step 10. Then, close the dialog.
- Run the game in the editor by pressing the Play button. Your new character should be animating and moving if you run the GPS service in simulation mode. Ensure that you build and deploy the game to your mobile device.
As you can see, the process is pretty simple to quickly switch out a character, so try any number or all of the iClone characters. If you have another character asset in mind, you could also try that as well. Of course, the possibilities are endless. Here is an example of the three different iClone characters in our game:

Three different base iClone characters in game.