
The great thing about dividing the game content into scenes is our ability to develop and test each functional piece in isolation. We don't have to worry about other game start-up, events, or functionality slowing down our development. Yet, at some point, we need to bring all those pieces together, and it is important to frequently test the whole game, as well.
Before we start working on the Inventory scene, we will do another full reset import of all scripts, as we have done in the previous chapters. This means we will be importing several new and updated scripts and won't be able to cover the extensive changes in detail. We won't have time in the remaining chapter to highlight any interesting code but it is recommended that you wander through the code at your leisure. For those who have made your own changes to the scripts, it is recommended that you back those items up on your own. Follow the directions here to do the asset import:
- Save your scene and project and do a backup of the project to another location if you made any changes you want to preserve.
- From the menu, select Assets | Import Package | Custom Package... to open the Import package... dialog.
- From the dialog, navigate to the book's downloaded source code folder
Chapter_6_Assetsand select theChapter6_import2.unitypackagefile. Then, click on Open to start importing the assets. - When the Import Unity Package dialog opens, just make sure that all the items are selected and then click on the Import button.
With the updated and new scripts loaded, let's build the new Inventory scene by following these directions:
- From the menu, select File | New Scene. This will create a new empty scene with a camera and directional light.
- From the menu, select File | Save Scene As.... When prompted, name the scene
Inventoryand save it. - From the menu, select GameObject | Create Empty. Rename the new object
InventorySceneand reset the transform to zero in the Inspector window. - Drag the
Main CameraandDirectional Lightobjects onto the newInventorySceneobject in the Hierarchy window. This will reparent the objects,as we did for other scenes. - From the menu, select GameObject | UI | Panel. This will add a
Panelwith aCanvasparent and anEventSystemobject. - Select
EventSystemin the Hierarchy window and press delete to remove it. Remember, Unity will add one for us later. - Select the
Canvasparent object and rename itInventoryBagin the Inspector window. - In the Hierarchy window, drag the new
InventoryBagobject onto theInventorySceneto make it a child. - In the Hierarchy window, select the
Panelobject. Then, in the Inspector window, change the Image component color by clicking on the slot. This will open the Color dialog selector. Change the Hex value to#FFFFFFat the bottom of the dialog and then close it. This will set the entire Game window to a white background.
This establishes the base of our InventoryScene. Before we immerse ourselves more deeply in some of the components, we will first create the inventory item prefab:
- Select the
InventoryBagobject in the Hierarchy window. Then, from the menu, select GameObject | UI | Button. This will add a newButtonobject as a child ofInventoryBag. - Rename the
ButtontoMonsterInventoryItem, and set the Rect Transform | Anchor Presets to top-stretch while holding the pivot and position keys in the Inspector window. - Remove the Image component by clicking on the gear icon beside it and selecting Remove Component from the drop-down menu.
- You will now see a warning message in the Button component. Change the Button component Transition property to none. This will remove the warning.
- From the
Assets/FoodyGo/Scripts/UIfolder in the Project window, drag theMonsterInventoryItemscript onto theMonsterInventoryItembutton object in the Hierarchy window. This will add the inventory script to the object. - Right-click (press Ctrl and click on a Mac) the
MonsterInventoryItemin the Hierarchy window. From the context menu, select UI | Raw Image. - With the
Raw Imageobject selected in the Inspector window, change the Raw Image | Texture property by clicking on the bullseye icon beside the field. From the Select Texture dialog, choose the monster texture. Also, change the Rect Transform | width and height properties to a value of80. - From the Hierarchy window, select the child
Textobject ofMonsterInventoryItemand press Ctrl + D (command + D, on a Mac) to duplicate the object. - Select the first
Textobject and rename itTopTextin the Inspector window. Also, change the component Text | Paragraph | Alignment to center-top, as shown in the following screenshot:
Setting UI text alignment to center-top
- Repeat the process for the second
Text(1)object, but rename the objectBottomTextand set its paragraph alignment to center-bottom. - In the Hierarchy window, drag the
Raw Imageobject to just below theMonsterInventoryItemso that it is the first child. - From the Hierarchy window, drag the
MonsterInventoryIteminto theAssets/FoodyGo/Prefabsfolder in the Project window. This will make theMonsterInventoryIteminto a prefab. Keep the original object in the scene.
With our inventory item created, we will go back and finish the inventory bag:
- Select the
InventoryBagobject in the Hierarchy window, and then from the menu, select GameObject | UI | Scroll View. This will add aScroll Viewbeside thePanel. Drag theScroll Viewonto thePanelto make it a child, as shown in the following screenshot:
InventoryScene hierarchy thus far
- Select the
Scroll Viewobject in the Hierarchy window. Then, in the Inspector window, change the Rect Transform | Anchor Presets to stretch - stretch while holding down the pivot and position keys, as follows: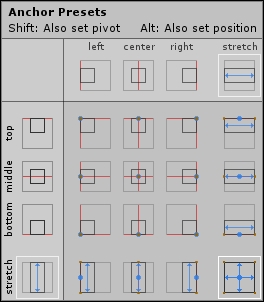
Selecting anchor preset stretch-stretch while holding the pivot and position keys
- With the
Scroll Viewstill selected, uncheck the Horizontal scroll option from the Scroll Rect component. We only want the inventory to be vertically scrollable. - In the Hierarchy window, expand the
Scroll Viewobject and then expand the childViewportobject as well. This will expose a bottom-level object calledContent. Select theContentobject. - In the Inspector window, set the Rect Transform | Anchor Presets to top - stretch again by holding down the pivot and position keys.
- With the
Contentobject selected in the Hierarchy window from the menu select Component | Layout | Grid Layout Group to add the component to theContentobject. Repeat the process by selecting Component | Layout | Content Size Fitter. - From the
Assets/FoodyGo/Scripts/UIfolder in the Project window, drag theInventoryContentscript onto theContentobject in the Hierarchy or Inspector windows. - With the
Contentobject selected in the Inspector window, drag theScroll Viewobject onto the empty Inventory Content | Scroll Rect property. - Then, from the
Assets/FoodyGo/Prefabsfolder in the Project window, drag theMonsterInventoryItemprefab onto the empty Inventory Content | Inventory Prefab slot. - Confirm or set the values for Rect Transform, Grid Layout Group, Content Size Fitter and Inventory Content to the values shown in the following screenshot:

Content object configuration
- Finally, in the Hierarchy window, drag the
MonsterInventoryItemonto theContentobject, to make it a child. Then, deactivate the object by unchecking the checkbox beside the object name in the Inspector window. We will just use that object as a reference. Your updated Hierarchy window should match the following screenshot:
Inventory hierarchy
Thus far, we have most of the Inventory scene constructed and now all we have to do is connect things together. Perform the following instructions to finish the scene:
- Drag
InventorySceneControllerscript from theAssets/FoodyGo/Scripts/Controllersfolder in the Project window and drop it onto theInventorySceneobject in the Hierarchy window. - Select the
InventorySceneobject. Drag theContentobject from the Hierarchy window onto the empty Inventory Scene Controller | Inventory Content slot in the Inspector window. - From the
Assetsfolder in the Project window, drag the Catch scene onto the Hierarchy window. This allows us to see both scenes overlapping each other. - Select and drag the
Servicesobject from theCatchscene and drop it onto the Inventory scene. This will add theServicesto the Inventory scene. If you recall, we only used those services for testing and planned to remove them from the Catch scene later, anyway. - Right-click (press Ctrl and click, on a Mac) on the Catch scene to open the context menu. Select Remove Scene and when prompted to save, click on the Save button.
- Press Play to run the scene and see the results. The following is a sample screenshot of several captured practice monsters caught during play testing the Catch scene:

Inventory scene showing the caught monsters
Note
The 3D character is designed by Reallusion iClone Character Creator. To create more customized characters, please visit http://www.reallusion.com/iclone/character-creator/default.html for more details.
Hopefully, you spent some time catching monsters in the test Catch scene after we connected the Inventory service and can now see those caught monsters. If you have no monsters showing, not to worry we will wire the game together before the end of the chapter. Also, you may have noticed that our monster inventory items are actually buttons, but they don't do anything. That is also fine, we will add the detail section of the inventory later. For now though, we want to finish up the chapter by connecting all the scenes together in a proper game.