
In order to connect our scenes together, we need player input to trigger an event. We do have an event setup for when the player clicks on the monster in the Map scene. However, we also want the player to move from the Map/Catch scene to the Inventory scene and back. In order to do this, we will add some UI buttons to each of the scenes.
Since we already have the Inventory scene already open, let's begin by adding the new button to that scene:
- Right-click (press Ctrl and click, on a Mac) on the
InventoryBagobject in the Hierarchy window and select UI | Button from the context menu. This will add a button just below thePanel. Expand theButtonobject and then select the childTextobject and press delete to remove it. - Select the new
Buttonobject and rename itExitButtonin the Inspector window. - From the Inspector window, set the Rect Transform | Anchor Presets to bottom-center while holding the pivot and position keys. Then, change the Rect Transform properties' Width and Height to 75 and the Pos Y to 10.
- Change the Image | Source Image by clicking on the bullseye icon beside the slot to open the Select Sprite dialog. Choose the sprite called
button_set11_bfrom the dialog. - Finally, we will wire up the button by clicking on the + under the Button | On Click event property. This will create a new event slot. Then, drag the InventoryScene object from the Hierarchy window onto the empty None(object) slot. From the No Function drop-down menu, select InventorySceneController | OnCloseInventory.
- The full configuration for the
ExitButtonis shown in the following screenshot:
ExitButton component configuration
The ExitButton we just added is for closing the Inventory scene and returning to the scene that opened it. Before we get the Map and Catch scenes, we first need to transfer our services to the Game scene and take care of some minor updates. Perform the instructions to update the Game scene:
- From the
Assetsfolder in the Project window, drag the Game scene to the Hierarchy window. - Drag the
Servicesobject from the Inventory scene to the Game scene. This will be the new permanent home for theServicesobject. Rename theServicesto_Servicesin the Inspector window. Again, we use the_to denote objects that are not to be destroyed. - Remove the Inventory scene by right-clicking (press Ctrl and click, on a Mac) on it and selecting Remove Scene from the context menu. When prompted, save the scene by clicking on Save.
- Select the
_GameManagerobject in the Hierarchy window, and update the Game Manager script scene names, as shown in the screenshot: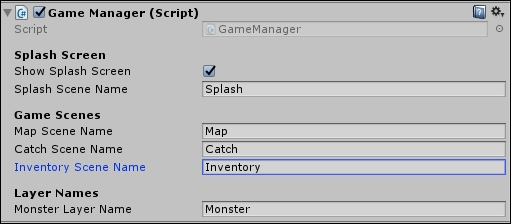
Game Manager Scene names updated
Next, we will add a new button to access the Inventory scene on the Map scene. Follow the instructions to add the new button:
- Double-click on the Map scene in the
Assetsfolder in theProjectwindow. This will close the Game scene, and when prompted, ensure that you save the changes. - Expand the
MapSceneobject in the Hierarchy window, and right-click (press Ctrl and click, on a Mac) to open the context menu. From the menu, select UI | Button, to add a new button. - Select the button created in previous step, and in the Inspector window, rename it
HomeButton. Set the Rect Transform | Anchor Presets to bottom-center while holding the position/pivot keys. Change the Rect Transform | Width/Height to80and the Pos Y to10. Then, change Image | Source Image tobutton_set06_bby clicking on the bullseye icon and selecting the sprite for the Select Sprite dialog. - Drag the
HomeButtonscript from theAssets/FoodyGo/Scripts/UIfolder in the Project window and drop it onto theHomeButtonobject in the Hierarchy window. - Select and drag the
HomeButtonobject from the Hierarchy window to theAssets/FoodyGo/Prefabsfolder in the Project window to make it a new prefab.
Finally, the last scene we need to do is the Catch scene, which will make our round trip complete. Perform the following directions to add the HomeButton to the scene:
- Double-click on the Catch scene in the
Assetsfolder of the Project window. This will close the Map scene, and when prompted, ensure that you save the changes. - Expand the
CatchSceneobject in the Hierarchy window. From theAssets/FoodyGo/Prefabsfolder in the Project window, drag theHomeButtonprefab and drop it onto theCatch_UIobject. You will now see theHomeButtondrawn over top of theCatchBallin the scene. - Select the
HomeButton, and in the Inspector window, change the Rect Transform | Anchor Presets to top-right while, of course, holding the pivot/position keys. Then, change the Pos X and Pos Y to-10. - Save the scene and project.
Now, with the scene transition buttons added, all the scripts updated, and everything else set, it is time to bring everything together and run the game.