
As you can see from the previous setup exercise and through testing, the Inventory service we imported already has the database wrapper attached. Let's review some of the script changes we imported and also get into details of the InventoryService script:
- Double-click on the
CatchSceneControllerlocated in theAssets/FoodyGo/Scripts/Controllersfolder in the Project window to open the script in the editor of your choice. - The only thing that has thus far changed in the
CatchSceneControlleris a new Start method calling ourInventoryservice. Perform the following reviewing method:void Start() { var monster = InventoryService.Instance.CreateMonster(); print(monster); } - Inside the
Startmethod, theInventoryServiceis being called as a singleton using theInstanceproperty. Then, theCreateMonstermethod is called to generate a newmonsterobject. Finally, themonsterobject is printed to the Console window with theprintmethod. - The code in the
Startmethod is essentially just temporary test code we will move later. However, appreciate the ease of access the singleton pattern is providing us with. - We have one more step before we look at the
InventoryService. Open theMonsterscript located in theAssets/FoodyGo/Scripts/Databasefolder. If you recall, we previously used theMonsterclass to track our spawn's location within theMonsterService. Instead, we decided to simplify theMonsterclass to use just for inventory/database persistence and promote our older class to a newMonsterSpawnLocation. TheMonsterServicescript was also updated to use the newMonsterSpawnLocation. - We will take a closer look at the new
Monsterobject that we will use to persist to the inventory/database:public class Monster { [PrimaryKey, AutoIncrement] public int Id { get; set; } public string Name { get; set; } public int Level { get; set; } public int Power { get; set; } public string Skills { get; set; } public double CaughtTimestamp { get; set; } public override string ToString() { return string.Format("Monster: {0}, Level: {1}, Power:{2}, Skills:{3}", Name, Level, Power, Skills); } } - The first thing that is obvious is the use of properties to define the
Monsterattributes, which is a divergence from Unity and the more traditional C#. Next, notice that the topIdproperty has a couple of attributes andPrimaryKeyandAutoIncrementattached. If you are familiar with relational databases, you will understand this pattern right away.For those less familiar, all records/objects in our database need a unique identifier called a primary key. That identifier, in this case, called
Id, allows us to quickly locate an object later. The attributeAutoIncrementallows us to know that theIdproperty, an integer, will be automatically incremented when a new object is created. This alleviates us from managing theIdof the objects ourselves and means theIdproperty will be automatically set by the database. - We won't worry too much about the other properties right now, but instead, just take notice of the overridden
ToStringmethod. OverridingToStringallows us to customize the output of the object and is useful for debugging. Instead of having to inspect all the properties and print them to the console, we can instead simplify this toprint(monster), as we saw in theCatchSceneController.Startmethod earlier. - With the background out of the way, open up the
InventoryServicescript located in theAssets/FoodyGo/Scripts/Servicesfolder. As you can see, this class has a number of conditional sections in theStartmethod in order to account for various deployment platforms. We won't review that code, but we will take a look at the last few lines of theStartmethod:_connection = new SQLiteConnection(dbPath, SQLiteOpenFlags.ReadWrite | SQLiteOpenFlags.Create); Debug.Log("Final PATH: " + dbPath); if (newDatabase) { CreateDB(); }else { CheckForUpgrade(); } - The first line creates a new
SQLiteConnection, which creates a connection to the SQLite database. The connection is set by passing the database path (dbPath) and options. The options provided to the connection are requesting read/write privileges and creating the database, if necessary. Therefore, if no existing database is found at thedbPath, then a new empty database will be created. The next line just writes the database path to the Console. - After the connection is open, we check whether a new database was created by checking the
newDatabaseBoolean variable. ThenewDatabasevariable was previously set above the section of code by determining whether an existing database was already present. IfnewDatabaseis true, then we callCreateDB,otherwise, we callCheckForUpgrade. - The
CreateDBmethod does not create the physical database file on the device. That is instead done in the connection code we looked at earlier. TheCreateDBmethod instantiates the object tables or schema in the database as follows:private void CreateDB() { Debug.Log("Creating database..."); var minfo = _connection.GetTableInfo("Monster"); if(minfo.Count>0) _connection.DropTable<Monster>(); _connection.CreateTable<Monster>(); Debug.Log("Monster table created."); var vinfo = _connection.GetTableInfo("DatabaseVersion"); if(vinfo.Count>0) _connection.DropTable<DatabaseVersion>(); _connection.CreateTable<DatabaseVersion>(); Debug.Log("DatabaseVersion table created."); _connection.Insert(new DatabaseVersion { Version = DatabaseVersion }); Debug.Log("Database version updated to " + DatabaseVersion); Debug.Log("Database created."); } - Don't be put off by the number of
Debug.Logstatements in this method; it is best to just think of them as helpful comments. After the install logging, we first determine whether theMonstertable has already been created using theGetTableInfomethod on the connection.GetTableInforeturns the columns/properties of the table; if no columns or properties have been set,minfowill have a count of0. If the table is present, however, we will delete or drop it and create a new table using our currentMonsterproperties.We follow the same pattern for the next table
DatabaseVersion. IfGetTableInforeturnsvinfo.Count>0, then delete the table, otherwise, just continue. You will see, as we add more objects to theInventoryService, we will need to create the new tables in the same manner.The SQLite4Unity3d wrapper provides us with an Object Relational Mapping (ORM) framework that allows us to map objects to relational database tables. This is why we will use the term object and table interchangeably at times. The following diagram shows how this mapping typically works:
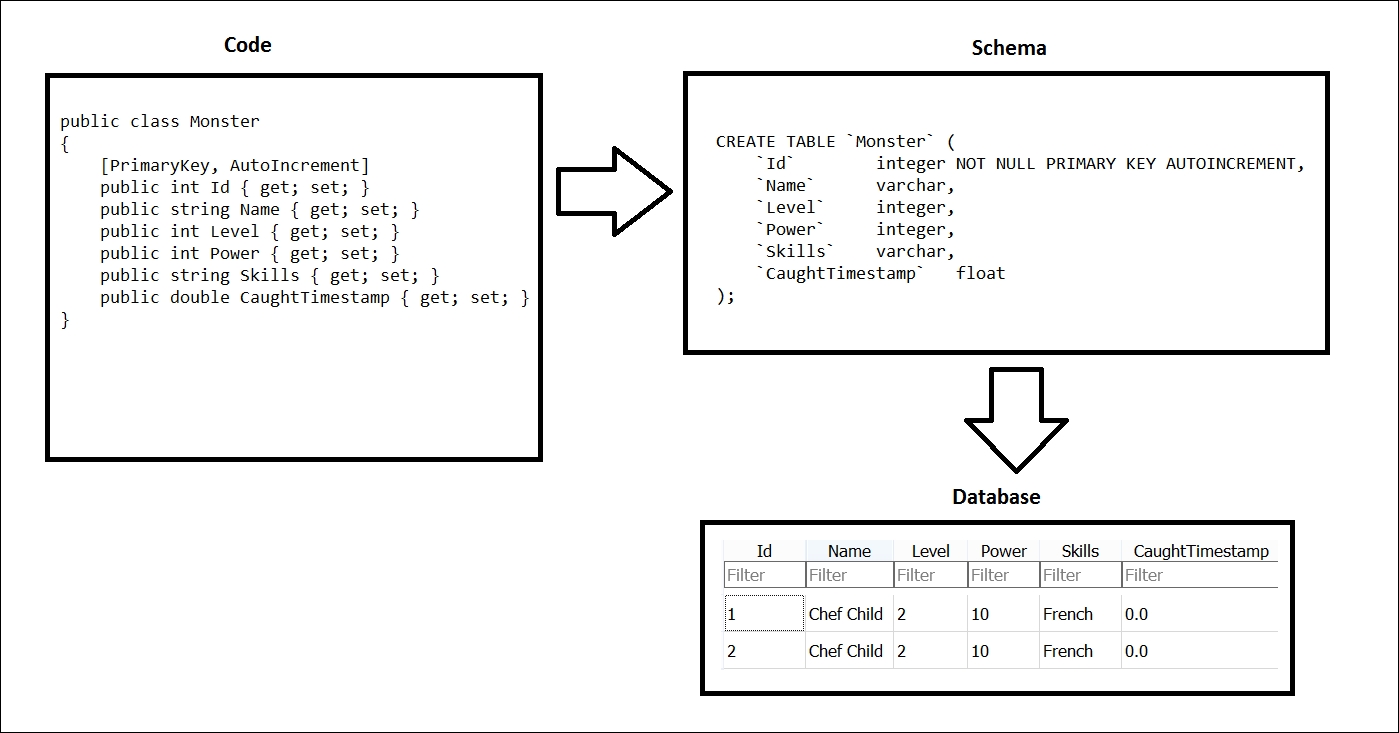
An ORM example of monster to database
- After the object tables are created, we create a new
DatabaseVersionobject and store it in the database using theInsertmethod on the_connection. TheDatabaseVersionobject is very simple and only has one property, calledVersion. We use this object/table to track the version of the database. - Remember that, if we don't need to create a new database, then we will check for an upgrade with the
CheckForUpgrademethod, as follows:private void CheckForUpgrade() { try { var version = GetDatabaseVersion(); if (CheckDBVersion(version)) { //newer version upgrade required Debug.LogFormat("Database current version {0} - upgrading to {1}", version, DatabaseVersion); UpgradeDB(); Debug.Log("Database upgraded"); } } catch (Exception ex) { Debug.LogError("Failed to upgrade database, running CreateDB instead"); Debug.LogError("Error - " + ex.Message); CreateDB(); } } - The
CheckForUpgrademethod first gets the current database file version and then compares it to the version required by the code in theCheckDBVersionmethod. If the code requires a newer database version, set by theDatabaseVersionsetting on theInventoryService, then it upgrades the database. If the database doesn't require an upgrade, then the game uses the current database. However, if there is an error in the version check or some other error happens, then the code will assume something is wrong with the existing database and just create a new version. We will spend more time later on doing an actual database upgrade. - Finally, we will review the
CreateMonstermethod called by theCatchSceneController:public Monster CreateMonster() { var m = new Monster { Name = "Chef Child", Level = 2, Power = 10, Skills = "French" }; _connection.Insert(m); return m; } - The
CreateMonstermethod currently just creates a hardcodedMonsterobject and inserts it into the database using the_connection.Insertmethod. It then returns the new object to the calling code. If you have experience working with relational databases and writing SQL code, hopefully, you can appreciate the simplicity of theInserthere. We will update theCreateMonsterand other operation methods, in the next section of this chapter.