
We now have a great-looking ice ball just in front of our walking monster. Time to get that ball in motion using the following steps to add the objects and scripts:
- Drag the
DualTouchControlsprefab from theAssets/Standard Assets/CrossPlatformInput/Prefabsfolder in the Project window to the Hierarchy window. - Rename the
DualTouchControlsobject toCatch_UIin the Inspector window. - Expand the new
Catch_UIobject and delete theTurnAndLookTouchpadand theJumpobjects. When prompted to break the prefab, click on continue. - Expand the
MoveTouchpadobject and delete theTextobject by selecting it and pressing delete. - Select the
MoveTouchpadobject and rename itThrowTouchpadin the Inspector window. - Open the Anchor Presets in the Rect Transform component, and select the stretch-stretch option in the bottom-right corner while holding the pivot and position keys. This will expand the overlay to fill the screen just as we did before for the free look camera.
- Select the Image component Color field to open the color dialog. Set the color to
#FFFFFF00in Hex. - Click on the Add Component button at the bottom of the Inspector window. From the drop-down list, select Throw Touch Pad or enter it in the search field.
- Select the gear icon beside the Touchpad component, and select Remove Component from the context menu.
- From the Hierarchy window, drag the
CatchBallobject and drop it onto the empty Throw Object field in Throw Touch Pad component, as shown in the following screenshot: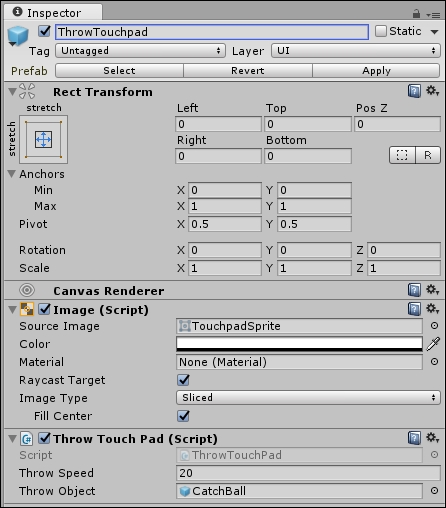
Configuration for the ThrowTouchpad object
- Drag the
Catch_UIobject onto theCatchSceneobject in order to add it as a child. - Press Play in the editor to the run game. You can now click on the ball, drag it in a throwing motion and then release it by unclicking the mouse.
- Build and deploy the game to your mobile device. Use your finger to throw the ball; see how well you can hit the monster.
All of the work of throwing the ball is being done by the ThrowTouchPad script, which uses a heavily modified Touchpad script at its base. Let's review the critical sections of code:
- Open the
ThrowTouchPadscript in the editor of your choice. Of course, you know how to do this now. - Scroll down to the Start method and review the initialization this script does. Most of the initialization occurs inside an
ifstatement that checks whether athrowObjectis not null. Further initialization of variables is down in theResetTarget()call. The following is the code for review:if (throwObject != null) { startPosition = throwObject.transform.position; startRotation = throwObject.transform.rotation; throwObject.SetActive(false); ResetTarget(); } - Scroll down to the
OnPointerDownmethod; the code for the method is shown here for review:public void OnPointerDown(PointerEventData data) { Ray ray = Camera.main.ScreenPointToRay(data.position); RaycastHit hit; if (Physics.Raycast(ray, out hit, 100f)) { //check if target object was hit if (hit.transform == target.transform) { //yes, start dragging the object m_Dragging = true; m_Id = data.pointerId; screenPosition = Camera.main.WorldToScreenPoint (target.transform.position); offset = target.transform.position - Camera.main.ScreenToWorldPoint(new Vector3(data.position.x, data.position.y, screenPosition.z)); } } } - This code is very similar to what we used earlier to select the monsters you need to catch. As you can see, that same
Physics.RayCastmethod is used, without a layer mask. If the pointer (touch) hits something, it checks whether it is the target, which so happens to be theCatchBall. If it has hit the target, then it sets aBoolean m_Draggingto true and gets a screen position of the touched object and of the offset of the pointer or touch. - Next, if you scroll down a little to the
Updatemethod, you will see anifstatement that checks whether the ball is being dragged by checking them_Dragging Boolean. If it is, then it takes a snapshot of the current pointer (touch) position and calls theOnDraggingmethod for review:void OnDragging(Vector3 touchPos) { //track mouse position. Vector3 currentScreenSpace = new Vector3(Input.mousePosition.x, Input.mousePosition.y, screenPosition.z); //convert screen position to world position with offset changes. Vector3 currentPosition = Camera.main.ScreenToWorldPoint(currentScreenSpace) + offset; //It will update target gameobject's current postion. target.transform.position = currentPosition; } - The
OnDraggingmethod just moves the target object (ball) around the screen based on the pointer (touch) position. - Next, scroll down to the
OnPointerUpmethod. TheOnPointerUpmethod is called when the mouse button is released or a touch is removed. The code inside the method is quite simple: it again checks whether them_Draggingis true; if it isn't, it just returns. If an object is being dragged, then at this point, theThrowObjectmethod is called, as shown in the following code:void ThrowObject(Vector2 pos) { rb.useGravity = true; //turn on gravity float y = (pos.y - lastPos.y) / Screen.height * 100; speed = throwSpeed * y; float x = (pos.x / Screen.width) - (lastPos.x / Screen.width); x = Mathf.Abs(pos.x - lastPos.x) / Screen.width * 100 * x; Vector3 direction = new Vector3(x, 0f, 1f); direction = Camera.main.transform.TransformDirection(direction); rb.AddForce((direction * speed * 2f ) + (Vector3.up * speed/2f)); thrown = true; var ca = target.GetComponent<CollisionAction>(); if(ca != null) { ca.disarmmed = false; } Invoke("ResetTarget", 5); } - The
ThrowObjectmethod is where we calculate the launch position and determine the force with which the object will be thrown. Thex,ycalculations determine how fast the object was moving across the screen before it was released. It determines this by taking the difference between the last-known pointer position and the position of the release. The x value or position of release determines the direction (left or right) of the throw, whereas the y or up movement determines the speed of the throw. These values are then summed into a force vector and applied to the rigidbody by the callrb.AddForce(). Therbis the target rigidbody, which was set in theResetTargetmethod during initialization. At the bottom of the method is the call toGetComponentfor aCollisionActioncomponent. We won't worry about this here, but will cover it later. Then, finally, we callResetTargetagain using theInvokemethod, which waits for 5 seconds before being called.
Tip
Rigidbody.AddForce is one of the most important methods to master when developing any game with physics. You can find more excellent physics resources at https://unity3d.com/learn/tutorials/topics/physics.
..................Content has been hidden....................
You can't read the all page of ebook, please click here login for view all page.