
The Game Manager (GM) will be our overseer and controller for all the major activities in the game. The GM will manage the scene loading or unloading and transitions, as well as many other higher functions we will get into later. The GM will reside in the Game scene, which will be the first scene loaded. Then, as needed, the GM will manage other activity between scenes, as shown in the following diagram:
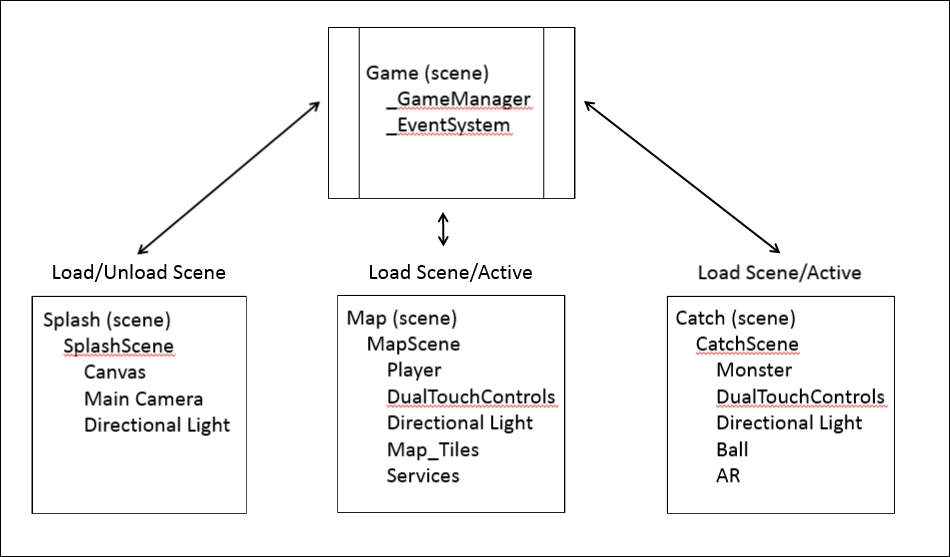
Overview of the scenes and GameManager activity
We will get the GameManager game object and script set up and running, and that will explain things further. Unfortunately, this will be a very busy chapter, and we won't have much time to review all the code. It is strongly suggested that you take some time to look over the scripts yourself. Now, follow the next instructions to import and set up the GameManager script:
- Open up the Game scene by selecting the
Assetsfolder in the Project window and double-clicking on the Game scene. - After the scene loads, create a new empty game object by selecting the menu item GameObject | Create Empty.
- Rename the new object
_GameManagerand reset the transform to zero in the Inspector window; note the use of the underscore. We will use an underscore to denote an object that should not be destroyed or deactivated. - Select and rename the
EventSystemobject to_EventSystemin the Inspector window, for the same reason. - Select menu item Assets | Import Package | Custom Package.... Then, in the Import package dialog, navigate to the downloaded
Chapter_5_Assetssource code folder and selectChapter5_import1.unitypackage. Then, click on Open to begin the import. - When the Import Unity Package dialog opens, just make sure that all the assets are selected and click on Import.
- Navigate to the
Assets/FoodyGo/Scripts/Managersfolder. Drag and drop theGameManagerscript onto the_GameManagerobject in the Hierarchy window. - Select the
_GameManagerobject and set theGame Managerscript component properties, as follows: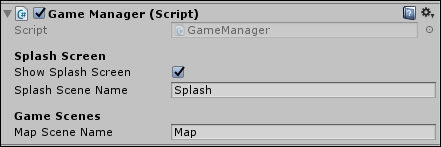
Game Manager settings
- Select the menu item File | Build Settings.... We need to add the Game, Splash, and Map scenes into the build settings and set them in the order shown in the following Build Settings dialog:
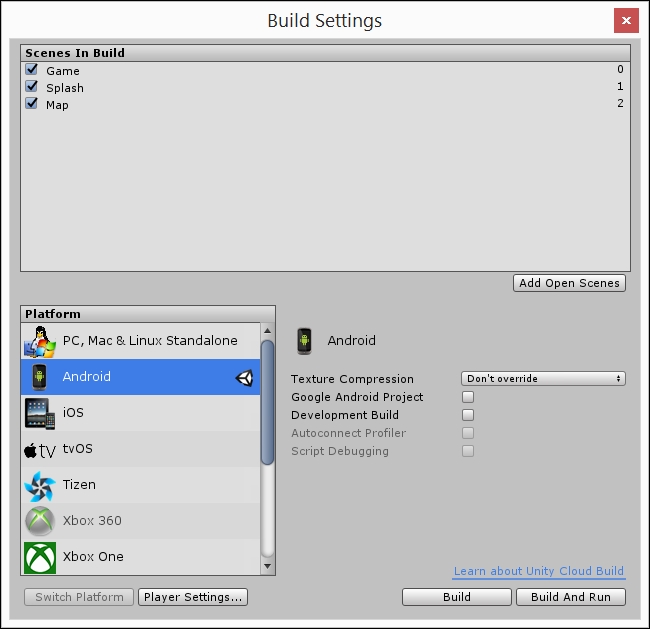
Build Settings dialog, with scenes added and ordered
- You can add scenes by dragging the scene from the
Assetsfolder in the Project window and dropping it onto the scene area. The scenes can be reordered in the area by selecting and dragging the scene up or down and dropping it as needed. The first scene in the list will be the scene that gets loaded first. Ensure that your scene configuration matches the dialog image. - After you get the scenes added and ordered, run the game in the editor by pressing Play. Notice now that the Game scene quickly loads and then the Splash scene is loaded, followed a few seconds later by the Map scene. You should also notice that the Map scene loaded behind the Splash scene, in the Scene window.
- Ensure that you also build and deploy the game to your mobile device. Run the game on your device, to be confident that it works as it did from the previous chapter.