
If you recall from our Foody GO storyline, the players needed to hunt down the escaped experimental cooking monsters and catch them. As of the end of last chapter, the player can now track and see monsters around them on the map. What we need now is for the player to be able to interact with and attempt to catch the monsters they can see. In order to keep our game immersion deep, we want the player to catch the monsters in an alternate-reality view. Thus, we also want to incorporate the device's camera to provide the backdrop to our catch activity. Adding the AR component will now classify our game in the real-world adventure or location-based AR genre.
In this chapter, we will be adding a number of new features to our game that will require us to touch on a few new concepts. Unlike the previous chapters, we won't get too heavily into the theory since most of these new concepts are fundamental to game development and Unity. Instead, we will review how these things work within Unity and provide some references for those wanting to learn more about a particular concept. Here is the list of items we will be covering in this chapter:
- Scene management
- Introducing the Game Manager
- Loading a scene
- Updating touch input
- Colliders and rigidbody physics
- Building the AR catch scene
- Using the camera as our scene backdrop
- Adding the catching ball
- Throwing the ball
- Checking for collisions
- Particle effects for feedback
- Catching the monster
Just as in the previous chapters, if you have Unity open from the previous chapter, with the game project loaded, then move on to the next section. Otherwise, open up Unity and load the FoodyGO game project or open the Chapter_4_End folder from the downloaded source code. Then, ensure that the Map scene is loaded.
Before we jump into adding some new features to the game, we should step back a bit and address how we will transition from scene to scene. Currently, we have two scenes developed for our game: the Splash and Map scenes. Also, in this chapter, we will add two more scenes, Game and Catch. However, we currently have no way of managing scene transitions or game-object lifetime. Ideally, we want some master object and/or script that can do all that for us. This is exactly what we will build, and we will call it Game Manager.
Hold your excitement for a minute. In order to seamlessly load and transition between scenes, we want to do a little housekeeping with our current scenes. Open up Unity and perform the following instructions to clean and reorganize the current game scenes:
- Ensure that the Map scene is loaded in the Hierarchy window. Create a new empty game object by selecting the GameObject | Create Empty menu.
- Rename the new object MapScene and reset the transform to zero.
- Drag and drop the
Playerobject onto theMapobject in the Hierarchy window. This will make the Player a child of Map. Do this again for Map_Tiles, Services, DualTouchControls, and Directional Light, as shown in the following screenshot: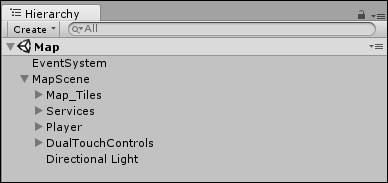
MapScene child objects
- Save the scene by selecting menu item File | Save Scene.
- Save the scene as a new scene called
Gameby selecting menu item File | Save Scene As..., and in the Save Scene dialog, enterGamefor name and click on the Save button. - Ensure that you follow the next sequence of steps closely in order to avoid frustration. If you do delete something you shouldn't and accidently save it, then you can always restart from the source code
Chapter_5_Startfolder. - In the Hierarchy window, delete the
EventSystemobject by selecting the object and pressing the delete key. The scene should only contain theMapSceneand children now. - From the menu, select File | Save As... and name the scene
Mapand then click on the Save button. You will be prompted to overwrite the scene; click on Yes, as follows:
Confirmation prompt
- Open the new Game scene by selecting the
Assetsfolder in the Project window and then double-clicking on the Game scene. - Delete the
MapSceneobject by selecting it and pressing delete. After you delete theMapSceneobject, you will notice that the Game window goes black and now displays a No cameras rendering message. Try not to be distracted, panic, or go into repair mode and try to add a new camera to the scene. Everything is OK, so just carry on. - The Game scene should now just have an
EventSystemobject. We could actually delete this object, as Unity would automatically add it back in if a UI component was added to the scene. In order to better manage our scenes and objects though, we will keep theEventSystemobject as it is. - Save the scene by selecting the menu item File | Save Scene.
- Open the
Splashscene by selecting theAssetsfolder in the Project window and then double-clicking on the Splash scene to open it. - Select the menu item GameObject | Create Empty. Rename the new object
SplashSceneand reset the transform to zero in the Inspector window. - Drag and drop the
Main Camera,Directional Light, andCanvasto theSplashSceneobject. They should all now be children of theSplashSceneobject. - Delete the
EventSystemobject by selecting it and pressing delete. The Splash scene in the Hierarchy window should not look like the following screen excerpt:
- Save the scene by selecting menu item File | Save Scene.
You should now be able to open the Splash and Map scenes and play them without any issues. Try this now as a test to make sure that you moved everything around and it has all saved fine. As you run the scenes, you will notice that an EventSystem object gets dynamically added to the Map scene; that is fine and expected.