
Now that we have the new SQLite wrapper plugins, SQLite script, and other scripts imported, we will set up some services in our Catch scene in order to test them:
- From the menu, select GameObject | Create Empty. Rename this new object
Servicesand reset the transform to zero in the Inspector window. - Select the new
Servicesobject in the Hierarchy window and right-click (press control and click on a Mac) to open the context menu. From the context menu, select Create Empty. This will create a new empty child object attached to theServicesobject. Rename this new object Inventory in the Inspector window. - Repeat Step 2, but this time name the new object CUDLR.
- Select the
Inventoryobject in the Hierarchy window. From theAssets/FoodyGo/Scripts/Servicesfolder, drag theInventoryscript onto the Inventory object. - With the
Inventoryobject selected, review the Inventory component settings in the Inspector window, as follows:
Inventory Service component's default configuration
- The Inventory Service has some critical parameters that are explained here:
- Database Name: This is the name of the database. You should always use a
.dbextension, which is standard for SQLite databases. - Database Version: This sets the version of the database. The version should always be in the form major.minor.revision and should contain only numeric values. We will discuss how upgrading the database works in detail later.
- Database Name: This is the name of the database. You should always use a
- Select the
CUDLRobject in the Hierarchy window. From theAssets/CUDLR/Scriptsfolder, drag the Server script onto theCUDLRobject. If you missed Chapter 2, Mapping the Player's Location, and the section setting up the CUDLR console, please refer back to that chapter. - From the menu, select Window | Console. Drag and pin the Console window to just below the Inspector window.
- Press Play in the editor and run the Catch scene. You don't have to play the game; just review the output, as shown in the Console window:
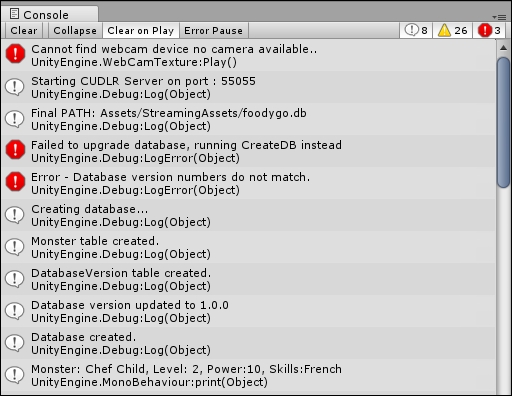
Console output showing a new database being created
- Your console output should match the output shown in the sample (except for the webcam error). As you can see in the output, the database is actually being created when the game starts.
- Stop running the game by clicking on the Play button again. Then, run the game again. Note that the Console window output is now different. The second time you ran the game, it didn't need to create a database because one was already created.
- Build and deploy your game to the mobile device. As always, ensure that you have configured the right scenes in your build settings. In this case, only the Catch scene should be checked for the build.
- While the game is running, open your browser and enter the
CUDLRaddress you used previously to connect to the console. If you are unsure how to do this, refer back to Chapter 2, Mapping the Player's Location, on setting upCUDLR. - The
CUDLRoutput should look very similar to the output you see in the Console window:
CUDLR output for creating a new database on Android devices
- If you don't see something similar on your
CUDLRoutput, then check the Plugin settings from preceding section or refer to Chapter 10, Troubleshooting. - Close the game on your device. Reopen the game and review the output again on the
CURLRconsole. Again, you should not see a new database created, since one is already created for the game.
..................Content has been hidden....................
You can't read the all page of ebook, please click here login for view all page.