
As described at the beginning of the chapter, players will sell their monsters by going to a place and then initiating a sale by clicking on a button. The place or restaurant will then examine the player's monsters and offer a price for what it considers the best. A player can then accept the offer by clicking on a Yes button or refuse by clicking on a No button. Even with this very simple workflow, there are still a lot of elements we will need to put together, most of which will be UIs.
We will break down building the UI into sections so that it is easier to follow. The first part we will work on is adding the UI canvas and the primary buttons by performing the following directions:
- From the menu, select GameObject | UI | Canvas. Rename the new canvas UI_Places. If you have been counting, that is our third canvas in the scene, with each rendering to a different space (Screen Space-Overlay, Screen Space-Camera and World Space).
- Select the new canvas, and in the Inspector window, change the Canvas Scaler component properties, as follows:
- Canvas Scaler: UI Scale Mode =
Scale with Screen Size - Canvas Scaler: Reference Resolution: X =
500, Y =900
- Canvas Scaler: UI Scale Mode =
- Right-click (press Ctrl and click on a Mac) on the
UI_Placesobject, and from the context menu, select UI | Button. Rename the new buttonSellButton. - Expand the
SellButtonin the Hierarchy window, and select theTextobject. Type delete to remove theTextobject from the button. - Select the
SellButtonin the Hierarchy window and type Ctrl + D (command + D on a Mac) to duplicate the button. Rename the new button ExitButton. - For each of the new buttons, change the component properties according to the following table:

That completes adding the buttons to interface. Don't worry about wiring up the buttons, yet. We will instead work to complete the rest of the UI elements needed in the scene. Next, we will construct the OfferDialog:
- Right-click (press Ctrl and click, on a Mac) on the
UI_Placescanvas in the Hierarchy window, and from the context menu, select UI | Panel. Rename the panel OfferDialog. This will be the parent object for all our dialog components. - Select the
OfferDialogpanel in the Hierarchy window, and then from the menu, select Component | Layout | Vertical Layout Group. Then, from the menu, select Component | UI | Effects | Shadow. - In the Inspector window, set the Rect Transform, Image, and Vertical Layout Group component properties, as shown in the next screenshot:

OfferDialog component properties
- Right-click (press Ctrl and click on a Mac) on the
OfferDialogin the Hierarchy window, and from the context menu, select UI | Panel. Rename the panelPromptPanel. - Select the
PromptPanelin the Hierarchy window and press Ctrl + D (command + D on a Mac) to duplicate the object. Do this two more times so that there are three new panels in total. Rename the new panels as follows:MonsterDetailPanel,OfferPanel, andButtonPanel. - Notice how the panels inside the layout group adjust to evenly fit the space. Now that you have an idea of how to add layouts and build a UI hierarchy, continue building the dialog, by following the table:
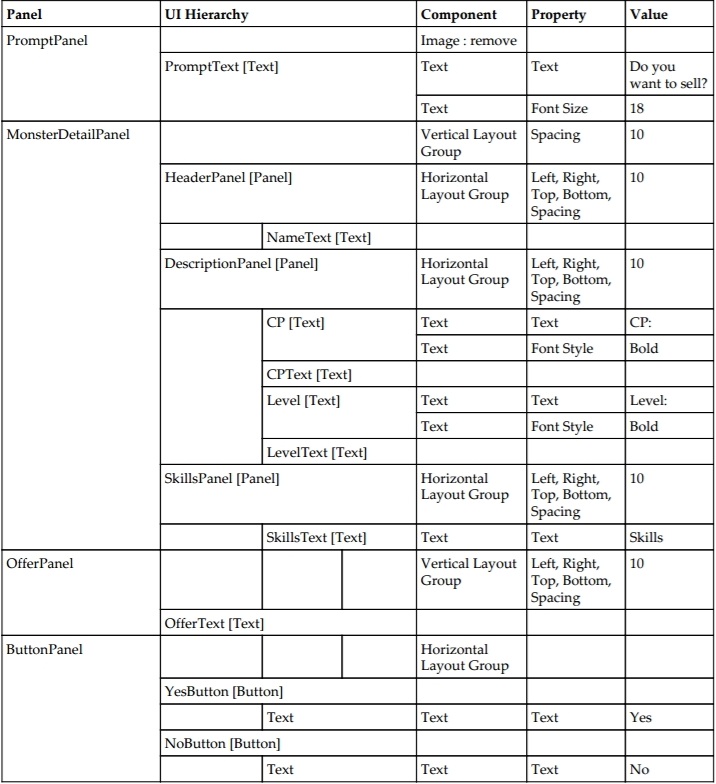
- Check whether your final construction matches the dialog and hierarchy:

Completed OfferDialog and object hierarchy
With the OfferDialog completed, we can quickly add the RefuseDialog by following the next directions:
- Select the
OfferDialogpanel in the Hierarchy window and press Ctrl + D (command + D on Mac) to duplicate the dialog. Rename the panelRefuseDialog. - In the Inspector window, change the Rect Transform - Height =
150. - Expand the
RefuseDialog, and delete theMonsterDetailPanelandOfferPanel. - Expand the
PromptPaneland then select thePromptTextin the Hierarchy window. In the Inspector window, change the Text - Text toThis place will not be making an offer for any of your current stock!. - Expand the
ButtonPanelin the Hierarchy window, and delete one of the buttons, it doesn't matter which. Rename the remaining button asOKButton. Expand the button, and select the childTextobject. In the Inspector window, change the Text - Text toOK. - Finally, drag the
UI_Placesobject onto thePlacesSceneobject in the Hierarchy window to make it a child of the scene root.
With the UI elements all constructed, we can now wire up all the scripts we need to complete the scenes selling interaction. Perform the following instructions to add the various component scripts:
- Drag the
PlacesSceneUIControllerscript from theAssets/FoodyGo/Scripts/Controllersfolder in the Project window onto theUI_Placesobject in the Hierarchy window. - Select the
UI_Placesobject and drag theSellButton,OfferDialogandRefuseDialogto each of the appropriatee slots on the Places Scene UI Controller component in the Inspector window. - Drag the
MonsterOfferPresenterscript from theAssets/FoodyGo/Scripts/UIfolder in the Project window onto theOfferDialogobject in the Hierarchy window. - Select the
OfferDialogobject and drag theNameText,CPText,LevelText,SkillsTextandOfferTextto each of the appropriate slots on the Monster Offer Presenter component in the Inspector window. - Drag the
PlacesSceneControllerscript from theAssets/FoodyGo/Scripts/Controllersfolder in the Project window onto thePlacesSceneroot object. - Select the
PlacesSceneobject and drag theStreeViewTexturePanel,PlacesMarker, andUI_Placesobjects to the appropriate places on the Places Scene Controller component in the Inspector window, as shown in the following screenshot:
The Places Scene Controller component object settings
- Select the
ExitButtonin the Hierarchy window, and then in the Inspector window, add a new event handler by pressing the plus. Then, drag thePlacesSceneobject onto the object slot and then open the function dropdown. Select the PlacesSceneController.OnCloseScene function, as follows:
The ExitButton event handler configuration
- Repeat the process for the
SellButton, but this time select the PlacesSceneController.OnClickSell function from the function dropdown. - Select the
YesButtonand add a new event handler. Drag theUI_Placesobject into the object slot, and select thePlacesSceneUIController.AcceptOffer()for the function. - Select the
NoButtonand add a new event handler. Drag theUI_Placesobject into the object slot, and select thePlacesSceneUIController.RefuseOffer()for the function. - Select the
OKButtonand add a new event handler. Drag theUI_Placesobject into the object slot, and select thePlacesSceneUIController.OK()for the function.
That finishes wiring up the scene. Now, we just need to add a couple of services in order to run the Places scene by itself. Perform the following directions to add the services:
- Create a new empty game object called
Servicesin the scene. Drag it onto thePlacesSceneobject in order to make it a child of the root scene object. - Add two new child objects to the
Servicesobjects calledInventoryandMonsterExchange. - Drag the
InventoryServicescript onto theInventoryobject and theMonsterExchangeServicescript onto theMonsterExchangeobject from theAssets/FoodyGo/Scripts/Servicesfolder in the Project window. - Press Play to run the scene, and try clicking on the Sell button and various other buttons. As you will notice, you can't actually sell a monster yet, but the UI should all be working as expected, except for the
ExitButton, of course.
That completes all the required UI elements for the scene, which as you have seen is quite a lot for a simple scene. The UI is still very basic, and it will be left up to you, the developer, to extend and make your own later. Feel free to explore and change the UI dialogs the way you like. You may also notice that we do not provide feedback to the player if they do sell items. That is left up to the developer to incorporate a new dialog or sound as they see fit.
In the next section, we will get into how the monsters are evaluated by taking a closer look at the MonsterExchangeService.