
Now that we have our player moving around the real and virtual world, it is time to get into other aspects of our game. If you recall, in Foody GO, players need to catch the foody monsters. Foody monsters are genetically engineered lab accidents. These monsters now wander everywhere and also happen to be amazing cooks and chefs. After a monster is caught, the player can train it to be a better cook or take it to restaurants to work and earn points. With that bit of background established, in this chapter we will work toward spawning and tracking the monster creatures around the player.
This chapter will be a mix of working with Unity and writing or editing new scripts. The design of our game is unique enough that we cannot rely on standard assets anymore. Also, we have previously avoided the complexities of GIS and GPS math in order to not bog us down. Instead, we opted to only briefly mention the GIS library functions. Fortunately, you should have enough basic GIS knowledge now to take your learning to the next level and get into the math. If math isn't your subject, that is fine, as we will also be covering the following topics:
- Creating a new monster service
- Understanding distance in mapping
- GPS Accuracy
- Checking for Monsters
- Projecting coordinates to a 3D world space
- Adding a Monster to the Map
- Building the monster prefab
- Tracking monsters in the UI
Before we get into it, if you have Unity from the last chapter opened, with the game project loaded, then move on to the next section. Otherwise, open up Unity and load the FoodyGO game project or open the Chapter_4_Start folder from the downloaded source code. Then, ensure that the Map scene is loaded.
When you open up one of the saved project files, you will also likely need to load the starting scene. Unity will often create a new default scene rather than trying to guess which scene should be loaded.
Since we need a way to track the monsters around the player, what better way to do this than with a new service? The monster service will need to accomplish a few jobs, as follows:
- Track the players location
- Query for monsters in the vicinity
- Track monsters within range of the player
- Instantiate a monster when it is close enough to the player
For now, our monster service will only query and track monsters local to the player's device. We are not creating a monster web service where multiple players will consume and see the same monsters, yet. However, in Chapter 7, Creating the AR World, we will convert our service to use an external service to better populate our monsters. Open up Unity and follow these directions to start writing the new service script:
- In the Project window, open the
Assets/FoodyGo/Scripts/Servicesfolder. Right-click (press Ctrl and right-click on a Mac) to open the context menu and select Create | C# Script to create a new script. Rename the scriptMonsterService. - Double-click on the new
MonsterService.csfile to open it inMonoDevelopor the code editor of your choice. - Just after the usings and before the class definition, add the following line:
namespace packt.FoodyGO.Services { - Scroll down to the end of the code and finish the namespace by adding an ending:
}
- As you may recall, we added a namespace to our code in order to name conflicts and for organization.
- Just inside the class the definition, add a new line:
public GPSLocationService gpsLocationService;
- That line allows us to add a reference to our GPS service in the editor. Remember, we want to track the player's location also. After you are done with editing, save your file.
- Confirm that your script now looks like the following:
        using UnityEngine;
        using System.Collections;

        namespace packt.FoodyGO.Services
        {
            public class MonsterService : MonoBehaviour
            {
                public GPSLocationService gpsLocationService;
                // Use this for initialization
                void Start()
                {

                }

                // Update is called once per frame
                void Update()
                {

                }
            }
        }
Now, we will add the new script to a new MonsterService game object in the Hierarchy window using the following steps:
- Go back to Unity and make sure that the Map scene is loaded.
- Select and expand the Services object in the Hierarchy window.
- Right-click (press control and right-click on Mac) on the Services object, to open the context menu and select Create Empty to create a new empty child object.
- Select and rename the new object Monster in the Inspector window.
- Open the
Assets/FoodyGo/Scripts/Servicesfolder in the Project window. - Drag the new
MonsterServicescript and drop it onto the new Monster object. - Select the Monster object in the Hierarchy window.
- Drag the GPS object, also under the Services object, to the
Gps Location Service
slot for the
Monster Servicescript component on the Monster object in the Inspector window. The following screenshot shows what this will look like: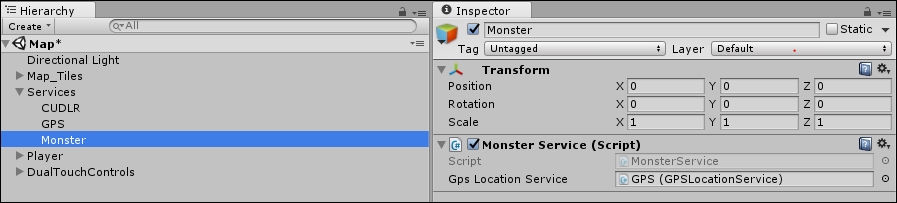
Monster service added and configured
Obviously, we have a number of things left to do, but this is a good first step in adding our new Monster Service. In the next section, we will get into the math behind calculating distances and world position. After that, we will get back to adding more functionalities to our new service.
In the previous chapters, we didn't have to worry about distance because we were only working with a fixed point, that is, the player's position. Now, we want the player to search out and find monsters. We want our Monster service to determine whether a monster is close enough to be seen or heard. In order to do that, our Monster service needs to be able to calculate distance between two mapping coordinates: the player's position and the monster's hiding location.
You may ask, "Why is that so difficult, doesn't Unity do that all the time?" The answer is yes and no. Unity is great at calculating linear distances between two points in 2D and 3D space. However, remember that our mapping coordinates are actually in decimal degrees around a sphere, the earth. In order to properly calculate the distance between two points on a sphere, we need to draw a line on the sphere and then measure the distance. Here is a diagram that hopefully should explain that better:

Measuring the distance between two points on a sphere
As the preceding diagram shows, we are measuring the arc and not the straight line distance between coordinate points P and Q. As an exercise, think about measuring the distance between u and v in the diagram. Imagine you were flying around the world from city at point u to city at point v. Which method would you hope your airline used to calculate the fuel?
In order to correctly find the distance between two map coordinate locations, we use a formula called the haversine, as shown in the following diagram:

After a little algebraic manipulation, the preceding formula reduces to the form:

haversine formula for distance
If you are not a mathematician, at this point, your eyes may be closing or maybe struggling to continue on, for fear of your head exploding. Well, not to worry. As intimidating as those equations look, getting that formula into code is quite simple. The trick is to not get overwhelmed and just break it down bit by bit. As for you mathematicians, apologies for not going further into the details of the equation but the rest of us are sure that you can work that out on your own. So, let's get started and get that formula into a new Math library:
- In the Project window, go to the
Assets/FoodyGo/Scripts/Mappingfolder. - Right-click (press Ctrl and right-click on a Mac) on the
Mappingfolder to open the context menu and select Create | C# Script . Rename the scriptMathG. - Double-click on the new
MathGscript to open it in MonoDevelop or the preferred editor of your choice. - Add the namespace by inserting the following line after the using statement:
namespace packt.FoodyGO.Mapping { - Remember to close the namespace by adding an end brace
}to the last line. - Change the class definition to match the following:
public static class MathG { - Since this is a library, we marked the class static and removed the
MonoBehaviour. - Delete the
StartandUpdatemethods completely. - Add new using statement for system, as follows:
using system;
- At this point, your base library should look like this:
        using UnityEngine;
        using System.Collections;
        using System;

        namespace packt.FoodyGO.Mapping
        {
            public static class MathG
            {

            }
        }
If you are new to scripting or scripting in Unity then it is highly recommended that you follow the coding exercise. There is no better way to learn scripting than to just do it. However, if you are an old pro or just prefer to read through the chapters and look at the code later, then that is also fine. Just open the Chapter_4_Asset folder from the downloaded source code, and all the completed scripts will be there.
The base new library MathG is ready; let's add the haversine distance function, as follows:
- Create a new method inside the
MathGclass by typing:public static float Distance(MapLocation mp1, MapLocation mp2){} - Inside the
Distancemethod enter the following first line of code:double R = 6371; //avg radius of earth in km
- Next, we enter some more initialization code:
        //convert to double in order to increase
        //precision and avoid rounding errors
        double lat1 = mp1.Latitude;
        double lat2 = mp2.Latitude;
        double lon1 = mp1.Longitude;
        double lon2 = mp2.Longitude;
- After the latitudes or longitudes have been converted from float to double, we calculate the difference and convert the values to radians. Most trigonometric math functions require input as radians and not degrees. Enter the following code:
        // convert coordinates to radians
        lat1 = deg2rad(lat1);
        lon1 = deg2rad(lon1);
        lat2 = deg2rad(lat2);
        lon2 = deg2rad(lon2);

        // find the differences between the coordinates
        var dlat = (lat2 - lat1);
        var dlon = (lon2 - lon1);
- Calculate the distance using the haversine formula by entering the code:
        // haversine formula
        var a = Math.Pow(Math.Sin(dlat / 2), 2) + Math.Cos(lat1) *                     Math.Cos(lat2) * Math.Pow(Math.Sin(dlon / 2), 2);
        var c = 2 * Math.Atan2(Math.Sqrt(a), Math.Sqrt(1 - a));
        var d = c * R;
- As you can see, the formula is broken down to a few lines of code for simplicity. There is nothing especially difficult. Finally, we return the value from the function converted back to float and in meters. Enter the last line in the method:
        //convert back to float and from km to m
        return (float)d * 1000;
- Lastly, we need to add a new method to convert the degrees to radians. If you noticed, we used it in the preceding code. Just below the
Distancemethod, enter the following method:public static double deg2rad(double deg) { var rad = deg * Math.PI / 180; // radians = degrees * pi/180 return rad; } - After the
gpsLocationServicedeclaration, add the following line:private double lastTimestamp;
- Then, add the following code in the
Updatemethod:if (gpsLocationService != null && gpsLocationService.IsServiceStarted && gpsLocationService.PlayerTimestamp > lastTimestamp) { lastTimestamp = gpsLocationService.PlayerTimestamp; var s = MathG.Distance(gpsLocationService.Longitude, gpsLocationService.Latitude, gpsLocationService.mapCenter.Longitude, gpsLocationService.mapCenter.Latitude); print("Player distance from map tile center = " + s); } - Most of that code should look familiar by now. The if statement does the same set of tests to make sure that the GPS Location Service is running and has new data points. When it does have new data points, we calculate the distance from the current latitude or longitude and the current map origin. Then, we use print to output the results.
- One last thing we need to do is add a new using at the top file to include our new
MathGfunctions:using packt.FoodyGO.Mapping;
- After you finish editing, make sure that all the scripts are saved and then return to Unity editor. Wait for a few seconds, to let the script updates compile. Make sure that you have the GPS Service set to simulate and then press the Play button to start testing.
If you jumped here from another part of the book or just forgot how to enable GPS simulation, refer to the section on the GPS Location Service in Chapter 3, Making the Avatar.
- As the game is running in the editor, open the Unity Console window by selecting Window | Console .
- Drag the Console window tab and attach it to the bottom of the
Inspector
window. Here is the screenshot:
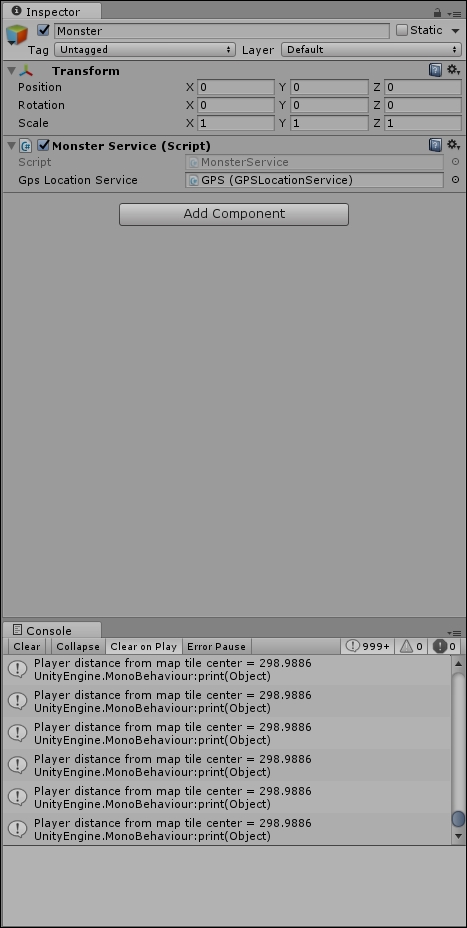
Console window placement
- You should be seeing the distance the player is from the map tile center in meters. For our current configuration, a single map tile represents an area of roughly 600 x 600 meters. So, our character should never get more than 300 meters away from the center, in any direction before the map redraws itself. If your distances are vastly different, then check the
MathG.Distancefunction and make sure that you typed the code correctly. - Build and deploy the game to your mobile device. Run the game from your mobile device and attach the CUDLR console. Walk around your house or within Wi-Fi range and see what distances you are getting.
When you walked around your house or the Wi-Fi area, you likely noted that the distances were inaccurate or changed unexpectedly. That inaccuracy is the result of the GPS on your device doing its best to calculate the best possible position using satellite triangulation. As you saw, your device may struggle at times to give an exact location. Since this is important for you to understand as a GPS and mapping developer, we will get into the details of this in the next section.
In Chapter 2, Mapping the Player's Location, when we introduced the concept of GPS tracking, we only briefly mentioned how satellite triangulation worked and what GPS accuracy is. At that time, adding the extra level of detail would have been just information overload and we didn't have a good example to demonstrate GPS accuracy. Now, as you just saw in the last section, GPS accuracy will have an impact on the way the player interacts with the world. As such, let's take a moment to understand how a GPS calculates the location.
A GPS device uses a network of 24-32 satellites orbiting the earth called the Global Navigation Satellite System (GNSS) network. These satellites revolve around the earth every 12 hours and transmit their time-encoded location in microwave signals. The GPS device then receives these signals from the satellites it has a clear line of sight to. GPS software on the device uses these readings to calculate distance and use trilateration to find its own location. The more satellites a GPS can see the more accurate the calculation will be.
The following diagram shows how trilateration works:
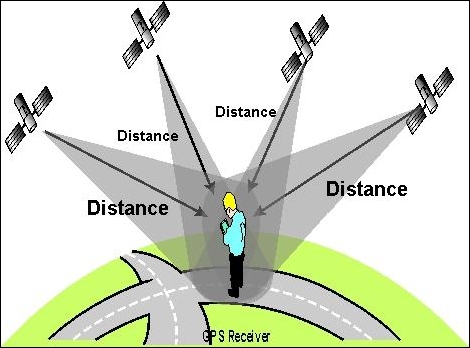
Trilateration of location
Astute readers may have noticed that we switched from using triangulation to using trilateration. That is intentional; triangulation uses angles to determine location. As you can see in the preceding diagram, a GPS actually uses distances. Therefore, the correct and more specific term is trilateration. If you are trying to explain GPS accuracy to your friends though, you still may find the need to use the term triangulation.
At this point, you may be thinking to yourself, aside from the math, if we can see a lot of satellites and can calculate the distances accurately, then our accuracy should be really high. That is true, but there are a number of factors that can skew the calculations. Here is a list of things that can interfere with measuring distances in GPS tracking:
- Satellite clock offsets: Satellites use atomic clocks guaranteed to a certain level of precision for the public. Offsets are introduced by the U. S. military in order to intentionally reduce accuracy.
- Atmospheric conditions: Weather and cloud cover can impact signals.
- GPS receiver's clock: The accuracy of the device's clock will play a major part in accuracy. A mobile phone, for instance, does not have an atomic clock.
- Signal blockage: Satellite signals can be blocked by tall buildings, walls, roofs, overpass, tunnels, and so on.
- Electromagnetic fields: Power lines and microwaves can have an impact on signal path.
- Signal bounce: The worst problem for GPS tracking is signal bounce. Signals can bounce off buildings, metal walls, and more.
The following diagram demonstrates examples of signal problems:
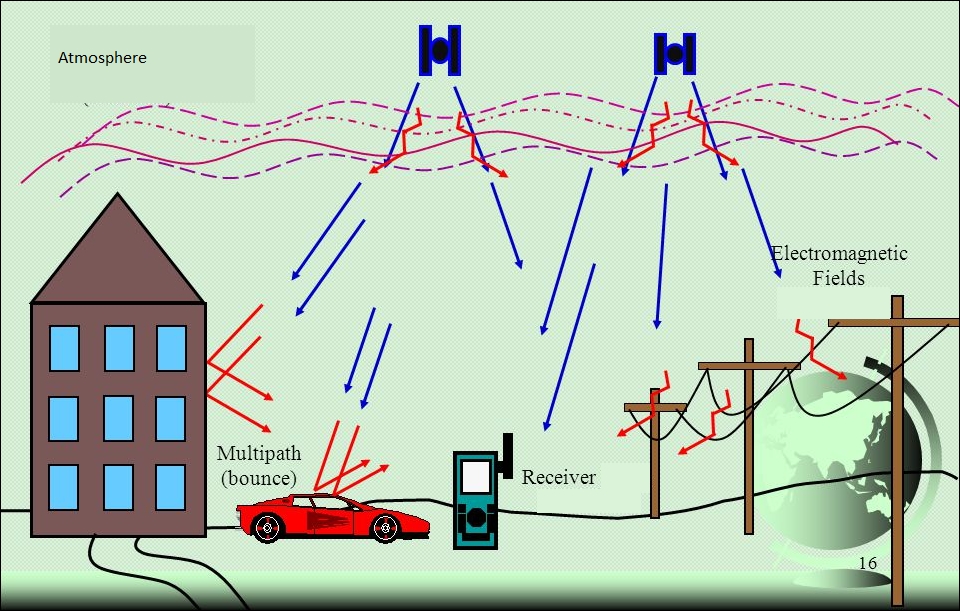
Example of GPS signal problems
Understanding why a device may not be as accurate as it should be can go a long way towards helping you understand problems when you are out testing the game. Try running the game again and wander around your house or the Wi-Fi area with CUDLR connected to your development machine. Check whether you understand why the device may be giving some inaccuracy in the location.
So, now we know that our device is only accurate up to a point. Fortunately, there is an accuracy measure returned from each new location acquisition. This accuracy value will essentially give us the radius of error in meters for the reported calculation. Let's test it out by performing the following:
- Open the
Assets/FoodyGo/Scripts/Servicesfolder in the Project window and double-click on theMonsterServicescript to open it in the script editor of your choice. - Change the print line in the
Updatemethod to match the following:print("Player distance from map tile center = " + s + " - accuracy " + gpsLocationService.Accuracy); - Save the script when you have done editing and return to the Unity editor. Wait for a few seconds for the scripts to recompile.
- Build and deploy the game to your device. Attach CUDLR and test the game again by wandering around your house or the Wi-Fi area.
You most likely noticed that a value of around 10 was returned for accuracy. There may have been some other strange values, possibly values in the range of 500 or 1,000. The reason the accuracy defaults to around 10 is because that is the default setting when the GPS service starts. It also happens to be the typical accuracy for a wide range of mobile devices equipped with GPS. As technology advances, the typical GPS accuracy on newer mobile devices is closing to around three meters.
Since players in our game will be searching on foot, we want the GPS updates and accuracy to be calculated at the best possible resolution. Players would get quickly frustrated if they had to walk several meters in a direction only to find that they traveled the wrong way. Let's change the default accuracy for the GPS Location Service by following these steps:
- In the Unity editor, select and expand the Services object in the Hierarchy window.
- Select the GPS object, and then in the
Inspector
window click on the gear icon next to the GPS Location Service (Script) to open the context menu. Select
Edit Script
from the menu. The following screenshot shows the gear icon and menu:

Gear icon context menu to select Edit script
- You will be directed to the script editor of your choice with the
GPSLocationServicescript open. - Add the following variable declarations and header attribute to just below the
OnMapRedrawevent declaration:public event OnRedrawEvent OnMapRedraw; //add code after this line [Header("GPS Accuracy")] public float DesiredAccuracyInMeters = 10f; public float UpdateAccuracyInMeters = 10f; - Scroll down to the
StartServicemethod and edit theInput.Location.Start()call to this:// Start service before querying location Input.location.Start(DesiredAccuracyInMeters, UpdateAccuracyInMeters);
- After you are done with editing, save your script. Return to the Unity editor and wait for the recompilation.
- Select the GPS object in the Hierarchy window. In the Inspector window, you should now see the new heading and properties that we just added. Change both of the accuracy settings to 1 from 10.
- Build and deploy the game to your mobile device.
- After the game starts running on the mobile device, attach the CUDLR console. Move around your house or Wi-Fi area and check the CUDLR console and note any changes in the results.
Hopefully, your device supports better accuracy than 10 meters, and you may have noticed a flood of new GPS updates come in. If you are seeing those updates, you will also notice that the reported accuracy has likely decreased to a number smaller than 10. For those readers unable to see a change, perhaps you can convince a friend with a newer device to test the game.
Unfortunately, as great as it is having our device now report updates every couple of meters, those more frequent updates come at a price, battery power. The GPS uses a lot of power to constantly receive satellite signals and perform distance and trilateration calculations. By requesting more frequent updates, it is likely the battery on a device will drain quicker. As a game developer, you will need to decide what accuracy works best for your game.