
Much like the Catch scene we created earlier, which used the camera as a backdrop, we want to use a real-world element as the background. Instead of the camera, this scene will use Google Street View. Street View will be able to provide an interesting backdrop for the scene without using the camera.
Before we get started, you will need to create a Google Maps API key similar to what you did in the previous chapter. Follow this URL to the Google Street View Image API to generate a developer key as you did previously: https://developers.google.com/maps/documentation/streetview/.
Click on the GET A KEY button at the top of the page, and follow the process as you did before to generate a key.
After you have generated your developer key, perform the following directions to set up the backdrop with the Google Street View Image API:
- From the menu, select Assets | Import Package | Custom Package... to open the Import package dialog. From the dialog, navigate to the downloaded source code
Chapter_8_Assetsfolder. Select theChapter8_import1.unitypackageand click on Open. - After the Import Unity Package dialog opens, just make sure that everything is selected and click on Import.
- Select the
Panelobject in the Hierarchy window. Then, in the Inspector window, delete the Image component by clicking on the gear icon beside the component and selecting Remove Component from the context menu. - From the menu, select Component | UI | Raw Image. This will add a new Raw Image component to the
Panel. Rename the panelStreeViewTexturePanel. - From the
Assets/FoodyGo/Scripts/Mappingfolder in the Project window, drag theGoogleStreetViewTextureonto theStreetViewTexturePanelobject in the Hierarchy or Inspector window. - In the Inspector window, set the properties of the Google Street View Texture component to the values, as follows:

Google Street View Texture component configuration
- Press Play to run the game in the editor and notice how the background is now the street outside the Google office.
- From the menu, select File | Build Settings..., and click on the Add Open Scenes button to add the
Placesscene to Scenes in Build. Then, uncheck the other scenes, as shown in the Build Settings dialog: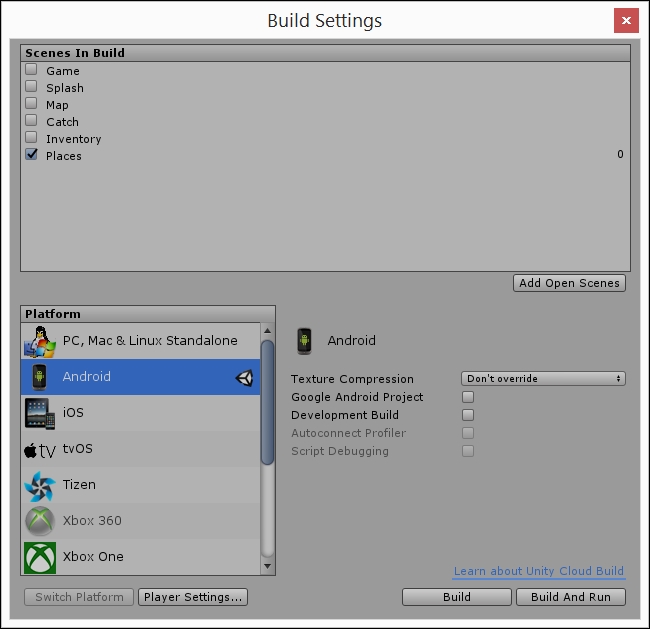
Updated build settings for running the Catch scene on a device
- Build and deploy the game to your mobile device. As the scene is running, rotate the device and watch as the background changes. The background changes to match the heading on the phone.
Using the Google Street View Image API is great as a background texture when the player engages in areas mapped by Street View. However, not all locations (latitude/longitude) will have Street View imagery. This could be fixed by changing the background for locations with no imagery, but we will leave it as is for now.
The GoogleStreetViewTexture script works much like to the Google Places and Google Maps API scripts we developed earlier. Let's open up the script and take a look at the main method that does the query, as follows:
IEnumerator LoadTexture()
{
    var queryString = string.Format("location={0}&fov={1}&heading={2}&key={3}&size={4}x{5}&pitch={6}", location.LatLong, fov, heading, MapsAPIKey, size.x, size.y, pitch);

    var req = new WWW(GOOGLE_STREET_VIEW_URL + "?" + queryString);
    //yield until the service responds
    yield return req;
    //first destroy the old texture first
    Destroy(GetComponent<RawImage>().material.mainTexture);
    //when the image returns set it as the tile texture
    GetComponent<RawImage>().texture = req.texture;
    GetComponent<RawImage>().material.mainTexture = req.texture;
}
As mentioned, this looks very similar to the other code we used earlier to access the other Google APIs. So, the main thing we will focus on is the query parameters getting submitted to the API:
location: This is the latitude and longitude coordinates separated by a comma. Later, when we connect this script to the GPS service, it will populate these values automatically.fov: This is the field of view, in degrees, of the image, which essentially equates to zoom. We use a value of 60, which represents a reasonable narrow view of our world in order to match the device's screen dimensions.heading: This is the compass heading in degrees north. We allow the compass heading of the device set this value if the option is enabled, otherwise 0.size: This is the size of the requested image. The maximum size is 640 x 640. We use a value of 430 x 640 because of the portrait view.pitch: This is the angle above or below the horizon. Values can range from -90 to 90. We use a value -4 to get a bit of the ground in the Street View images.key: This is the API key you generated for the Google Street View API.
Feel free to review the rest of the GoogleStreetViewTexture script on your own. You will find the rest of the code similar to what we did in the Google Places and Maps scripts. In the next section, we will cover additional queries against the Google Places API.