
When we implemented the new CRUD operations for storing our monsters in the Inventory, we broke the existing CatchSceneController script. If you recall, we deleted the old sample CreateMonster method and wrote a new method to just create a monster entry in the database. This means that not only do we need to fix our updated code, but we also need a way to instantiate new random monster properties.
As usual, before we fix the scene controller, let's address the matter of creating new random monster properties. The ideal solution here is to create a simple static class called a MonsterFactory that will randomly build the monsters. Follow the directions to build our new MonsterFactory script:
- Right-click (press Ctrl and click on a Mac) the
Assets/FoodyGo/Scripts/Servicesfolder in the Project window. From the context menu, select Create | C# Script. Rename the scriptMonsterFactory. - Double-click on the new script to open it in the editor of your choice.
- Edit the file so that the script matches the following:
using packt.FoodyGO.Database; using UnityEngine; namespace packt.FoodyGO.Services { public static class MonsterFactory { } } - We virtually stripped out the start-up script because we just want a simple
static class. - Next, we will add a list of random names that we will conjugate into a monster name. Add the following field just inside the class:
public static class MonsterFactory { public static string[] names = { "Chef", "Child", "Sous", "Poulet", "Duck", "Dish", "Sauce", "Bacon", "Benedict", "Beef", "Sage" }; - Feel free to add as many other names as you want to the list; just remember that you should follow every entry with a comma, except for the last one.
- After this, we will create a few other fields to hold skills and other maximum properties:
public static string[] skills = { "French", "Chinese", "Sushi", "Breakfast", "Hamburger", "Indian", "BBQ", "Mexican", "Cajun", "Thai", "Italian", "Fish", "Beef", "Bacon", "Hog", "Chicken" }; public static int power = 10; public static int level = 10; - Just like the names list, feel free to add your own entries to the skills list, as well. Keep in mind that a skill is like a specialty in a cuisine or food product. We will use the skills later in the game when we send our monsters to restaurants in order to find jobs.
- With the properties out of the way, we will now get down to write the
CreateRandomMonstermethod and helpers:public static Monster CreateRandomMonster() { var monster = new Monster { Name = BuildName(), Skills = BuildSkills(), Power = Random.Range(1, power), Level = Random.Range(1, level) }; return monster; } private static string BuildSkills() { var max = skills.Length - 1; return skills[Random.Range(0, max)] + "," + skills[Random.Range(0, max)]; } private static string BuildName() { var max = names.Length - 1; return names[Random.Range(0, max)] + " " + names[Random.Range(0, max)]; } - The code is fairly straightforward, but we will review a few things. We use
Random.Rangein the main method and helpers (BuildName,BuildSkills) to provide a random range of values. For the name and skills helper methods, those random values are used as an index into thenamesorskillsarrays to return a string value. The random values are then combined into either a name- or comma-separated set of skills. - The
PowerandLevelproperties are easily set again using theRandom.Rangemethod. Use a value of1, the start, to the maximum property value we set above. - As always, when you are done with editing the script, save it.
- Open up the
CatchSceneControllerscript in the Unity editor from theAssets/FoodyGo/Scripts/Controllersfolder. - Select and delete the
Startmethod at the top of the file. We will be rewriting the code, as follows:void Start() { var m = MonsterFactory.CreateRandomMonster(); print(m); } - These couple of lines of code mean that, when the
CatchScenebecomes initialized, a new, random monster will be generated. - After you are done with editing, save the file and return to the Unity editor. Wait for the scripts to compile and then press Play, to start the scene. Check out the Console window for the output of the new monster properties, and you will see more random values, as shown in the following sample:
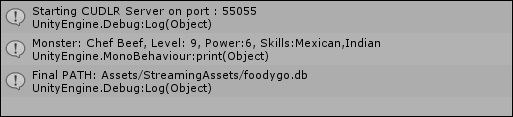
Example of randomly generated monster properties in the Console
So, now when the CatchScene starts, random monsters will be created for the player to catch. However, we want the monsters attributes to determine how easy or difficult it is for the player to catch them. What we need to do is add some code that makes the monster more difficult to catch and a way for them to escape. Perform the following to add some difficulty to the CatchScene:
- The first thing we will do is add some new fields to the
CatchSceneControllerscript. Open theCatchSceneControllerscript from theAssets/FoodyGo/Scripts/Controllersfolder. - After the existing fields and just above the
Awakemethod, add the new fields:public Transform escapeParticlePrefab; public float monsterChanceEscape; public float monsterWarmRate; public bool catching; public Monster monsterProps;
escapeParticlePrefabwill be our particle effect when the monster escapes.monsterChanceEscapedetermines the chance of escape.monsterWarmRatesets how quickly the monster warms after being hit.catchingis just aboolvariable we will use to exit from a loop. Finally,monsterPropsstores the randomly generated monster properties.- Change the code in the
Awakemethod, to the following code:monsterProps = MonsterFactory.CreateRandomMonster(); print(monsterProps); monsterChanceEscape = monsterProps.Power * monsterProps.Level; monsterWarmRate = .0001f * monsterProps.Power; catching = true; StartCoroutine(CheckEscape());
- First, we store the new random monster properties in a variable called
monsterProps. Then, as you can see by the code, we derive the escape chance by multiplying the monster's power and level together. After we modify that warm rate by multiplying a base value by the power. (Don't worry too much about the hardcoded.0001ffor now.) Then, we set ourcatchingstate totrueand finally, start a coroutine calledCheckEscape. - Now, add the
CheckEscapecoroutine, as follows:IEnumerator CheckEscape() { while (catching) { yield return new WaitForSeconds(30); if (Random.Range(0, 100) < monsterChanceEscape && monster!= null) { catching = false; print("Monster ESCAPED"); monster.gameObject.SetActive(false); Instantiate(escapeParticlePrefab); foreach (var g in frozenDisableList) { g.SetActive(false); } } } } - Inside the
CheckEscapecoroutine, there is a while loop that will keep running as long ascatchingistrue. The first statement inside the loop yields or effectively pauses the loop for30seconds, which means the contents of thewhileloop will only run every30seconds. After that pause, there is a test to check whether a random value from0-100is less than ourmonsterChanceEscape. If it is, and the monster (MonsterController) is not null, the monster escapes. - When the monster escapes, a few things happen. First, we set the
catchingstate tofalse, which stops the loop. Next, we print a message to the Console, always a good practice. After this, we disable themonster.gameobject, instantiate that escape particle, and finally, disable the scene items. In order to disable the scene items, we iterate over thefrozenDisableList. - Just inside the if statement of the
OnMonsterHitmethod, enter the new line of code highlighted:monster = go.GetComponent<MonsterController>(); if (monster != null) { monster.monsterWarmRate = monsterWarmRate; - This line just updates the monster (
MonsterController)monsterWarmRateto the same value we calculated above in theAwakemethod. - While still in the
OnMonsterHitmethod, add a couple more lines just after theprint("Monster FROZEN");statement, as highlighted:print("Monster FROZEN"); //save the monster in the player inventory InventoryService.Instance.CreateMonster(monsterProps); - This line of code just saves the monster properties or monster object to the database inventory after they have been caught. Remember, we need to use the
CreateMonstermethod when we are adding a new monster to the inventory. - After you have done editing, save the file and return to the Unity editor. Ensure that the code compiles without issue.
- Before we can test the changes, we need to create and add a new
escapeParticlePrefabto theCatchSceneController. - From the
Assets/Elementals/Prebabs(Mobile)/Firefolder in the Project window, drag theExplosionprefab into the Hierarchy window and drop it. You will see the explosion particle effect play in the scene. - Select the
Explosionobject in the Hierarchy window. Rename the object to EscapePrefab and set the Transform component Z position to-3. - Now, drag the
EscapePrefabobject into theAssets/FoodyGo/Prefabsfolder to create a new prefab. The reason we created a new prefab is because we changed the default position of the object relative to our scene. - Delete the
EscapePrefabfrom the scene by selecting it in the Hierarchy window and pressing the delete key. - Select the
CatchSceneobject in the Hierarchy window. Drag theEscapePrefabfrom theAssets/FoodyGo/Prefabsfolder onto the empty Escape Particle Prefab slot on the Catch Scene Controller component in the Inspector window. - Save the scene and project. Press Play in the editor window to run and test game. Try playing the scene a few times and notice the difference in how easy or difficult it is to catch a monster now. Notice that monsters at the higher-power levels are now impossible to catch. Not to worry, we will offset that later when we add different freeze level balls to a new inventory section in a future chapter.
- Of course, build and deploy the game to your mobile device and test. As it is right now, it appears the scene just hangs when the monster escapes or is caught. We will fix that later within the
GameManagerwhen we wire everything together.
Thus far, we now have the MonsterFactory generating us random monsters. The monster attributes set the difficulty level on the Catch scene. Then, when the monster is caught, we store its attributes in the new InventoryService within the SQLite database. Sounds like our next task is to build the UI for the Inventory, which we will get to in the next section.