
Great, now that we understand how to determine distance and how GPS accuracy can alter trilateration of location, it is time to start tracking the monsters around the character. For now, we will use a simple method to randomly place monsters around the player. In a future chapter, we will locate monsters with the help of a web service.
At this point, we have already covered a fair amount of scripting, and we have more to do by the end of the chapter. Also, the scripting changes we need to make are more intricate and prone to mistakes. So, in order to avoid putting you through that turmoil, we will import the next section of changes. For the rest of this chapter, we will switch between manual edits and script imports wherever appropriate. Perform the following instructions to do the first script asset import:
- From the Unity editor menu, select Assets | Import Package | Custom Package...
- When the Import package... dialog opens, navigate to where you placed the book's downloaded source code and open the
Chapter_4_Assetsfolder. - Select the
Chapter4_import1.unitypackagefile to import and click on the Open button. - Wait for the Import Unity Package dialog to display. Ensure that all the scripts are selected and click on the Import button.
- Open the FoodyGo folder in the Project window and browse through the new scripts.
Let's open up the new MonsterService script in your code editor and take a look at what has changed:
- Find the
MonsterServicescript in the Project window and double-click on it to open it in your code editor. - At the top of the file, the first thing you may notice is that some new using statements and a few new fields have been added. Here is an excerpt of the new fields:
[Header("Monster Spawn Parameters")] public float monsterSpawnRate = .75f; public float latitudeSpawnOffset = .001f; public float longitudeSpawnOffset = .001f; [Header("Monster Visibility")] public float monsterHearDistance = 200f; public float monsterSeeDistance = 100f; public float monsterLifetimeSeconds = 30; public List<Monster> monsters; - As you can see, new fields have been added to control monster spawning and at what distances monsters can be seen or heard. Finally, we have a list variable that is holding a new Monster type. We won't spend time looking at the Monster class since it is only a data container at this time.
- Next, scroll down to the
Updatemethod and note that the distance test code was removed and replaced withCheckMonsters().CheckMonstersis a new method we added to spawn and check the current state of the monsters. - Scroll down to the
CheckMonstersmethod. The following is the first section of that method:if (Random.value > monsterSpawnRate) { var mlat = gpsLocationService.Latitude + Random.Range(-latitudeSpawnOffset, latitudeSpawnOffset); var mlon = gpsLocationService.Longitude + Random.Range(-longitudeSpawnOffset, longitudeSpawnOffset); var monster = new Monster { location = new MapLocation(mlon, mlat), spawnTimestamp = gpsLocationService.PlayerTimestamp }; monsters.Add(monster); } - The first line of this method does a check to determine whether a new monster should be spawned. It does this using the Unity Random.value, which returns a random value from 0.0-1.0 and comparing this with the
monsterSpawnRate. If a monster is spawned, new latitude or longitude coordinates are calculated from the current GPS location and random range +/- the spawn offsets. After that, a new monster data object is created and added to the monsters list. - Scroll down a little more, and you will see that the player's current location is converted to a
MapLocationtype. We do this in order to speed up calculations. In game programming, store everything you may need later and avoid creating new objects. - In the next line, there is a call to a new Epoch type and storing the result to now. Epoch is a static utility class that returns the current Epoch time in seconds. This is the same time scale Unity uses to return the timestamps from the GPS device.
Epoch or Unix time is a standard for time measurement defined as the number of seconds that have elapsed since 00:00:00 time, which is 1, 1, 1970.
- Next in the script is a
foreachloop that checks whether the distance from the monster or player is under the see or hear threshold. If the monster is seen or heard, a print statement outputs the state and distance to the player. The entire remaining section of code is as follows://store players location for easy access in distance calculations var playerLocation = new MapLocation(gpsLocationService.Longitude, gpsLocationService.Latitude); //get the current Epoch time in seconds var now = Epoch.Now; foreach (Monster m in monsters) { var d = MathG.Distance(m.location, playerLocation); if (MathG.Distance(m.location, playerLocation) < monsterSeeDistance) { m.lastSeenTimestamp = now; print("Monster seen, distance " + d + " started at " + m.spawnTimestamp); continue; } if (MathG.Distance(m.location, playerLocation) < monsterHearDistance) { m.lastHeardTimestamp = now; print("Monster heard, distance " + d + " started at " + m.spawnTimestamp); continue; } - When you are done reviewing the script, go back to Unity and select the Monster Service object in the Hierarchy window. Look in the Inspector window and review the settings added. Don't change anything just yet.
- When you are done reviewing the changes, build and deploy the game to your mobile device. Attach CUDLR and do another walk around the Wi-Fi area. As you walk around, check whether new monsters are spawned and the distance.
Great, now we have a way to spawn and track monsters around the player as they move. The obvious next step is to start showing our monsters on the map. However, before we do that, we have to add the code to convert map coordinates to game world coordinates for our Monster service.
If you recall, in the CharacterGPSCompassController class the Update method we used already did the conversion from map coordinates to 3D world space. Unfortunately, that code requires a dependency on the GPS Location Service to determine the world map tile scale. So, as much as we would like to create a library function for the conversion, it will just be easier to add it as a helper method to the Monster service.
Fortunately, that helper method was already added as part of the last script asset import. Just go back to your code editor, and assuming you still have the Monster service open from the last section, scroll down to the bottom of the file. You will notice that a private method has been added to do the conversion and is shown as follows:
private Vector3 ConvertToWorldSpace(float longitude, float latitude)
{
    //convert GPS lat/long to world x/y
    var x = ((GoogleMapUtils.LonToX(longitude)
        - gpsLocationService.mapWorldCenter.x) * gpsLocationService.mapScale.x);
    var y = (GoogleMapUtils.LatToY(latitude)
        - gpsLocationService.mapWorldCenter.y) * gpsLocationService.mapScale.y;
     return new Vector3(-x, 0, y);
}
This is the same code we use to convert the player 's coordinates into world space. Essentially, what we do is project the map coordinates to x,y map tile image space and then convert them to world space.
The following figure will hopefully illustrate this concept better:
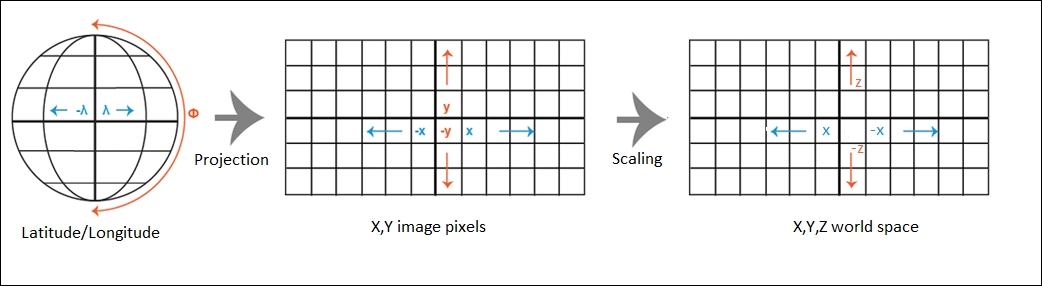
Transformation of latitude or longitude to (x,y,z) world space
So, now that we have everything lined up, it is time to start actually placing monsters on the map. Well, at least monster objects, to start with. Open up Unity and use the following instructions to add the monster instantiation code to our Monster service:
- In the search box at the top of the Project window, type
monsters. The assets should automatically filter the items with monsters in their name. Double-click on the MonsterService script in the filtered list to open the script in your editor of choice, as shown in the following screenshot:
Searching for monsters assets in the Project window
- Just after the
GPSLocationServicevariable declaration, add the following line of code:public GameObject monsterPrefab;
- Scroll down to the bottom of the file, and create a new method
SpawnMonsterwith the following code:private void SpawnMonster(Monster monster) { var lon = monster.location.Longitude; var lat = monster.location.Latitude; var position = ConvertToWorldSpace(lon, lat); monster.gameObject = (GameObject)Instantiate(monsterPrefab, position, Quaternion.identity) } SpawnMonsteris another helper method we will use to spawn our monster prefab. TheInstantiatemethod dynamically creates and returns an object, given a prefab game object and a position or rotation. The returned game object is then added as a reference to theMonsterdata object, which will provide direct access to the game object later.- Next, we need to add a call to the
SpawnMonsterinside theCheckMonstersmethod. Locate the following line of code in theCheckMonstersmethod:m.lastSeenTimestamp = now;
- After that line, enter the following lines of code:
if (m.gameObject == null) SpawnMonster(m);
- What we are doing here is testing whether the monster already has a spawned object attached. If it doesn't—and it should be visible—we call
SpawnMonsterto instantiate a new monster. - Save the script in your code editor and return to Unity. Wait for Unity to do a compile of the updated scripts.
- Create a new cube game object by selecting GameObject | 3D Object | Cube from the menu. Rename the object
monsterCubein the Inspector window. - Open the
Assets/FoodyGo/Prefabsfolder in the Project window. Then, drag the newmonsterCubegame object to thePrefabsfolder to create a new prefab. - Delete the
monsterCubegame object from the Hierarchy window. - Select and expand the Services object in the Hierarchy window, and then select the Monster object.
- From the
Assets/FoodyGo/Prefabsfolder, drag the monsterCube prefab onto the empty Monster Prefab slot on the Monster Service component in the Inspector window. - Press the Play button to run the game in the editor. Ensure that the GPS service is simulating. As the simulation runs, you should see a monsterCube object spawn around the player. If you don't see any monsters spawn after a while, lower the monster spawn rate to a number around 0.25 on the Monster service. The following is a sample screenshot, notice the how the monsterCube clones are added to the
Hierarchy
:
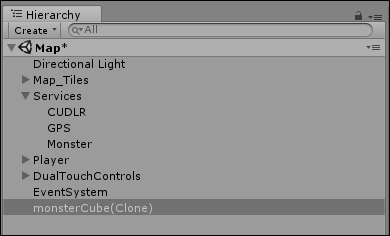
Instantiated monsterCube(Clone) shown in the Hierarchy
Well, obviously, our blocks don't look like very convincing monsters, so let's do something about that. We will use another Reallusion character as the base for our monster. If you recall, Reallusion is the company that creates those great iClone characters we are using for our player character. Perform the following instructions to set up the new monster character:
- Open the Asset Store window by selecting Window | Asset Store .
- After the
Asset Store
page loads, type in the search field
grouchoand press Enter or click on search. - There will be a paid and free version of the Groucho character listed; select the free version in the list.
- After the asset page loads, click on the Download button to download and import the asset. Again, this may take a while; so, grab a beverage or just relax.
- When the download completes, the
Import Unity Package
dialog will open. Just make sure that everything is selected and click on
Import
, as follows:

Importing the Groucho character
- After the character is imported, open the
Assets/Groucho/Prefabfolder in the Project window. Then, drag the groucho prefab into the Hierarchy window. - Select the Groucho object in the Hierarchy window. In the Inspector window, reset the objects transform by selecting the gear icon next to the Transform component to open the context menu. Then, select Reset from the context menu. The Groucho character should now be overlapping your iClone character.
- Rename the Groucho object to Monster in the Inspector window.
- Click on the target icon beside the Animation field of the Animation component in the Inspector window. Select Walk_Loop from the dialog and then close.
- The imported walk loop animation for the Groucho character is not imported to loop by default. We need to fix the animation loop problem by selecting the Walk_Loop animation we just set in the Inspector window. This will highlight the animation in the Project window.
- Then, select the Groucho_Walk_Loop parent object. The animation import properties will then be displayed in the
Inspector
window, as shown in the subsequent screenshot:
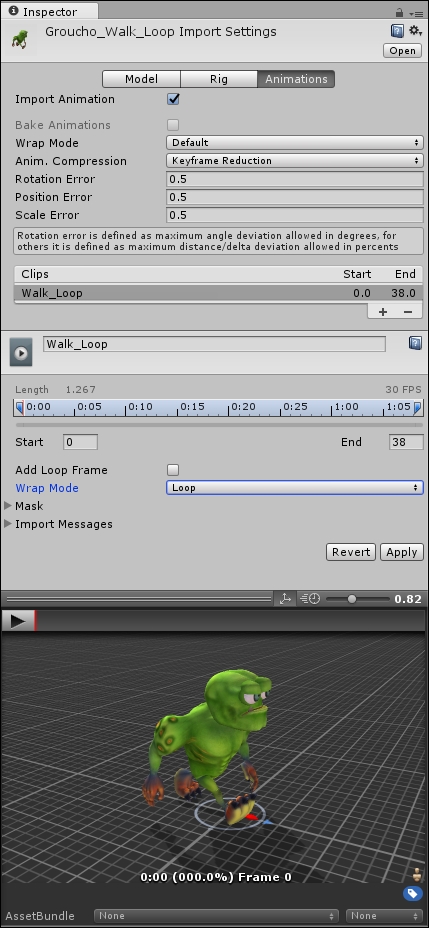
Setting the Wrap Mode of the Walk_Loop animation
- Change the Wrap Mode to Loop and then click on the Apply button.
- Select the Monster object in the Hierarchy window and rescale the monster by changing the scale values in the Transform component from 1 to .5 in the x,y,z. The monster needs to be smaller and less intimidating.
- Drag and drop the Monster game object to the
Assets/FoodyGo/Prefabsfolder in the Project window to create a newMonsterprefab. - Delete the Monster game object from the Hierarchy window by selecting and pressing the Delete key.
- Select and expand the Services object in the
Hierarchy
window. Then, select the
Monster
service to highlight it in the
Inspector
window. Drag and drop the Monster prefab from the
Assets/FoodyGo/Prefabsfolder in the Project window to the Monster Prefab field on the Monster Service component in the Inspector window. - Run the game in the editor by pressing Play. Ensure that the GPS simulation is set to simulate. The following sample screenshot shows a high monster spawn rate:
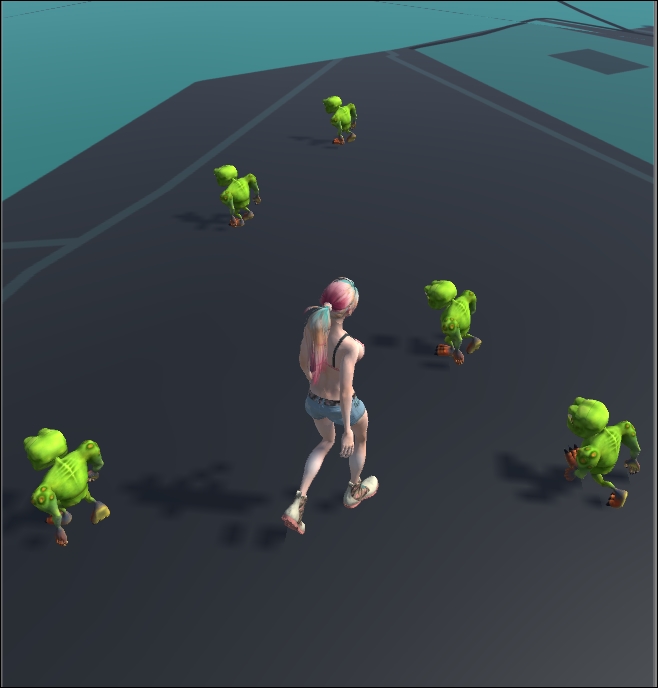
Monsters spawning around the player
Note
The 3D character is designed by Reallusion iClone Character Creator. To create more customized characters, please visit HERE for more details.
Great, now, we have our monsters spawning on the map. While you were running the game, you likely noted that there are a few new issues. Here is a list of those issue that we need to address:
- When the map recenters itself, the monsters don't recenter
- The monsters remain visible on the map even after a player has moved out of visibility range
- The monsters all face in the same direction
- We still have no way of tracking audible monsters
In order to fix the first three issues, we will do another script asset import and then review the changes. After that, we will fix the final issue by adding a UI element to the scene. Perform the following instructions to import the new scripts and other assets we will need:
- Import the asset package by selecting Assets | Import Package | Custom Package...
- After the
Import package...
dialog opens, navigate to the downloaded source code folder
Chapter_4_Assets, selectChapter4_import2.unitypackageand then click on Open . - When the Import Unity Package dialog opens, just confirm that all the assets are selected and then click on Import .
- Confirm whether the new assets are imported by opening the
Assets/FoodyGofolder in the Project window. You should see a some new folders, such asImagesandScripts/UI.
The first three issues were all fixed with a few additions to MonsterService script. Open up the MonsterService script in the editor of your choice and review the fixes and respective changes given in the following list:
- The monsters need to recenter after a map redraw:
- The first issue was fixed by attaching to the
OnMapRedrawevent of theGPSLocationService. If you recall, that event fires when the center map tile redraws itself. Here, you can see the code changes://event hookup inside Start() gpsLocationService.OnMapRedraw += GpsLocationService_OnMapRedraw; //event method private void GpsLocationService_OnMapRedraw(GameObject g) { //map is recentered, recenter all monsters foreach(Monster m in monsters) { if(m.gameObject != null) { var newPosition = ConvertToWorldSpace(m.location.Longitude, m.location.Latitude); m.gameObject.transform.position = newPosition; } } }
- This method loops through the monsters in the
MonsterService, checks to see if they have an instantiated game object. If they do, the game object is repositioned on the map.
- The first issue was fixed by attaching to the
- Monsters stay visible after being seen:
- The next fix is also relatively straightforward with just a couple of additions to the
CheckMonstersmethod. The first fix handles when a monster is not seen or heard; we want to ensure that they are not visible. We do this by checking whether a monster'sgameObjectfield is not null then we set theActiveproperty to false usingSetActive(false), which is the same as making the object invisible. Here is the section of that code://hide monsters that can't be seen if(m.gameObject != null) { m.gameObject.SetActive(false); }
- Previously, if a monster was seen, we just spawned a new monster if the
gameObjectfield was null. Now, we also need to make sure that if the monster does have agameObject,the object is active and visible. We do this almost exactly like we did above, but now we make sure that the game object is active and visible usingSetActive(true). The following is the section of code for review:if (m.gameObject == null) { print("Monster seen, distance " + d + " started at " + m.spawnTimestamp); SpawnMonster(m); } else { m.gameObject.SetActive(true); //make sure the monster is visible }
- The next fix is also relatively straightforward with just a couple of additions to the
- Monsters all face in the same direction:
- We will fix this last issue by setting the monsters rotation around the y axis of
Upvector to be random. Here is the section of code, as updated in theSpawnMonstermethod:private void SpawnMonster(Monster monster) { var lon = monster.location.Longitude; var lat = monster.location.Latitude; var position = ConvertToWorldSpace(lon, lat); var rotation = Quaternion.AngleAxis(Random.Range(0, 360), Vector3.up); monster.gameObject = (GameObject)Instantiate(monsterPrefab, position, rotation); }
- We will fix this last issue by setting the monsters rotation around the y axis of
For the final issue, we want the player to be able to track monsters that are nearby but not seen. We will do this by providing a visual cue to the player in the form of a footsteps icon or image. One footstep or paw/claw print is very close, two prints not as close, and three prints are just within hearing range. Since we only have one type of monster, at least for now, we will only show the player a single icon representing the closest monster.
Before we get into the code, let's take a look at the new properties that were added to the MonsterService in order to support footstep ranges. Expand the Services object and then select the Monster object. The following is a view of the
Inspector
window for the
Monster
service:
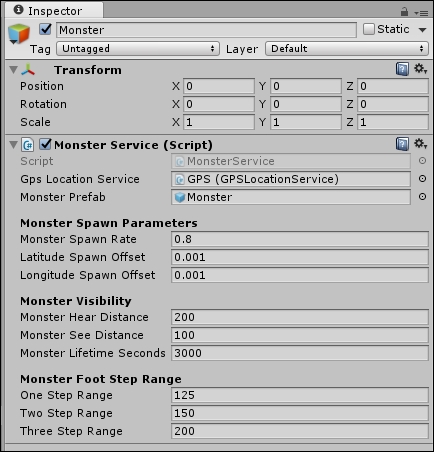
Monster service parameters in the Inspector window
As you can see, in the Inspector window, there is a new section added to the Monster Service component. The new section defines at what ranges the various steps activate, with the value being the maximum range. For example, if the closest monster is at 130 meters distance, the player will see two footsteps because 130 is greater than the 125 set for One Step Range , but less than the 150 for Two Step Range .
Open up the MonsterService script back in your favorite code editor. The following are the script changes where the footstep range is determined and set:
- The first change is in the
CheckMonstersmethod inside theifstatement that checks whether the monster is audible:var footsteps = CalculateFootsetpRange(d); m.footstepRange = footsteps;
- The second change is the addition of the new
CalculateFootstepRange. This method just simply determines the range based on the footstep range parameters and is as follows:private int CalculateFootstepRange(float distance) { if (distance < oneStepRange) return 1; if (distance < twoStepRange) return 2; if (distance < threeStepRange) return 3; return 4; }
In order to show the player the footstep's range, we will add an icon view to the UI, as follows:
- Go back to
Unity
and select the
Map
scene in the
Hierarchy
window. Select
GameObject
|
UI
|
Raw Image
. This will expand the
DualTouchControlsobject and add a newRawImageobject as a child. - Rename the
RawImageobject toFootstepsin the Inspector window. - With the Footsteps object selected, open the
Assets/FoodyGo/Scripts/UIfolder. Drag theFootstepTrackerscript onto theFootstepsobject in the Inspector window. This will add the Footstep Tracker (Script) component to the Inspector window, as follows: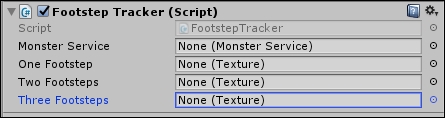
Empty Footstep Tracker (Script) component
- Expand the Services object in the Hierarchy window. Drag and drop the Monster Service object onto the open Monster Service field on the Footstep Tracker script component in the Inspector window.
- Click on the bullseye icon beside the One Footstep field. The Select Texture dialog will open. Scroll down in the dialog and select paws1 and then close the dialog. This will add the paws1 texture to the One Footstep field.
- Do the same thing for the
Two Footsteps
and
Three Footsteps
fields, as follows:
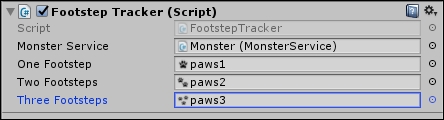
Filled-in Footstep Tracker Script Component
- Open the Anchor Presets menu by clicking on the Rect Transform icon in the Inspector window.
- While the
Anchor Presets
menu is open, hold and press the Shift and Alt keys and then click on the top left preset, as shown in the next dialog:
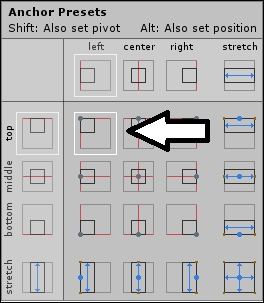
Selecting the Anchor Preset
- You should now see an empty white square in the top-left corner of the Game window. This is where the footsteps icon will appear.
- Run the game in the
Unity
editor by pressing Play. Ensure that the GPS service is running in simulation mode. As your character moves around now, you should see the footstep's icon turn on with the number of paws representing the distance to the closest monster, as shown in the following screenshot:

One footstep icon showing
After you are done testing the game in the editor, build and deploy it to your mobile device. Then, walk around your house or neighborhood and try to track monsters. Check how close you can get to the monsters. As you are live-testing, be aware of the various distances we set in the Monster Service. Consider whether any of those distance values need to be changed.