
GPS is an acronym for global positioning system, a network of 24 to 32 satellites that orbit the earth twice every hour. As these satellites orbit, they emit time-encoded geographical signals as a beacon to any GPS device on earth that can see them. A GPS device then uses these signals to triangulate its position anywhere on the planet. The more satellites and signals a device can receive a signal from, the more accurate the location will be. We will get into more details about GPS triangulation and accuracy in Chapter 4, Spawning the Catch.
The following diagram shows a GPS device acquiring a signal from visible satellites on the network:

GPS Device tracking visible satellites
This is a list of terms we may come across when talking about or using GPS on a device:
- Datum: It is a term used in GPS to define the coordinate transformation system used to convert those satellite signals into usable coordinates. All GPS devices use WGS 84 as the standard, which is convenient for us since our maps also use WGS 84. A dedicated GPS device will support several different data according to an advanced user's needs.
- Latitude/longitude: By default, a GPS device will return latitude and longitude coordinates in WGS 84 datum. For us, this makes things easy, as we don't require any additional math conversions to map a device's location.
- Altitude: This represents the device's height above sea level. Most mobile GPS devices we will be building our game for do not support altitude, currently. Thus, we won't use altitude in the game, but hopefully this will we be supported in the future.
- Accuracy: This is reported by the device and represents the range of error calculated when determining the location. The more satellites a device acquires signals from, the better the location calculations will be. There is a limit to each device's accuracy and even what is possible on the public GPS network. A modern smartphone will often report at 5-8 meters in accuracy. However, some older smartphones can be as high as 75 meters. We will spend more time discussing GPS accuracy later in the book when we start to allow the player to interact with virtual objects.
As previously mentioned, we will use Google Maps for our map service. For this version of the game, we will use the Google Maps' static map, which means we do not need an API developer key or need to worry about its usage.
In order to use the static map's API, we call a URL with a number of query string parameters in a GET request, just like you would call a typical REST service. The Google Maps API then returns a single image matching our request. Here is an example of a request to the Google Maps API static map REST service: https://maps.googleapis.com/maps/api/staticmap?center=37.62761,-122.42588&zoom=17&format=png&sensor=false&size=640x480&maptype=roadmap.
This will render the following map image:

Image rendered from Google Maps API
Ensure that you test this on your own by clicking on the link or copying and pasting that URL into your favorite browser. Let's break down that URL into its component parts so we can understand the elements we need to define when requesting a map image:
https://maps.googleapis.com/maps/api/staticmap: This represents the base URL of the Google Maps service. If we call this URL without any parameters, we will get an error. Let's take a look at each of the parameters and query syntax in some more detail.?: The question mark denotes the start of the query parameters.center=37.62761,-122.42588: This represents the center of our requested map in latitude and longitude coordinates.&: The ampersand symbol denotes the start of a new query parameter.zoom=17: This represents the zoom level or scale at which we want the map rendered. Remember from our GIS fundamentals that the higher the zoom level the smaller the map scale.format=png: This is the type of image we want be returned. The PNG format is preferred for our use.sensor=false: This indicates we did not use a GPS to acquire our location. Later when we integrate the mobile device's GPS, this will be set to true.size=640x480: This represents the size in pixels of the image requested.maptype=roadmap: This requests for the type of map. There are four types of map you can request, as follows:roadmap: This is a map showing streets, transit, landscape areas, water, and points of interest.satellite: This is a map showing actual satellite imagery.terrain: This is a map showing elevation mixed with roadmap.hybrid: This is a mix of a roadmap over top of a satellite map.
Fortunately, you won't be required to generate these URLs as that will be done by some packaged scripts already prepared for this chapter. Yet it will be helpful for you to understand how those requests for maps are being made in case you want to customize the game or encounter some problems.
If you recall in our discussion of mapping we mentioned that GIS maps are always constructed in layers. The great thing with Google Maps is that we can style our various map layers dynamically as part of the request. That allows us to style our maps specifically according to the game look and feel that we want. Take a few minutes to play with the Google Maps' style wizard available at https://googlemaps.github.io/js-samples/styledmaps/wizard/.
For our game, we have set a couple simple styles to give our game a darker look. The following screenshot shows the style selections as they are shown in the Google Maps style wizard:

Game styles defined in the style wizard
For now, we won't get into extracting the styles from the wizard and using that to define our own map styles. That customization will be left for Chapter 9, Finishing the Game. Those readers who are curious can quickly see what those style parameters look like by clicking on the Static Map button on the left-hand panel in the style wizard.
After our brief introduction to mapping with GIS and GPS, let's jump back into Unity and add a map to our game. As we build out the map, we will review some of those GIS terms again. Let's continue where we left off in the previous chapter.
Follow the instructions here to get the map added to the game:
- Open up Unity and load the FoodyGO project we created in the previous chapter. If you jumped ahead to this chapter, you can also load the project from the downloaded source code. Open the
Chapter_2_Startfolder in Unity to load the project. - After Unity opens, you should see the Splash screen loaded. If it isn't loaded, that is fine, since we will be creating a new map scene. Select the menu item File | New Scene.
- This will create new empty scene in Unity with only a Main Camera and Directional Light. Before we forget, let's save this new scene. Select the menu item File | Save Scene as..., and on the Save Scene dialog, enter the name
Mapas the file name and then click on Save. - Select the Map scene in the Hierarchy window. Then, select the menu item GameObject | Create Empty to create a new empty GameObject in the scene. Select this new game object and view its properties in the Inspector window.
- In the Inspector window, rename the GameObject to
Map_Tilesby editing the name field. Reset the object's transform position by selecting the gear icon in the Transform component and then selecting Reset Position from the drop-down menu.
The following screenshot shows you how to make the selection from the drop-down menu:

Resetting a game object's position
- We will generally reset most of our game objects to or near zero in order to simplify any GIS math conversions. The Map_Tiles game object should now have a zero or identity transform as shown in the following screenshot:

A game object with zero transform
- With the Map_Tiles game object selected, right-click (press
command
and click, on a Mac) to open the context menu and select 3D Object | Plane. Here is a screenshot showing you how to add the plane from the context menu:

Game object's context menu
- Select the plane game object and rename it to
Map_Tilein the Inspector window. Make sure that the object's transform is zero. - Double-click on the Map_Tile plane in the Hierarchy window to focus on the object in the Scene window. If the object is not visible, make sure that the 2D button is turned off in the Scene window.
- In the Inspector window, edit the Transform component properties and then edit the scale of the X and Z to
10. Notice how the plane's dimensions expend as you edit the scale. - We now need to add a script to our Map_Tile object that will render our map. At this point, we will avoid creating new scripts and instead just add script from an imported asset. Of course, later in the book, we will be building new scripts. The scripts we need will be in the downloaded code in
Chapter_2_Assetsfolder. Open the menu item Assets | Import Package | Custom Package... to open the Import package dialog. - Use the dialog to navigate to the
Chapter_2_Assetsfolder located in the downloaded source code folder and import theChapter2.unitypackageasset by clicking on Open. - A progress dialog will appear that will show loading of the assets, which will quickly be replaced by the Import Unity Package dialog. Make sure that all the items in the dialog are selected and available to import and then click on Import. The Import Unity Package dialog with the scripts being imported will appear:

Chapter assets being imported
- After you import the assets, you will notice a new folder created under Assets in the Project window. Feel free to explore this new folder and its contents so you are familiar with how the project assets will start to be organized. Notice how the folder contents match exactly what we imported.
- Select the Map_Tile object in the Hierarchy window. Click on the Add Component button seen in the bottom of the Inspector window. A context menu will open showing you a list of components; select Mapping | Google Tile Map. This will add the Google mapping script component to the Map_Tile game object.
Google Maps for Unity available for free on the Unity Asset Store was the inspiration for the Google Tile Map code. Several things were changed for the more advanced version used in the game.
- In the Inspector window, edit the Google Map Tile script to match the values, as follows:

Editing the component values to match the screen
- Hopefully, those mapping parameters make some sense after the preceding introduction. For now, we will use a Zoom Level of 15 to test how our make works. Those location coordinates are for Google located in San Francisco. Of course, we will connect the device's GPS and use your local coordinates later.
- Press the Play button. After a couple of seconds, your screen should look similar to this:
Google Map running within Unity
- To test the game on your mobile device, follow the steps we used previously to set up deployment. If you are unclear on the exact details of deploying the game, refer to Chapter 1, Getting Started.
Here is a quick summary of the steps, assuming you have previously deployed the game to your device:
- Make sure that your device is connected to the Unity development machine by a USB cable.
- Save your scene by choosing File | Save Scene.
- Save your project by selecting File | Save Project; note it is always a good habit to save your game before building. Unity build is notorious for crashing the editor.
- Select the menu item File | Build Settings... to open the Build Settings dialog.
- Uncheck the Splash scene, as we don't need it yet. Click on the button Add Open Scenes to add the Map scene to the build.
- Select your appropriate deployment platform, Android or iOS.
- Click on the Build and Run button to start the build and deployment process.
- When prompted, save and overwrite your deployment to the same location as you chose before.
- Wait for the game to finish building and then deploy it onto your device.
- After the game loads on your device, inspect the map and rotate your device. At this point, the game does very little, but this indeed shows that the map is functioning on your device.
The first thing you may notice is that the map image is brighter. This brightness is caused by our lighting and the default material on the plane. Fortunately, for us, this visual style is what we are after and we will leave the added brightness as it is.
Secondly, you will notice that the map is more pixelated than the image we rendered on the server in the preceding style wizard. That pixelation is a result of stretching our map image across the plane. The obvious solution is to increase the image size and resolution. Unfortunately, the maximum image size we can request from Google Maps is around 1200 x 1200 pixels, which is what we are already doing using double resolution. This means we need to find a different solution to get a cleaner, crisp-looking map. In the following section, we will resolve this pixelation issue.
Due to the level of detail on maps and the fine lines, we generally always want to render our maps at the highest resolution possible. Unfortunately, rendering high-resolution images is performance intensive and prone to errors. Fortunately, there are plenty of examples on how others have solved this resolution issue in mapping by stitching multiple images or image tiles together. We will take the exact same approach and extend our map from a single tile to a 3 x 3 grid of tiles, as follows:

Map tile layout for a 3 x 3 grid
Note that in the diagram, the x axis and the tile offsets are inversely related, or in other words, a tile offset of 1 in the X direction will need to be offset on the x axis in 3D space in the negative direction. The z axis and Y tile offset are in a direct relationship. This means that as the Y tile offset is set to 1, the z axis will also be set a positive value. As our player is close to the ground, the game only needs a 3 x 3 grid. If you build a game with a higher-level camera or want to show farther in the horizon, you would extend the tile layout to 5 x 5, 7 x 7, 9 x 9, or whatever size you need.
So, let's get started and extend our map from a single tile to the 3 x 3 grid tiles. Follow these instructions in Unity to build the map tile layout:
- Select the Map_Tile game object in the Hierarchy window. In the Inspector window, edit the object's properties to match these values:
- Transform, Scale, X: 3
- Transform, Scale, Z: 3
- Google Map Tile, Zoom Level: 17
- Create a new folder under the
FoodyGOfolder by right-clicking (Press command and click on Mac) to open the context menu and select item Create | New Folder. Rename the folder in the highlighted edit window toPrefabs. - We will now create a prefab of our Map_Tile object. You can think of prefabs as game object copies or templates. To create the prefab, select and drag the Map_Tile game object to the new
Prefabsfolder we just created. You will see a new prefab appear in the folder called Map_Tile. After the prefab is created, you will notice that the Map_Tile game object turns blue in the Hierarchy window. The blue highlight means the game object is bound to a prefab. - Go back to the Hierarchy window and again select the Map_Tile object and rename it
Map_Tile_0_0. We did this in order to denote this as the center or 0,0 tile. - Select the Map_Tile_0_0 game object in the Hierarchy window and enter
Ctrl
+
D (command
+
D
on a Mac) to duplicate the map tile. Do this eight times to create eight additional map tiles, as follows:

Copied map tiles shown parent to the Map_Tiles game object
- Rename the copied map tiles and set the properties of each within the Inspector window, as shown in the following table:
Game object
Properties
Map_Tile_0_0 (1)
Name:
Map_Tile_0_1Transform.Position.X:
0Transform.Position.Z:
30GoogleMapTile.TileOffset.X:
0GoogleMapTile.TileOffset.Y:
1Map_Tile_0_0 (2)
Name:
Map_Tile_0_-1Transform.Position.X:
0Transform.Position.Z:
-30GoogleMapTile.TileOffset.X:
0GoogleMapTile.TileOffset.Y:
-1Map_Tile_0_0 (3)
Name:
Map_Tile_1_0Transform.Position.X:
-30Transform.Position.Z:
0GoogleMapTile.TileOffset.X:
1GoogleMapTile.TileOffset.Y:
0Map_Tile_0_0 (4)
Name:
Map_Tile_-1_0Transform.Position.X:
30Transform.Position.Z:
0GoogleMapTile.TileOffset.X:
-1GoogleMapTile.TileOffset.Y:
0Map_Tile_0_0 (5)
Name:
Map_Tile_1_1Transform.Position.X:
-30Transform.Position.Z:
30GoogleMapTile.TileOffset.X:
1GoogleMapTile.TileOffset.Y:
1Map_Tile_0_0 (6)
Name:
Map_Tile_-1_-1Transform.Position.X:
30Transform.Position.Z:
-30GoogleMapTile.TileOffset.X:
-1GoogleMapTile.TileOffset.Y:
-1Map_Tile_0_0 (7)
Name:
Map_Tile_-1_1Transform.Position.X:
30Transform.Position.Z:
30GoogleMapTile.TileOffset.X:
-1GoogleMapTile.TileOffset.Y:
1Map_Tile_0_0 (8)
Name:
Map_Tile_1_-1Transform.Position.X:
-30Transform.Position.Z:
-30GoogleMapTile.TileOffset.X:
1GoogleMapTile.TileOffset.Y:
-1 - Press the play button to run the game. While the game is running, select the Map_Tile_0_0 in the Hierarchy window and type
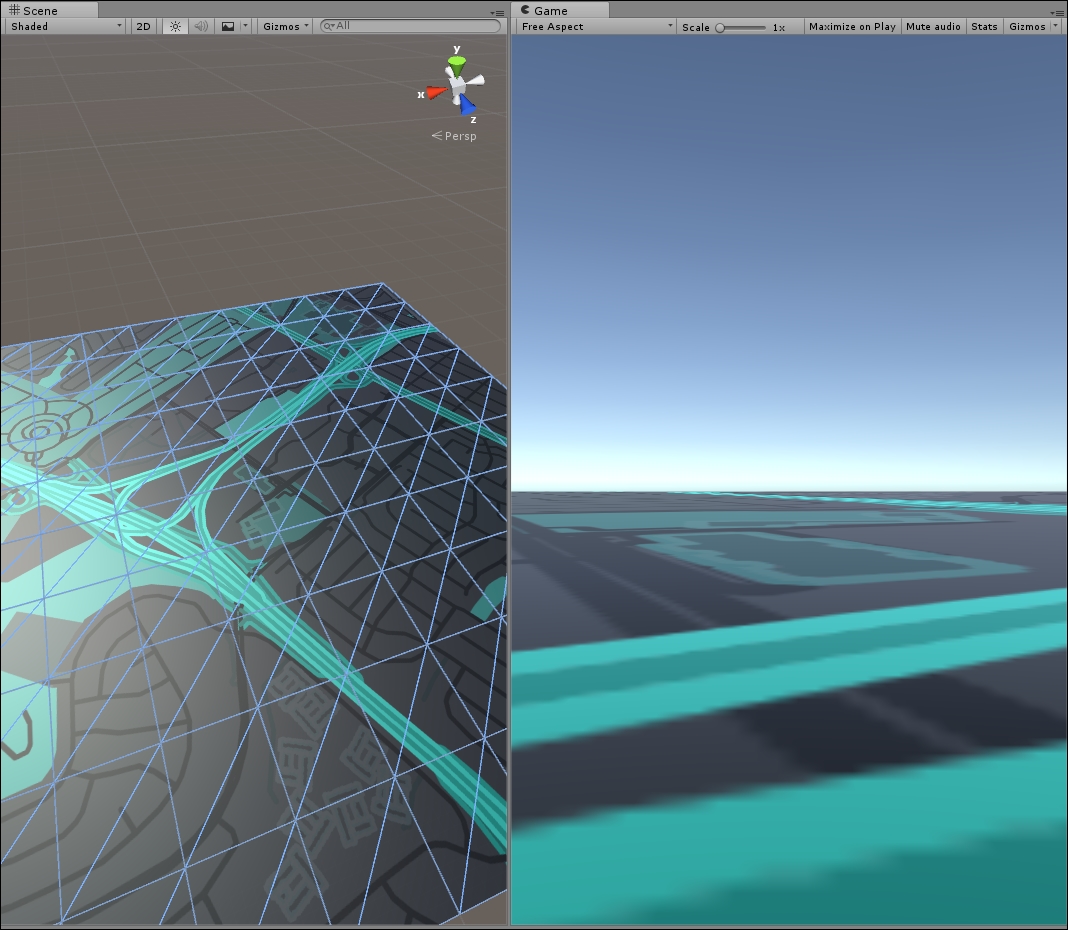
F, to frame the object in the Scene window. Notice how the pixelation on the map has been dramatically reduced. You should see something similar to the following screenshot:
Game running in the play mode showing our tiled map
Great, we now have a cool-looking map in our game. Of course, the process was a bit repetitive to build the map; but if you are careful, it should not take too long. If you were expecting a lot of math in order to line up those tiles, fortunately that is all done in the GoogleMapTile script. Let's take this opportunity to take a break from Unity and look at the GoogleMapTile script in MonoDevelop.
In Unity, select Map_Tile_0_0 in the Hierarchy window. Go to the Inspector window, and on the Google Map Tile script component, click on the gear icon to open the context menu. From the menu, select Edit Script. You will see a progress bar, and after a few seconds, MonoDevelop will open.
In MonoDevelop, you will see the GoogleMapTile script open. As was mentioned in the book's prerequisites, you should have a basic knowledge of C#, so the contents of the script should not look overly intimidating. If you are new to Unity scripting, that is fine, as we will get into more detail about writing scripts later. For now, we will concentrate on a few areas of the code that will show how the map tiling works.
Scroll down through the code until you reach the method, IEnumerator _RefreshMapTile(). Here is an excerpt from the top lines of that method we will look at in more detail:
IEnumerator _RefreshMapTile ()
        {
            //find the center lat/long of the tile
            tileCenterLocation.Latitude =  GoogleMapUtils.adjustLatByPixels(worldCenterLocation.Latitude,  (int)(size * 1 * TileOffset.y), zoomLevel);
            tileCenterLocation.Longitude =  GoogleMapUtils.adjustLonByPixels(worldCenterLocation.Longitude, (int)(size * 1 * TileOffset.x), zoomLevel);
As the comment mentions, these two lines of code find the center of the tile in latitude and longitude map coordinates. They do that by taking the tile image size (size) and multiplying that by the TileOffset.y for latitude and TileOffset.x for longitude. The result of that multiplication and the zoomLevel is passed to a GoogleMapUtils helper functions to calculate the adjusted latitude or longitude for the tile. Seems simple, right? Of course, the bulk of the work is done in the GoogleMapUtils functions, which are just standard GIS math functions for converting distances. If you are curious, take a look at the GoogleMapUtils code, but for now we will continue looking at just the _RefreshMapTile method.
Continue scrolling down through the code until you come to this excerpt:
//build the query string parameters for the map tile request
queryString += "center=" + WWW.UnEscapeURL (string.Format ("{0},{1}", tileCenterLocation.Latitude,  tileCenterLocation.Longitude));
queryString += "&zoom=" + zoomLevel.ToString ();
queryString += "&size=" + WWW.UnEscapeURL (string.Format  ("{0}x{0}", size)); queryString += "&scale=" + (doubleResolution ? "2" : "1");
queryString += "&maptype=" + mapType.ToString ().ToLower ();
queryString += "&format=" + "png";

//adding the map styles
queryString +=  "&style=element:geometry|invert_lightness:true|weight:3.1|hue:0x00ffd5";
queryString += "&style=element:labels|visibility:off";
As the comment describes, this section of the code is what builds up those query parameters that are passed to the Google Maps API to request a map image. Since we are passing these parameters in a URL, we need to make sure that you encode special characters and that is what the WWW.UnEscapeURL calls do. Notice that at the bottom we are also adding a couple styles. In Chapter 9, Finishing the Game, we will take a look at how you can easily add your own styles using the Google Maps Style Wizard.
Finally, scroll down to the bottom of the _RefreshMapTile method; the following is an excerpt of the code:
//finally, we request the image
var req = new WWW(GOOGLE_MAPS_URL + "?" + queryString);
//yield until the service responds
yield return req;
//first destroy the old texture first Destroy(GetComponent<Renderer>().material.mainTexture);
//check for errors
if (req.error != null)
{
      print(string.Format("Error loading tile {0}x{1}:  exception={2}",
                    TileOffset.x, TileOffset.y, req.error));
}
 else
 {
      //no errors render the image
      //when the image returns set it as the tile texture
      GetComponent<Renderer>().material.mainTexture = req.texture;
         print(string.Format("Tile {0}x{1} textured", TileOffset.x, TileOffset.y));
         }
In the first line, the code uses the WWW class to make a request to the GOOGLE_MAPS_URL appended with the earlier constructed queryString. The WWW class is a Unity helper class that allows us to make calls to URLs for virtually anything. Later in the book, we will use this class to make other service requests.
The next line, yield return req;, essentially tells Unity to continue on until this request responds. We can do that here because this method is a coroutine. Coroutines are methods that return IEnumerator and are an elegant way to prevent thread blocking. If you have ever done more traditional C# asynchronous programming, you will certainly appreciate the beauty of coroutines. As before, we will cover more details about coroutines when we get into script writing.
Next, we call Destroy on the object's current texture. Destroy is a public method of the MonoBehaviour class that safely allows us to destroy objects and all components attached to the object. If you are seasoned C# Windows or Web developer, this step may seem quite foreign to you. Just remember that we have to be mindful of memory management that can quickly get out of hand when running a game. In this example, if we were to remove this line of code, the game would likely crash due to texture memory leaks.
After the Destroy call, we do an error check just to make sure that no errors occurred while requesting the image tile. If an error occurs, we just print an error message. Otherwise, we swap the current texture for a new downloaded image. We then use print, in order to write a debug message to the Console window. The prin
t method is the same as calling Debug.log, but is only available from a class derived from MonoBehaviour.
Our final look at the code will be to understand when the _RefreshMapTile method is called. Scroll up through the code until you find the Update method, as follows:
// Update is called once per frame
        void Update ()
        {
            //check if a new location has been acquired
            if (gpsLocationService != null &&
                gpsLocationService.IsServiceStarted &&
                lastGPSUpdate < gpsLocationService.Timestamp)
            {
                lastGPSUpdate = gpsLocationService.Timestamp;
                worldCenterLocation.Latitude =  gpsLocationService.Latitude;
                worldCenterLocation.Longitude =  gpsLocationService.Longitude;
                print("GoogleMapTile refreshing map texture");
                RefreshMapTile();
            }
        }
Update is a special Unity method available on every MonoBehaviour derived class. As the comment mentions, the Update method is called every frame. Obviously, we don't want to refresh the map tile every frame since it is unlikely the request would return that quickly anyway. Instead, we would first want to make sure that we are using a location service and it has started. Then, we check whether the location service has detected movement by checking a timestamp variable. If it passes those three tests, then we update the timestamp, get a new world center, print a message, and finally call RefreshMapTile. RefreshMapTile makes a call to StartCoroutine(_RefreshMapTile) that starts the tile refresh.
Since we haven't started connecting the GPS service yet, this all may seem foreign. Not to worry, we will get to that shortly, but for now it will be helpful to understand how frequently the map tiles will be redrawn.
In this section, we enhanced the resolution of our game map by rendering image tiles rather than a single image. For our purpose, we still used a fairly large tile size for each map tile image. We can get away with this because our camera will be above the player looking down. As you can see though, it is a simple process to create any size of tile map. If you do decide to create a larger map, just be aware that downloading several map tiles could increase a player's data consumption dramatically.
Services can have a broad definition depending on your application and need. For us, we will use the term services to denote any code that runs as a self-managed class that other game objects consume. Services are different than a library or global static class, such as the GoogleMapUtils class, because they run as an object or objects. In some cases, you may decide to implement services using the singleton pattern. As for this book, our intention is to write simpler code, so we will create and use services as game objects.
For this chapter, we will set up two services. The GPS Location Service, for finding the player's location and CUDLR, for debugging. Let's start by getting the CUDLR service started, as that will help us in debugging any issues we may have when we set up the location service.
CUDLR stands for Console for Unity Debugging and Logging Remotely and is a free asset available from the Unity Asset Store. We will use CUDLR to not only watch the activity of our device as the game plays but also execute some simple console commands remotely. We will look at Unity Remote, which is another diagnostic tool, in the following chapter. It is very powerful, but can be problematic to run and often fails to access the location service, even though Unity claims this is supported. As you get more into the development of the game, you will see that it is always helpful to have a remote method of monitoring and controlling our game.
Perform the following steps to install and set up CUDLR:
- Open the Asset Store window by selecting menu item Window | Asset Store. After the window opens, enter
cudlrin the Search field and press Enter. After a few seconds, the asset list should appear. - Click on the image or link for CUDLR to load the asset page. After the page loads, you will see an Import button; click on that button to import the asset into the project.
- The asset is quite small, so it should download quickly. After it finishes downloading, you will see the Import Unity Package dialog. Just make sure that everything is selected, as shown in the following screenshot:

Importing the CUDLR asset
- Since we are importing this asset into a project for the first time, we are going to install everything. Later on in development, we can always decide to remove unneeded parts of an asset, such as the Examples folder. When you are ready to import, click on the Import button on the dialog and wait for the import to finish.
- Create a parent services object in the scene by selecting menu item GameObject | Create Empty. This will create a new empty game object in the Hierarchy window. Rename the new object Services.
- Right-click (press Ctrl and click on a Mac) on the Services object in the Hierarchy window to open the context window. From the context menu, select Create Empty. This will create an empty object called GameObject as a child of the Services object. Repeat the process to create another empty game object.
- Select the first empty GameObject and rename it
CUDLR. Then, select the second and rename itGPS. We will add the GPS service later, but since we are here let's be efficient. - Open the Assets/CUDLR/Scripts folder in the Project window. Select and drag the server script from the Project window onto the CUDLR game object in the Hierarchy window. This will add the CUDLR server component to the game object. That's it, CUDLR is ready to go.
What makes CUDLR such a useful tool is that it turns part of our game into web server; yes, a web server. We can then view and communicate with our game just as if we had installed a backdoor. Since CUDLR is accessible to any computer on the network, we also don't need to have a physical connection or even run Unity to control the game. Of course, having your game run as a local web server is a security risk to your game and possibly your player's device. So, before you ship your game, just delete the CUDLR service game object to deactivate it.
Follow the instructions here to connect to the CUDLR service running in your game:
- Open you mobile device and find the IP address, write this down or remember it. Perform the following steps to find the IP address for Android or iOS:
- Android: Go to Settings | About phone | Status and scroll down to the IP address field.
- iOS: Select WiFi to open a list of currently available wireless networks. Locate the wireless network to which you are currently connected in the list, then tap on the blue circle with a white arrow that appears to the right of the network name. The IP Address field should be the first field listed under the DHCP tab.
- Build and deploy the game to your mobile device using the steps previously mentioned in this chapter. Make sure that the game is open and running on your device.
- Disconnect your USB cable from your device and computer.
- Open a web browser; Chrome is a good choice. Type the following URL in your address bar:
http://[Device IP Address]:55055/. - You should see the CUDLR console window in your browser, with output very similar to this screenshot:
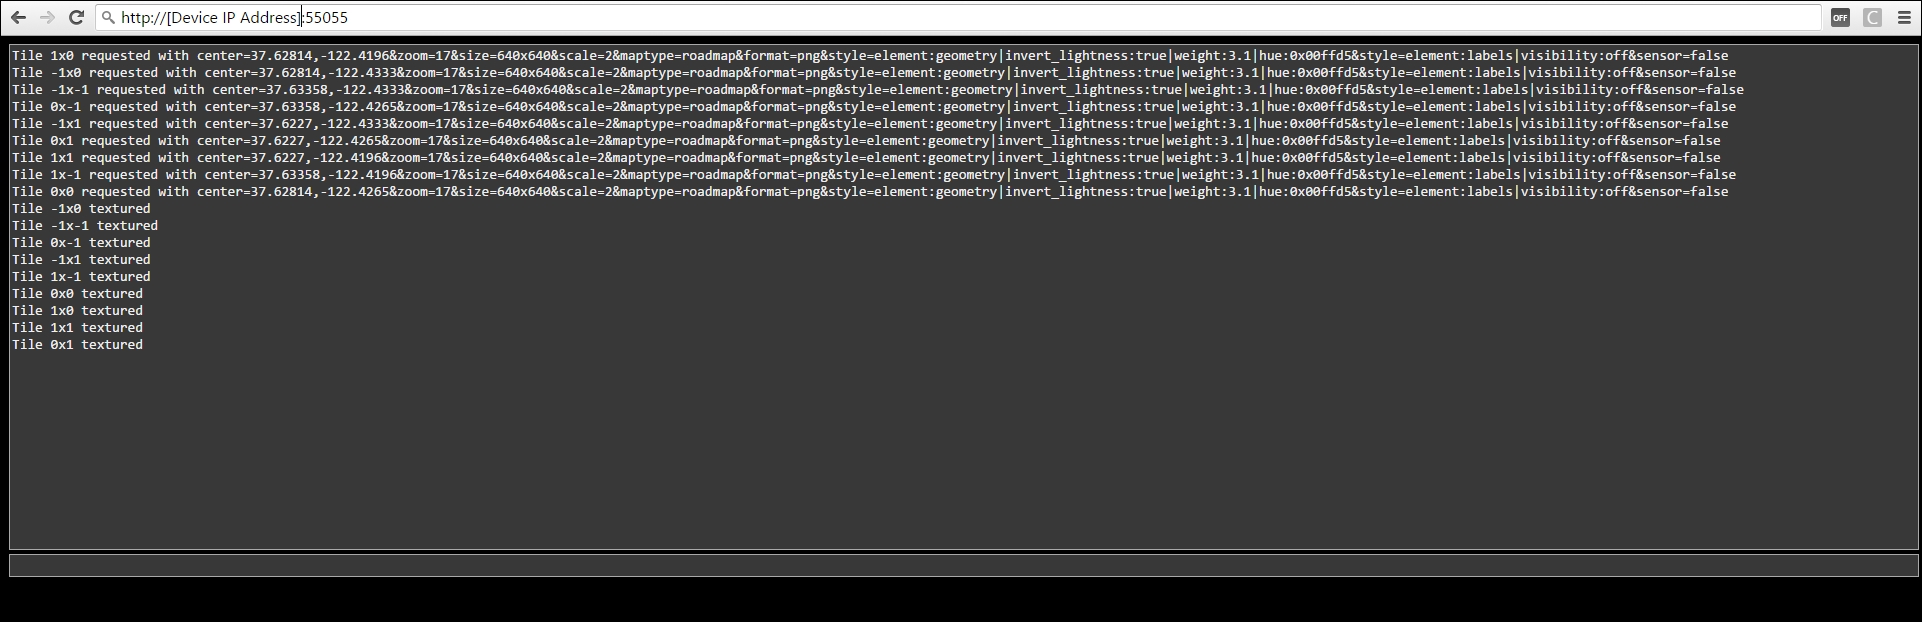
Browser showing CUDLR service console
- There should be nine request calls and nine response calls being logged in the window as the tile map is loaded. Hopefully, by now, you can read and understand a little of what those requests do.
- So, what else can the console do? Type
helpin the bottom textbox below the console output. That will list all the commands available. Currently, there are only a few commands, but we will add to those later. If for some reason, the console doesn't respond, try to refresh the page and/or make sure that the game is running on your mobile device.
If you have problems running or connecting to CUDLR, please refer to Chapter 10, Troubleshooting. As we mentioned previously, we will look at other options for debugging and diagnosing issues while developing with Unity. However, CUDLR, which can run completely remotely, will be our best option for testing our game, as we test real-world movement and GPS tracking. Speaking of GPS, time to finish up with the final section of this chapter and bring everything together.
The final piece we need to generate a real-world location-based map is to find where the device is located. Of course, the best way, as we learned in the previously section, is to use the built-in GPS to determine where the device is located in latitude and longitude coordinates. Like the tile map, we will use an imported script to build the service and get us running quickly without getting into any scripting.
Before we begin, be sure that your device has the location service enabled by checking the following:
- Android: Go to Settings | Location and confirm that the service is on.
- iOS: Follow these instructions:
1. Tap on Privacy | Location Services.
2. Scroll down and tap on FoodyGO.
3. Decide whether to allow location access Never or While Using the App.
Now, perform the following instructions to install the GPS service code and test the game:
- Select the GPS game object under Services in the Hierarchy window.
- Click on the Add Component button in the Inspector window, and from the component list, select Services | GPSLocationService.
- You will see the GPSLocationService component get added to the GPS service object.
- Select Map_Tile_0_0 in the Hierarchy window and then press Shift and click (same for Mac) on the bottom map tile in the list to select all the nine map tiles together.
- With all the nine map tiles selected, drag the GPS service object in the Hierarchy window to the Gps Location Service field, as follows:

Editing multiple map tile objects at the same time
- What we just did is edit all the nine map tiles at the same time and add the GPSLocationService to each. Remember that in our investigation of the
GoogleMapTilescript, we had noticed that the map tiles will call theGPSLocationServicein order to find the map world center coordinates. - Now that the GPS service is connected to all the map tiles, press Play and let's see what it looks like.
- If you are scratching your head wondering what went wrong, not to fear. Nothing has actually gone wrong. The problem is that the Unity editor has no access to a location service or GPS while running on your computer. What we need to do is deploy the game to your device.
- Build, deploy, and run the game on your device just as you have previously done. You should be feeling comfortable deploying the game now.
- You should now see a close-up map of the area around you. The map will likely look offset, and that is due to the position of the camera. Don't worry, we will fix that in the next chapter. If you are having trouble seeing a different map, then just verify each of the above steps. For those who continue to have issues even after confirming the previous steps, refer to Chapter 10, Troubleshooting.
- Ensure that you go back to your browser and refresh you CUDLR console page. Note all the console outputs we are seeing now. Pay special attention to the map tile requests being made; those center coordinates should now match your location coordinates.
- Unplug your device from your computer and wander around your house or property. Don't go so far so that you disconnect the device from the network, but try to get your GPS to update the location. Perhaps even have a friend wander around with the mobile device while you watch the CUDLR console.
Have fun...
Hopefully, you found this last section of the chapter to be a rewarding end to a very quick introduction to GIS, mapping, and GPS.