
The build up is over; we are finally here: creating the action scene where the players bravely catch the monster. Also, this will be our introduction to incorporating AR into our game. There is lots to do to get this all completed by the end of the chapter, so let's get going. We will start by creating a new Catch scene:
- Create a new scene by selecting menu item File | New Scene. Then, select File | Save Scene As... from the menu. In the Save scene dialog, enter the name of
Catchand click on the Save button. - From the menu, select GameObject | Create Empty. Rename the new object
CatchSceneand reset its transform to zero in the Inspector window. - In the Hierarchy window, drag and drop the
Main CameraandDirectional Lightobjects on to theCatchSceneobject, to reparent them. - From the menu, select GameObject | UI | Raw Image. This will create a
Canvasobject with theRaw Imageas a child. Select and rename theRawImageobject toCamera_Backdropin the Inspector window. - With the
Camera_Backdropselected in the Inspector window, set the Anchor Presets to stretch-stretch, by clicking on the Anchors icon to display the menu. Then, hold down the set pivot and set position keys when making the bottom-right corner selection, as follows:
Setting anchor presets on UI element
- In the Hierarchy window, drag and drop the
Canvasobject onto theCatchSceneobject. - Select the
Canvasobject. In the Inspector window, locate the Canvas component. Change the Render Mode to Screen Space - Camera. Then, drag and drop the Main Camera object from the Hierarchy window onto the open Render Camera slot on the Canvas component; refer to the following screenshot for the proper settings: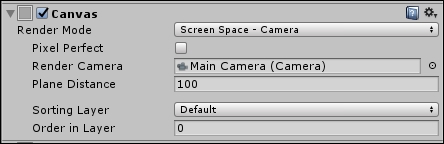
Canvas component settings for Screen Space - Camera
Tip
The difference between render modes Screen Space - Overlay and Screen Space - Camera is the positioning of the render plane. In the Overlay mode, all the UI elements are rendered in front of everything else in the scene. Whereas, in the Camera mode, a UI plane is created a fixed distance away from the camera. This way, world objects can be rendered in front of the UI elements.
- With the
Canvasobject still selected, change the UI Scale Mode in the Canvas Scaler component to Scale with Screen Size in the Inspector window, as follows:
Settings for Canvas Scaler component
- Select and delete the
EventSystemobject. We won't need it here, and even if we do, Unity will create one for us. Finally, save the scene.
That completes the base Catch scene. Time to move on to the world of AR.