
Synthetic transactions are PowerShell cmdlets built into Lync Server that are used to simulate activities performed by servers or users in our Lync deployment. They are a way to test a Lync service in an accurate way. Although it is possible to use synthetic transactions manually, the Lync management pack for SCOM, Microsoft Lync Server 2013 Remote Watcher Management Pack (that we introduced in the previous section), enables the use of synthetic transactions for active and automated monitoring of our Lync infrastructure. The previously mentioned feature requires a server (called watcher node) that will actually periodically run the synthetic transactions. A watcher node is required for every Lync site that we want to monitor with the previously mentioned feature.
- A watcher node server has some prerequirements: .NET Framework 4.5., Windows Identity Foundation (WIF), and Windows PowerShell 3.0. In Windows Server 2012 R2, only WIF is not enabled by default. We can enable it from PowerShell using the
add-WindowsFeature windows-identity-foundationcmdlet. - We have to mount the Lync Server 2013 installation media (for example, with the
D:letter) and install the core files and the RTCLocal database using theD:setupamd64Setup.exe /BootstrapLocalMgmtcmdlet. - Update the Lync components we have just installed according to your servers' patch level.
- Install the Local Configuration Store from Lync Server 2013 – Deployment Wizard, as shown in the following screenshot:
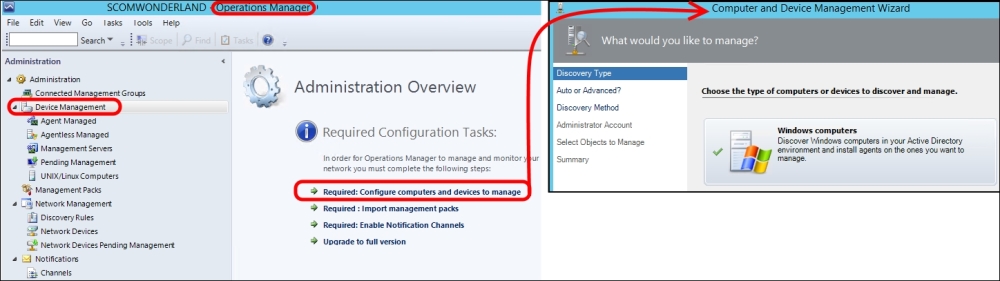
- Install the SCOM agent and enable it to act as a proxy, as we saw in the previous section.
- Assign a default certificate to each watcher node, using Lync Server Deployment Wizard. From Lync Server 2013 – Deployment Wizard, go to Install or Update Lync Server System | Step 3 Request, Install or Assign Certificates. In the following series of screenshots, we can see some of the usual steps to request a certificate to an internal certification authority:

- We have to assign the default certificate generated in the previous step.
- Create a Trusted Server Application Pool from the Lync Management Shell (note that marchhare.wonderland.lab is the watcher node and madhatter.wonderland.lab is the Lync Front End):
New-CsTrustedApplicationPool –Identity marchhare.wonderland.lab –Registrar madhatter.wonderland.lab –ThrottleAsServer $True –TreatAsAuthenticated $True –OutboundOnly $False –RequiresReplication $True –ComputerFqdn marchhare.wonderland.lab –Site Site001 - Create a Trusted Application:
New-CsTrustedApplication –ApplicationId STWatcherNode –TrustedApplicationPoolFqdn marchhare.wonderland.lab –Port 5061 - Enable the changes we made outside the Topology Builder using the
Enable-CsTopologycmdlet and restart Health service (net stop healthservice && net start healthservice). - Download the watcher node file,
WatcherNode.msi, included in the Lync Server 2013 Management Pack (http://www.microsoft.com/en-us/download/details.aspx?id=35842) and copy it to a folder (for example,c:wn). Launch the installation with the following command:C:wnWatcherNode.msi Authentication=TrustedServer - Configure the Lync watcher node. It is required that you have some test users with the right voice policies assigned (in our example,
[email protected],[email protected], and[email protected]):New-CsWatcherNodeConfiguration –TargetFqdn "LYNCSITEPOOL.CORP.COM" –PortNumber 5061 –TestUsers @{Add= "sip: [email protected]","sip: [email protected]", "sip: [email protected]"}
Corrado Mollica has published (in an Italian blog) an interesting script, WatcherNode.ps1, that automatizes a part of the configuration process. It is available at http://blogs.pulsarit.net/2014/06/watchernode-ps1/.