
The resource forest hosts disabled user accounts (used to enable access to Lync services). It is required that the msRTCSIP-OriginatorSID attribute for the disabled accounts maps to the ObjectSID of the account in the user forest. The resource forest topology has a higher level of isolation between Lync and the users' forest, but the increased security also implies increased administrative complexity.
This can be summarized as follows:
- We have to select a topology (central or resource forest)
- We have to configure forest trusts to enable users' authentication into the resource forest
Also, if we have not talked about this aspect before, we have to add another point to the list.
- We have to select a tool (automatic or manual) to create a match between the information required in the resource forest and the ones available in the user forest
If we have already deployed Exchange in our resource forest, we can take advantage of the attribute msExchMasterAccountSid that works as the previously mentioned msRTCSIP-OriginatorSID.
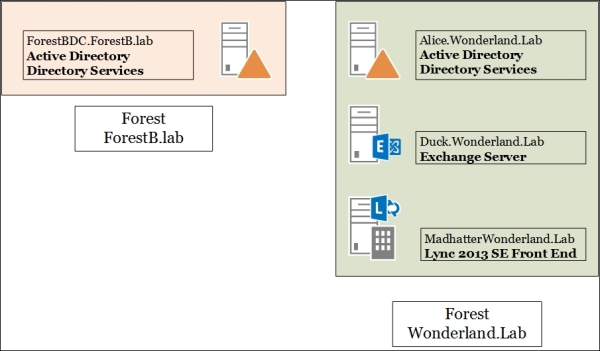
The msExchMasterAccountSid attribute is used to grant Exchange services to the user forests via a disabled account. As we shall see, msExchMasterAccountSid joins with the ObjectSID. Exchange has a practical wizard that helps to map Linked Mailboxes (mailboxes that are accessed by users in a separate, trusted forest) to user accounts in their originating forest. The same operation is available using the Exchange Management Shell. We will be able to use msExchMasterAccountSid to populate the msRTCSIP-OriginatorSID attribute required for Lync. The outline of the laboratory that we will use is shown in the following image:
This is the recipe we will see for planning the steps required to deploy Lync in a resource forest that already contains an Exchange deployment.
Our scenario is based on the assumption that a working Exchange 2013 deployment is already available in the resource forest. In addition, we will use the Lync 2013 Resource Kit (http://www.microsoft.com/en-us/download/details.aspx?id=36821). In a folder inside the installation path of the resource kit, LCSSync, we have a script called sidmap.wsf. This utility takes the existing SID information from the mxEXCHMasterAccountSID attribute (populated by Exchange when we have defined a linked mailbox) and uses this value to fill the msRTCSIP-OrginatorSID attribute, as shown in the following screenshot:

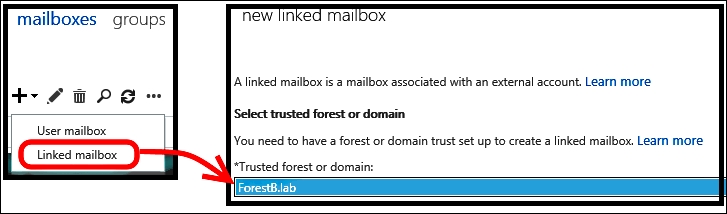
- From Exchange Admin Center (EAC) (accessible through the URL at
https://<CASServerName>/ecp), in the Recipients menu, open Mailboxes. - Click on New and select Linked mailbox. Follow the wizard to select a trusted forest or domain, as shown in the next image:
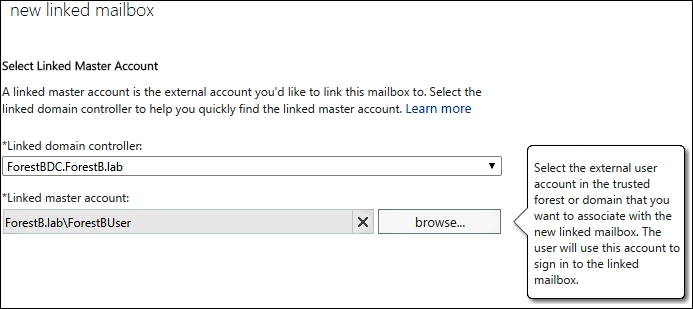
- We will be required to enter the administrative credentials for the trusted domain. In the next screen, we must identify the linked master account, as shown in the next screenshot:
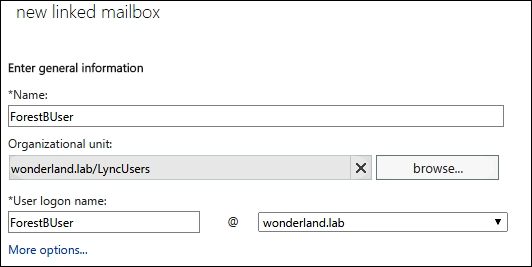
- The wizard requires information about the new disabled account, which will be defined in the resource forest, as shown in the following screenshot:
- Click on Finish.
- Using ADSIEDIT, we are able to verify objectSid of the user in the user forest and compare it with the
msExchMasterAccountSidattribute, as shown in the following screenshot: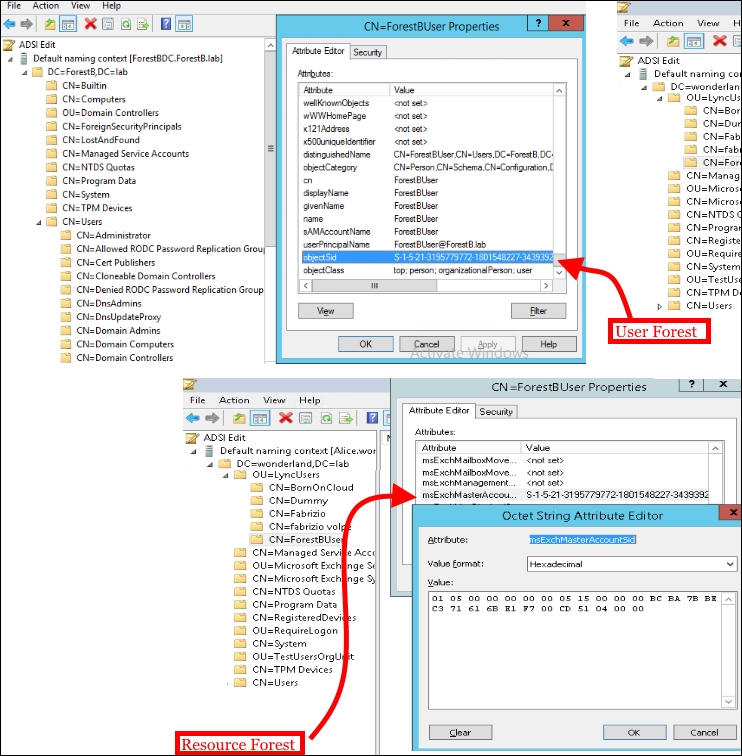
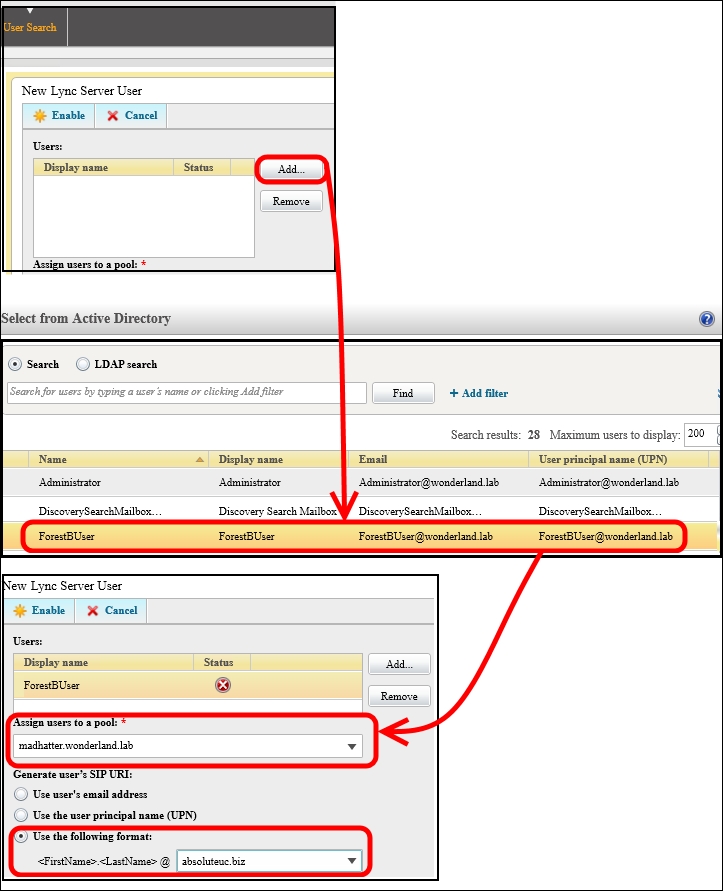
- Now it is possible to enable to Lync the disabled account that resides in the resource forest to Lync, as shown in the following screenshot:
- We have to synchronize the
mxEXCHMasterAccountSIDattribute with themsRTCSIP-OrginatorSIDattribute for the user account that we have SIP-enabled in the previous step. We will use thesidmap.swfscript. In our example, the users will be located in the LyncEnabled OU (OU=LyncEnabled,DC=wonderland,DC=lab). The path to the sidmap.wsf script isC:Program FilesMicrosoft Lync Server 2013ResKitLcsSync. - Open a command prompt as an administrator and launch the following commands:
cd "C:Program FilesMicrosoft Lync Server 2013ResKitLcsSync"
wscript //h:cscript
sidmap.wsf /OU:"OU=LyncEnabled,DC=wonderland,DC=lab" /logfile:c:sipmap.txt
We can verify the result of the script both on the command prompt and on the
sipmap.txtfile, as shown in the following screenshot: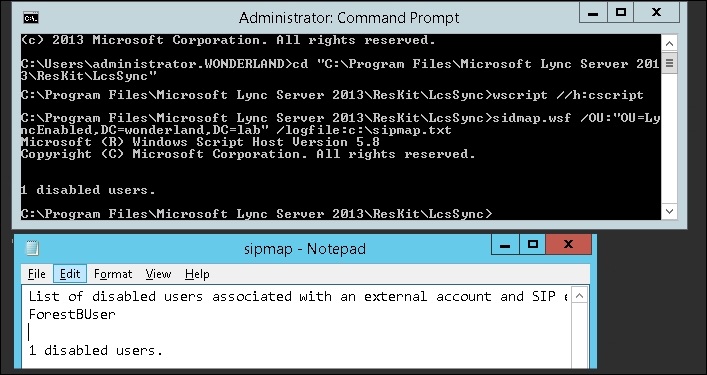
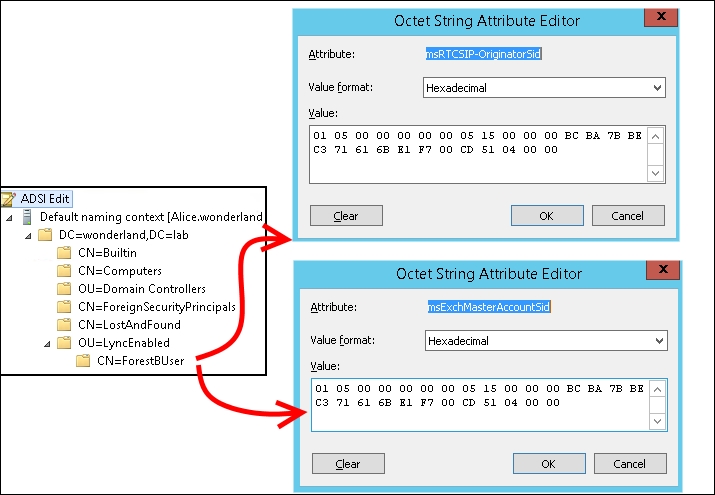
- Using ADSIEDIT, we are able to verify whether the two attributes are aligned, as shown in the following screenshot:
Users that are not mail-enabled have no data in the msExchMasterAccountSid attribute. We will have to manually map the active user's SID to the msRTCSIP-OriginatorSID attribute of the disabled account every time there is no linked mailbox.
The following code is an example of a script we can use to align msExchMasterAccountSid to msRTCSIP-OriginatorSID. We should save the text inside a .ps1 file (for example, enableUC.ps1) and launch it using the following cmdlet .enableUC.ps1 –name "username" –pool "LyncPoolName":
Param([String] $Name, [String] $Pool)
$user = Get-ADuser $name -Properties msExchMasterAccountSid,msRTCSIP-OriginatorSid,proxyAddresses
if (Get-CsUser $user.UserPrincipalName 2> $null)
{
 echo "User Already Enabled"
 Get-CsUser $user.UserPrincipalName
 exit

}
foreach ($smtp in $user.proxyAddresses)
{
   if ($smtp -clike "SMTP:*")
   {
        $sip = $smtp.ToString()
        $sip = $sip.Replace("SMTP", "sip")
        $sip
   }
}

if ($user.msExchMasterAccountSid -notlike $null)
{
    Set-ADUser -Identity $user -Add @{"msRTCSIP-OriginatorSid" = $user.msExchMasterAccountSid.Value.ToString() }
    enable-CsUser -Identity $user.UserPrincipalName -RegistrarPool $Pool -SipAddress $sip
    echo "User Enabled to Lync"
    Get-CsUser $user.UserPrincipalName
    exit
}Shawn Cathcart wrote a couple of handy scripts to automate the enabling of the cross-forest Lync user and the SID attributes' verification. They are available in the User Enabling in a Lync Resource Forest Deployment post at http://thecathcart.blogspot.it/2012/07/user-enabling-in-lync-resource-forest.html.
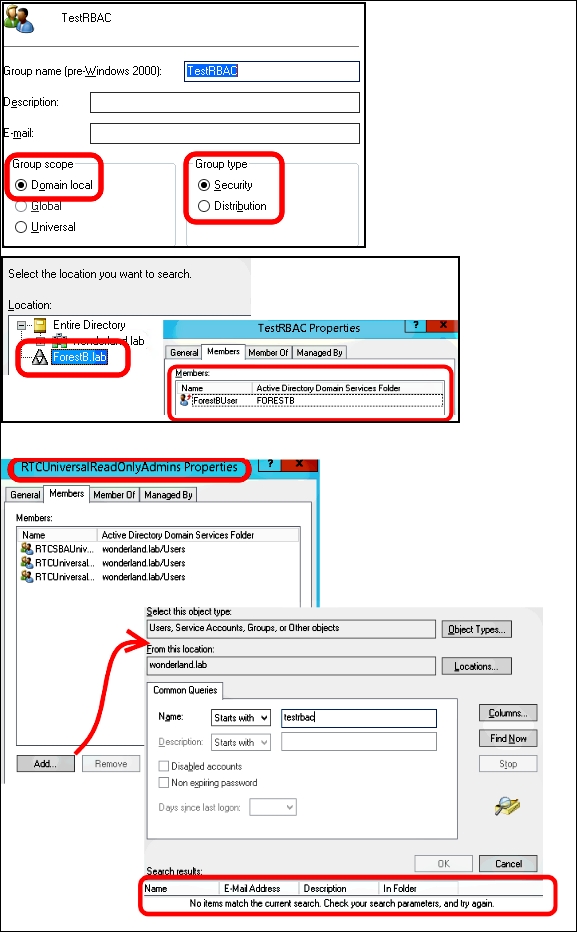
In the previously mentioned post, there is also important information about Lync RBAC in a resource forest scenario. The forest preparation step of the Lync 2013 installation creates the Role-Based Access Control (RBAC) groups (we have mentioned them in the Controlling administrative rights with RBAC and custom cmdlets recipe of Chapter 1, Lync 2013 Security). RBAC makes it easier to delegate administrative tasks that grant limited permissions and tools to the user that receives the delegation. In a resource forest scenario, the forest preparation is executed only in the forest that hosts the Lync services. Lync RBAC Roles are associated with Universal Security groups in the resource forest. Only local security groups can take members and groups from a trusted forest, but we are not able to add them in a universal security group. The creation of a domain local group, inserting a user forest's account, and adding the local group in the RTCUniversalReadOnlyAdmins group is shown in the following screenshot:
So, while there are some ways to overcome this problem with Exchange in a resource forest (see the Understanding multiple-forest permissions post at http://technet.microsoft.com/en-us/library/dd298099(v=exchg.150).aspx), the only way to administer Lync is to have an account in the same forest as the servers that are deployed.