
Several steps must be performed to fully configure the Unified Messaging integration between Lync 2013 and Exchange 2013. We will start by describing the prerequisites to achieve this integration.
The following prerequisites must be in place in order to configure the Unified Messaging integration:
- Microsoft Exchange Unified Messaging role: The UM role should be installed on an Exchange 2007 SP1 or later, Exchange 2010 RTM or later, or Exchange 2013 RTM or later versions.
- Certificates: The Exchange UM certificate installed must be valid, signed by a certification authority who is trusted by the Lync Front End server(s). The Exchange server also needs to trust the certification authority who signed the Lync certificates. The Exchange certificate must have the FQDN of the Exchange Unified Messaging Server as a subject name and must ideally be issued by a private certification authority. Getting Exchange Unified Messaging from a public certification authority can be more expensive (no cost is involved when it's signed by an internal one) and even impossible if the FQDN of the Exchange Unified Messaging Server is from a non-Internet routable domain (for example,
server.domain.local). - Enterprise Voice enabled users: To be able to use the Unified Messaging features on the Lync client, the user must be Enterprise Voice enabled on Lync. You can use the Lync control panel to enable the user for Enterprise Voice. More details on this can be found in Chapter 3, Lync Dial Plans and Voice Routing.
Here are the steps to configure Unified Messaging integration.
The first step of the configuration should be to configure valid certificates on the Exchange server and assign the Unified Messaging Call Router and the Unified Messaging service to these certificates. In Exchange 2013, the Unified Messaging Call Router service is part of the Client Access role, and the Unified Messaging Service is part of the Mailbox role. They can both coexist on the same server if you have both the Exchange 2013 roles installed on this server. The Unified Messaging Call Router service will receive all the SIP requests from Lync 2013 and redirect them to the Unified Messaging Service.
Ideally, as I just mentioned in the previous section, you should request a certificate from an internal certification authority, for each of the Unified Messaging servers. It's cheaper and doesn't require the internal domain name to be Internet-routable. The certificate can be requested both via the Exchange Admin Centre and via the Exchange Management Shell.
To request a certificate via the Exchange 2013 EAC, proceed with the following steps:
- Log in to the EAC as an Exchange Administrator.
- On the left menu, click on Servers.
- On the Tab options, click on Certificates.
- Select the server you want to request the certificate to and click on + to request a new certificate.
- Select create a request for a certificate from a certification authority.
- Select a friendly name for the certificate.
- Select a server to store the certificate request in.
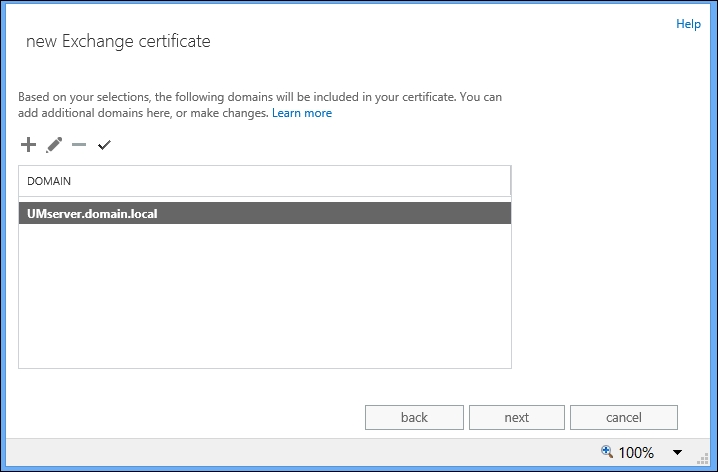
- On the names, make sure that you have the internal FQDN of the server.
- Fill in the certificate details and choose the path where you want to store the request file. Click on Finish.
The following screenshot illustrates a certificate request done via the EAC:
Once the certificate request is done, you should issue the certificate on your certification authority (internal or public) and then complete the request via the EAC by selecting the certificate request on the EAC and choosing the Complete certificate request option. You will then be prompted to enter the path for the certificate issued by your CA.
To use the Exchange Management Shell to create a new certificate, you need to run the following commands:
|
Command |
What does the command do? |
|---|---|
|
$requestfile = New-ExchangeCertificate -GenerateRequest -SubjectName "c=US, o=Company, cn=UMserver.domain.local" -DomainName UMServer.domain.local -PrivateKeyExportable $true
|
Creates a request file variable with the certificate request command |
|
$requestfile | out-file c:certificaterequest.txt
|
Generates the certificate request and stores the file in the specified path |
The following screenshot demonstrates the commands referenced previously:

Once the certificate is requested and issued, you should complete the certificate request by importing it to the Exchange 2013 certificates computer store. The following command should be used to import the certificate via the Exchange Management Shell:
|
Command |
What does the command do? |
|---|---|
|
Import-ExchangeCertificate -FileData ([Byte[]]$(Get-Content -Path C:certificatesUMcertificate.crt -Encoding byte -ReadCount 0))
|
Imports the generated certificate to the Exchange 2013 UM Server |
For official guidance on how to request a new certificate on Exchange 2013, refer to http://technet.microsoft.com/en-us/library/bb125165(v=exchg.150).aspx.
After installing the new certificate on the Exchange 2013 UM Server and making it available for the usage of Exchange Server, you need to assign the UM services to this certificate. Again, this can be done both via the EAC or the Exchange Management Shell. The following command should be used to enable the certificate via the Exchange Management Shell:
|
Command |
What does the command do? |
|---|---|
|
Enable-ExchangeCertificate 67DA55B9F5AB2A735E7CBD11A895F7757ACC07C4 -services "UM,UMCallRouter"
|
Enables the certificate with the referenced thumbprint for the Unified Messaging and Unified Messaging Call Router services |
Now, let's take a look at how you should prepare your Exchange UM services to both work in TLS mode and use the certificate you just created.
To set the UM services via the EAC to work in TLS mode, proceed with the following steps:
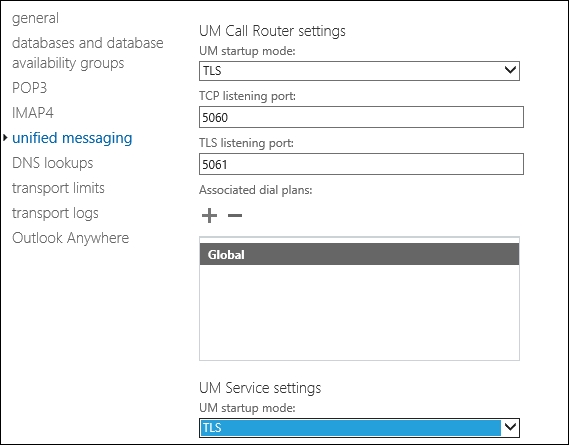
- Go to servers, and on the tab also called servers, double-click on your UM server to access the properties.
- Go to the unified messaging option and configure both the UM Call router settings option and the UM Service settings startup mode to TLS, as shown in following screenshot. Click on save to exit.
- To set the UM services via the Exchange Management shell to work in TLS mode, run the following commands:
UM Service
Set-UMService -Identity UMServer -UMStartupMode TLS
UM Call Router Service
Set-UMCallRouterSettings -Server UMServer.domain.local -UMStartupMode TLS
Besides configuring the Unified Messaging services to run in TLS mode, you also need to enable the certificate you just created to both these services. We showed you how to do this via the Exchange Management Shell. Now, let's look at the steps to do this via the EAC.
To enable the certificate via the EAC, perform the following steps:
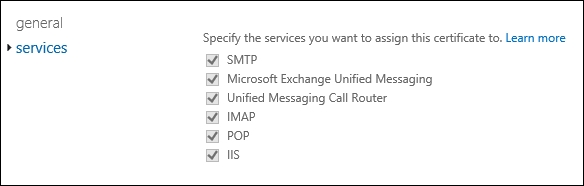
- On the EAC, go to servers and then to the certificates tab. Double-click on the certificate you issued for UM. Make sure that you're not selecting the certificate used for other services.
- Click on the services option and tick the checkbox for both UM services, as shown in the following screenshot. Click on Save.
- As referenced previously, to enable the certificate via the Exchange Management Shell, run the following command:
Enable-ExchangeCertificate -Server UMServer.domain.local -Thumbprint <Certificate thumbprint> -Services UM, UMCallRouter - To get the certificate thumbprint for the correct certificate, run this command:
Get-exchangecertificate |fl - Then, check the certificate details. Take note of the thumbprint of the certificate you are going to use for UM.
The next step will be to create a dial plan. This can be done, as usual, via the EAC or via the Exchange Management Shell. Once you configure the UM dial plan, you should also make sure that you configure the dialing restrictions both on the dial plan and on the UM mailbox policy.
To create a new UM dial plan via the EAC, proceed with the following steps:
- Open the EAC and click on the Unified Messaging option.
- Click on + to create a new dial plan. Define Name, Extension length, Dial plan type, VoIP security mode, Audio language, and Country/Region code, as shown in the following screenshot. Then, click on Save.
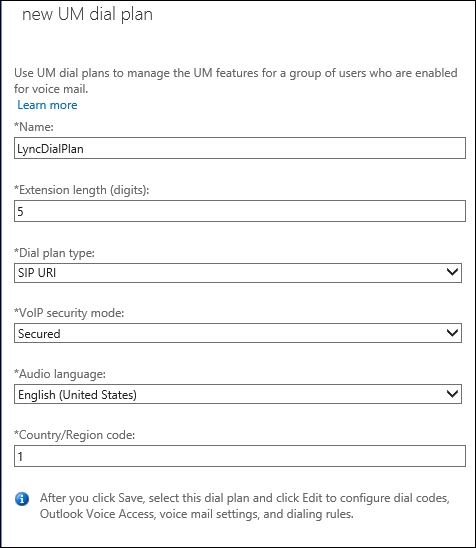
The nonoptional values when creating the dial plan are as follows:
- Dial plan type: Select SIP URI
- VOIP security mode: Select Secured
Once the dial plan is created, you should edit it, and it's fundamental that you add the following:
- An Outlook Voice Access number (for example, +44 123 456 7890).
- Dialing rules that you should create in the Dialing rules section and add in the Dialing authorization section. To have no dialing restrictions on your UM server, it's recommended that you create a rule for which the Number Pattern and the Dialed Number values are *.
Finally, from within the UM dial plan properties, you should access the UM mailbox policy properties and also add the previously configured dialing rules on the Dialing Authorization section. Now, proceed with the following steps:
- To create a new Exchange UM dial plan via the Exchange Management Shell, run the following command:
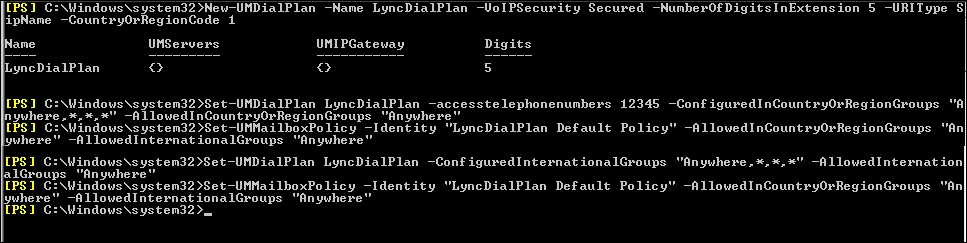
New-UMDialPlan -Name LyncDialPlan -VoIPSecurity Secured -NumberOfDigitsInExtension 5 -URIType SipName -CountryOrRegionCode 1 - To configure the dialing restrictions and the Outlook Voice Access number for the new dial plan, run the following commands:
Set-UMDialPlan LyncDialPlan –accesstelephonenumbers <OVA Number> -ConfiguredInCountryOrRegionGroups "Anywhere,*,*,*" -AllowedInCountryOrRegionGroups "Anywhere"
Set-UMDialPlan LyncDialPlan -ConfiguredInternationalGroups "Anywhere,*,*,*" -AllowedInternationalGroups "Anywhere"
- To configure the UM mailbox policy with the dialing rules, run the following command:
Set-UMMailboxPolicy -Identity "<Policy Name>" -AllowedInCountryOrRegionGroups "Anywhere" -AllowedInternationalGroups "Anywhere"The output can be seen in the following screenshot:
- Now that we have a new Exchange dial plan created and configured, we need to associate it to the Unified Messaging Server. To accomplish this, run the following Exchange Management Shell command:
Set-UMService -Identity UMServer -DialPlans LyncDialPlan - Finally, on the Exchange 2013 Server with the Unified Messaging service and the Unified Messaging call router service, you need to make sure that both services are started. Remember that as mentioned earlier, after changing the startup mode and assigning the certificate to both services, it's mandatory to restart them.
If not created already, you should create a dial plan on Lync. The dial plan name does not need to match the Exchange UM dial plan, unless you are using Exchange 2007 SP1 or Exchange 2010 RTM.
For information on how to create a Lync dial plan, refer to the official post at http://technet.microsoft.com/en-us/library/gg398909.aspx.
In addition, it's recommended that you also create a normalization rule in Lync. The following command is an example of a Lync Management Shell cmdlet to create a Lync normalization rule:
New-CsVoiceNormalizationRule -Name 'Exchange UM' -Parent "Central" -Description "Exchange UM" -Pattern '^(250d{1})$' -Translation '+$1' -IsInternalExtension: $TRUE | Out-Null
The preceding command assumes that you have Exchange Unified Messaging access numbers with 4 digits and starting with 250 (for example, 2501).
After creating the dial plan, we need to run the Exchange Util configuration script. This script is fundamental to get the integration with Lync working, as it will give permissions to the Lync Server on the Exchange UM objects and create a new UM IP gateway pointing to the Lync pool. You can run the script as many times as you like, and you should make sure that at the bottom of the output of the script, the dial plan you created and the Lync pool FQDN are present.
To run the script, open the Exchange Management Shell and navigate to the scripts directory under the Exchange install path. As an example, navigate to C:Program FilesMicrosoftExchange Serverv15scripts.
Then, run the following command:
.ExchUCUtil.ps1
You can see the initial output of the script as follows:

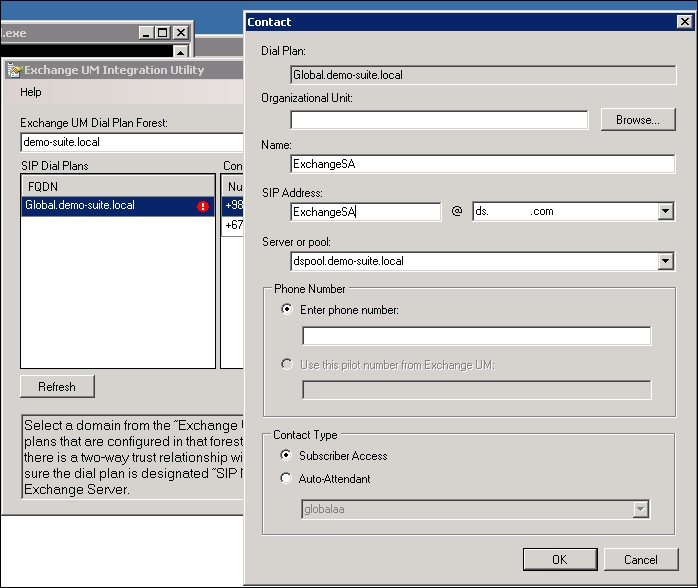
Now, we need to create Lync contacts for UM for the subscriber access number and auto attendants, if you have any. To do this, navigate to C:Program FilesCommon FilesMicrosoft Lync Server 2013Support.
Then, run the OcsUmUtil.exe tool.
From within the tool, proceed with the following steps:
- Click on load data and then on add to add a new subscriber access contact.
- Enter all the details for the contact, including whether it's subscriber access or auto attendant and the number associated with it.
Once the preceding steps have been completed, close the tool. The following screenshot shows the options present in the tool:
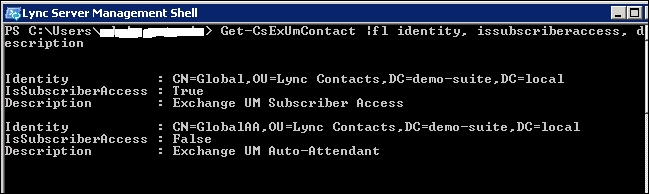
You can check the contacts created by the tool via the Lync Management Shell by running the following command:
Get-CsExUmContact |fl
The output of the Shell can be seen in the following screenshot:
Finally, we need to restart the Lync 2013 Front End service.
Once this is done, the integration between Lync 2013 and Exchange 2013 at the Unified Messaging level is done!
Although the task of managing your Unified Messaging users is exclusive to Exchange Administrators, we decided to include a small section on the subject. We will show you how to enable a user for UM, change the user UM settings, or get a list of all the UM-enabled users and their main settings.
You can use both the Exchange Administrative Centre and the Exchange Management Shell to enable your Exchange users for UM.
To enable a user for UM via the EAC, perform the following steps:
- Log in to the EAC as an Exchange Administrator.
- Go to Recipients and select your user. On the right menu, under Phone and Voice Features, click to enable Unified Messaging.
- Select Unified Messaging Mailbox Policy and click on Next.
- If the user is enabled for Lync and defined as an extension, those values should be prepopulated, and you just need to click on Finish, as shown in the following screenshot:
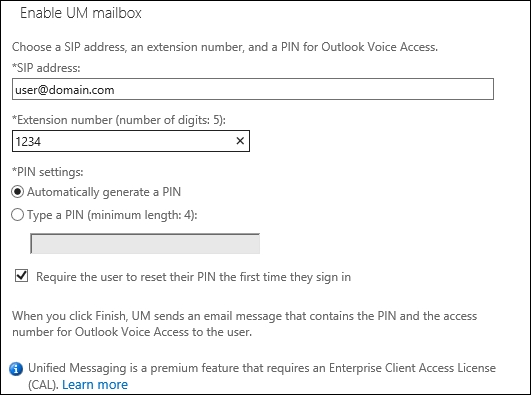
- To enable a user for Unified Messaging via the Exchange Management Shell, run the following command:
Enable-UMMailbox -Identity [email protected] -UMMailboxPolicy UMMailboxPolicy -Extensions 1234 - Once the user is enabled for Unified Messaging, they will receive an e-mail with all the Exchange 2013 Unified Messaging details for their account.
You can access the user's Unified Messaging details using the EAC or running the Exchange Management Shell cmdlet, Get-UMMailbox. You can change these settings via the EAC by going to the same section where you went to enable the user and clicking on view settings, or you can do it using the Set-UMMailbox cmdlet. A lot of settings can be changed on the user UM properties, such as the phone number. You can also enable or disable the Play on Phone feature or the subscriber access. Refer to the official link at http://technet.microsoft.com/en-us/library/bb124893(v=exchg.150).aspx for guidance on how to change the UM settings and a list of what settings can be changed.
In addition to giving you the recipes to configure the Unified Messaging integration between Lync 2013 and Exchange 2013, you can find information in the following sections on how to list Unified Messaging attributes, export this information, and test the Unified Messaging configuration, among others. Enjoy!
The Exchange Management Shell is a powerful tool that you can use to get information such as:
- List of users with Exchange UM enabled and disabled
- List with all the display names, SIP addresses, and extensions for UM-enabled users
- Number of UM-enabled users per mailbox policy
The preceding examples are just a few among many features that you can use the Exchange Management Shell to achieve.
Now, let's see how we can achieve this information by running an Exchange Management Shell cmdlet.
To list all the users with Unified Messaging enabled, run the following command:
get-mailbox |where-object {$_.UMEnabled -eq $true}
To list all users with unified messaging disabled, run the following command:
get-mailbox |where-object {$_.UMEnabled -eq $false}
To export this list into a CSV file, with the name, alias, and UMEnabled status, run the following command:
get-mailbox |where-object {$_.UMEnabled -eq $false} |Select-Object Name, Alias, UMEnabled |export-csv c: estumdisabledusers.csv -NoTypeInformation
To export a list of the display names, UM mailbox policy, and extensions of all your Unified Messaging users to CSV run the following command:
Get-UMMailbox |select-object DisplayName, UMMailboxPolicy, @{Name='Extensions';Expression={[string]::join(";",($_.Extensions))}} |Export-Csv c: estumusers2.csv -NoTypeInformation
To get a list of users using a specific UM mailbox policy, run the following command:
Get-UMMailbox |where-object {$_.UMMailboxPolicy -eq "Global Default Policy"}
To count the number of users using a specific mailbox policy, run the following command:
(Get-UMMailbox |where-object {$_.UMMailboxPolicy -eq "Global Default Policy"}).count
To test the UM connectivity, run the following cmdlet from the Lync Management Shell:
$credential = Get-Credential "domain.localsenderusername"
Test-CsExUMVoiceMail -TargetFqdn "lyncpool.domain.com" -ReceiverSipAddress "sip:[email protected]" -SenderSipAddress "sip:[email protected]" -SenderCredential $credential
The output of the preceding PowerShell cmdlet should be Success. Then, check the receiver mailbox and see whether the test command sent a test voicemail to their inbox successfully.
For some other tips on the Exchange Unified Messaging configuration and specific scenarios such as multilanguage auto attendants, refer to the excellent blog article at http://msucblog.wordpress.com/2013/04/09/multilanguage-auto-attendant-with-ms-exchange-2010-um-and-lync/.