
Having created sites, subnets, and regions, we have still not told Lync how sites connect to each other. This is what region links and routes are for. Region links define bandwidth policies between sites, and region routes are used to connect sites by creating possible audio paths.
The following are the five steps to add region links:
- Launch the Lync Server Control Panel with an account with the RTCUniversalServerAdmins rights, and navigate to Network Configuration | Region Link.
- Select New.
- Enter a name for the link, select the two sites that will be connected through this link, and enter which Bandwidth policy should apply, as shown in the following screenshot:

- Press Commit to save.
- This process is complete when all the links are added.
The following are the steps to add region routes:
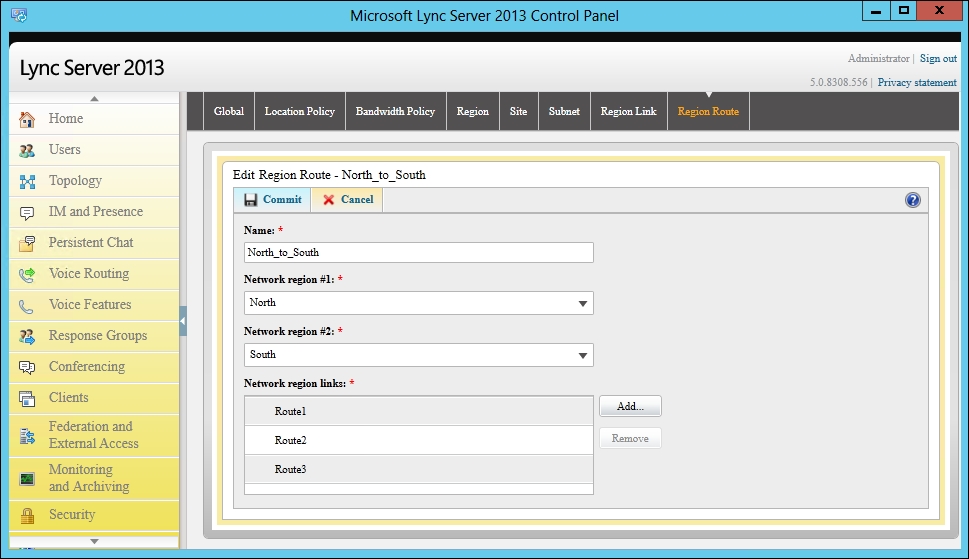
As with the other tasks, this task can also be completed using PowerShell.
The following are the three steps to add region links using PowerShell:
- Create a CSV file with all the information required, which looks similar to this:
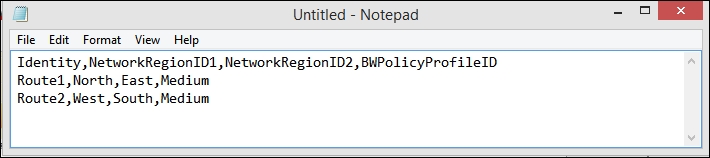
- Save the file (the example shows
C:LyncScriptssubnets.csv). - Run the following PowerShell command to import and configure:
Import-Csv C:LyncScripts
egionlinks.csv | foreach {
New-CsNetworkRegionLink -Identity $_.Identity`
 -NetworkRegionID1 $_.NetworkRegionID1`
 -NetworkRegionID2 $_.NetworkRegionID2`
 -BWPolicyProfileID $_.BWPolicyProfileID
}
Proceed with the following steps to add region routes using PowerShell:
- Create a CSV file with all the information required, which looks similar to this:
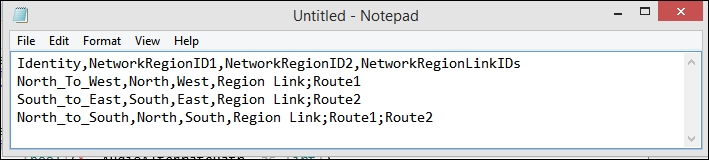
- Save the file (the example shows "
C:LyncScriptsRegionRoutes.csv). - Run the following PowerShell command to import and configure:
Import-Csv C:LyncScriptsRegionRoutes.csv| foreach {
$_.NetworkRegionLinkIDs = $_.NetworkRegionLinkIDs`
 -replace ';',','
New-CsNetworkInterRegionRoute -Identity $_.Identity`
 -NetworkRegionID1 $_.NetworkRegionID1`
 -NetworkRegionID2 $_.NetworkRegionID2`
 -NetworkRegionLinkIDs $_.NetworkRegionLinkIDs
}
- It is also possible to connect two sites that are directly connected through WAN but do not belong to any region. For this, we must use the New-CsNetworkInterSitePolicy command (it is not available through Lync CSCP). Simply run the following in an elevated administrative prompt (the Medium bandwidth policy is just an example):
New-CsNetworkInterSitePolicy`
 -InterNetworkSitePolicyID Southwest_Southeast`
 -NetworkSiteID1 Southwest`
 -NetworkSiteID2 southeast`
 -BWPolicyProfileID Medium
- The New-CsNetworkRegionLink post at http://technet.microsoft.com/en-us/library/gg398437.aspx
- The New-CsNetworkInterRegionRoute post at http://technet.microsoft.com/en-us/library/gg398779.aspx
- The New-CsNetworkInterSitePolicy post at http://technet.microsoft.com/en-us/library/gg412844.aspx
..................Content has been hidden....................
You can't read the all page of ebook, please click here login for view all page.