
It is a good thing to plan the entire CAC and QoS policy before beginning the configuration. Having done this, we can start adding the bandwidth policies. We could skip this and go directly to the Region tab, but once we get to the Site tab, we need to refer to these policies. Keep to the plan. Move left to right. Don't start this project unless the master QoS and CAC plan is complete.
Begin this task only after carefully collecting data and when the planning of the entire QoS and CAC configuration is complete.
Proceed with the following steps for creating network bandwidth policies:
- Launch the Lync Server Control Panel with an account that has the RTCUniversalServerAdmins rights, and navigate to Bandwidth Policies under the Network Configuration section.
- Select New as shown in the following screenshot:

- Enter the values desired for this policy (from the previous BW table).
- Name: This is also known as Identity in PS.
- AudioBWLimit: This is the total BW dedicated to audio.
- AudioBWSessionLimit: This is the maximum BW per audio call.
- VideoBWLimit: This is the total BW dedicated to videos.
- VideoBWSessionLimit: This is the maximum BW per video call.
- Description: This is not required but recommended.
- Click on Commit.
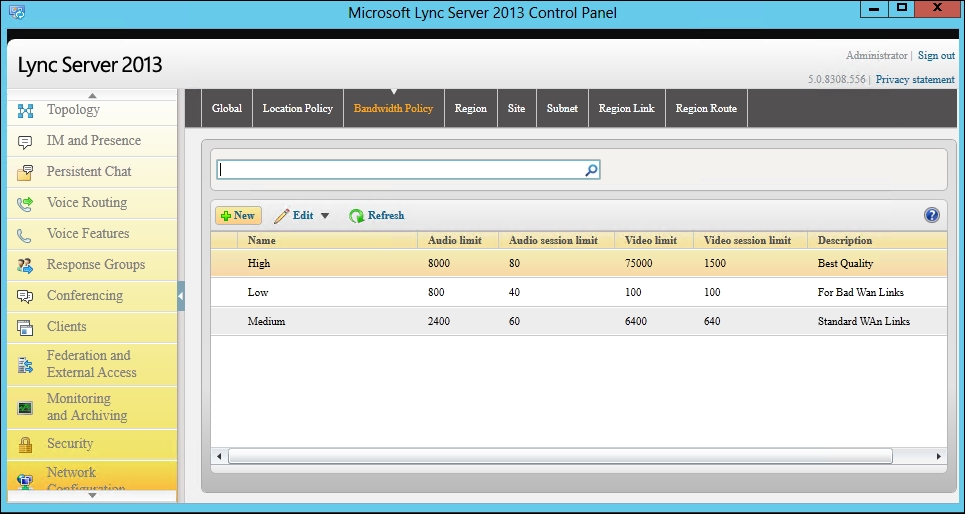
When this task is complete, the CSCP should look similar to the following screenshot:
This task can be completed in PowerShell as well, and if there is a call for many policies, PowerShell might be an easier and quicker way to apply these settings:
- Create a CSV file with all the information required, as shown in the following screenshot (the header row is named according to the matching properties to be imported):
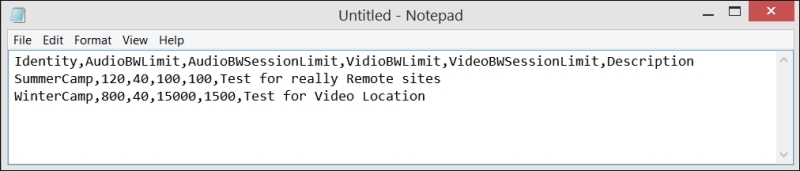
- Save the file (the example script shows
C:LyncScriptsQOSCAC.csv). - Run the following PowerShell command to import and configure:
Import-Csv C:LyncScriptsQOSCAC.csv | foreach {
New-CsNetworkBandwidthPolicyProfile -Identity $_.Identity`
 -AudioBWLimit $_.AudioBWLimit`
 -AudioBWSessionLimit $_.AudioBWSessionLimit`
 -VideoBWLimit $_.VideoBWLimit`
 -VideoBWSessionLimit $_.VideoBWSessionLimit`
 -Description $_.Description -Verbose
}
- The New-CsNetworkBandwidthPolicyProfile post at http://technet.microsoft.com/en-us/library/gg398675.aspx