
Back Up and Restore a Site Collection
A site collection backup is a complete, full-fidelity backup of a single site collection. Full-fidelity means that all content and the state of the site collection are preserved in entirety. Site collection backups are useful when you need a full-fidelity backup but do not want to back up a whole content database. For example, you might have a training area stored in a site collection, and you periodically need to restore it to its original state.
When a site collection backup runs, SharePoint extracts from the content database only the table rows that are specific to the site collection. This makes a site collection backup more overhead intensive and slower than a content database backup. For this reason, try to avoid running regular site collection backups for site collections larger than 15 GB and only do so during off-peak hours.
When a site collection backup runs, SharePoint places a read-only lock on the site collection to preserve its integrity. During this time, the site collection can be used, but the UI is modified to prevent changes. This behavior can be adjusted as covered in the “Using PowerShell to Back Up a Site Collection” section.
Unlike a farm backup, a site collection backup is stored as a single file. The backup command can be issued from Central Administration or PowerShell and whichever way you run it, the resulting backup file is the same. A site collection backup can only be restored using PowerShell.
Using Central Administration to Back Up a Site Collection
To perform a site collection backup using Central Administration, follow these steps:
1. Click Backup And Restore, and then select Perform A Site Collection Backup.
2. As shown in Figure 16.4, select the site collection.
Figure 16.4: Site collection backup
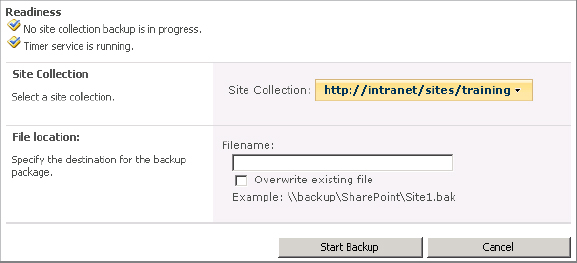
3. For Filename, specify the full path and filename where the backup should be stored. While this can be a local path, we recommend that you use a UNC path. Make sure that the farm account has read/write permissions to this share and the underlying NTFS folder.
4. Optionally, choose to overwrite the existing file at this path. If a file already exists and this option is not checked, the backup will fail.
5. Click Start Backup. SharePoint creates a new timer job for this backup and schedules it to run immediately.
Using PowerShell to Back Up a Site Collection
The PowerShell cmdlet you use to perform a site collection backup is Backup-SPSite. When you use it to back up a site collection, a timer job is not issued, and the backup is done on the fly within the PowerShell process.
Here is the syntax with the most common parameters:
Backup-SPSite <URL> -Path <BackupFile> [-Force][-NoSiteLock] [-UseSqlSnapshot]
The parameters are as follows:
- The -Force switch is used to overwrite the backup file.
- The -NoSiteLock switch tells SharePoint not to apply a read-only lock on the site collection during backup. We don’t recommend that you use this switch in normal situations.
- The -UseSqlSnapShot switch tells SQL Server to create a database snapshot during the site collection backup. Using a snapshot allows the site collection to remain writable during backup. This feature is only available if you are running the Enterprise version of SQL Server. To learn more about database snapshots, see the article “Database Snapshots” at http://msdn.microsoft.com/en-us/library/ms175158.aspx.
Here is a basic example of backing up a single site collection:
Backup-SPSite http://intranet/sites/training
-Path \NAS01BackupsTraining.bak
The following is a more advanced example. This sequence of cmdlets iterates through each site collection in a web application and issues a site collection backup for each one:
Get-SPWebApplication "SharePoint - intranet" |
Using PowerShell to Restore a Site Collection
A site collection backup is most commonly restored using PowerShell. The cmdlet that restores a site collection is Restore-SPSite, and the syntax is similar to Backup-SPSite:
Restore-SPSite <URL> -Path <BackupFile>
The -Force switch is used if you will be restoring on top of an existing site collection. In this case, the existing site collection is first deleted.
The -DatabaseName switch allows you to specify which content database to use when restoring the site collection. This saves you from having to manually adjust each database’s status as covered in Chapter 2, “Creating and Managing Web Applications.” The content database must already exist and be associated with the web application.
This example restores a site collection into the designated content database:
Restore-SPSite http://intranet/sites/training
When you’re restoring a site collection, the managed path does not need to match what was used when backing up. For example, you can also restore the training site collection to the following URL: http://intranet/sites/training_copy. You just need to make sure that a matching wildcard or explicit managed path already exists. To learn more about managed paths, see Chapter 3, “Creating and Managing Site Collections.”
NOTE You cannot restore a duplicate copy of a site collection within the same content database where the original is currently stored. This is because objects in a site collection are uniquely identified by a GUID, and these GUIDs must be unique across the database.
SharePoint also lets you restore site collections across web applications and farms. If you restore to a different farm, it must be the same SharePoint version and should be the same build (patch level).