Configure Site Collection Security
While permissions can be granted to multiple site collections through the web application policy as covered in previous sections, this is only used for special cases. Users are authenticated at the web application level, and authorization is usually done at a site collection level. In other words, for regular, day-to-day permission management, permissions are assigned via individual site collections.
By default, permissions are inherited or cascade down to all websites, lists, and libraries in the site collection hierarchy. Thus, permissions granted to the top-level website also apply to a document buried deep within a site collection. As you will learn in successive sections, this inheritance can be broken.
Adding or Removing Site Collection Administrators
A site collection administrator has full control permissions over a site collection. The purpose of this role is to delegate the day-to-day management of a site collection to others in the organization, usually non-IT personnel. This concept is covered more thoroughly in Chapter 3, “Creating and Managing Site Collections.” This section describes how to add and remove site collection administrators to and from site collections.
There are three ways site collection administration rights can be assigned or removed:
- Through the web application policy, as covered in the previous section. Keep in mind, this sets site collection administration permissions to all site collections in the web application.
- By changing the site collection administrators in Central Administration. This approach allows you to define a maximum of two site collection administrators for a single site collection.
- Through the Site Settings page for the top-level website within the site collection. This allows you to grant as many site collection administrators as needed.
NOTE A site collection administrator’s permissions in a site collection can only be revoked by using a web application policy. Assuming this type of policy is not in force, a site collection administrator always has full control access to all websites, lists, and libraries in the site collection, even if not specifically granted.
To change, add, or remove site collection administrators using Central Administration, follow these steps:
1. Click Application Management, and then select Change Site Collection Administrators.
2. In the Site Collection box shown in Figure 14.3, change the selected site collection if needed. When changing this, you must first select the web application and then the site collection.
Figure 14.3: Managing site collection administrators

3. The primary and secondary site collection administrators are shown. Accounts specified here must be individual users, not security groups. If two administrators are already assigned, you must remove one of them before you can assign another, or grant access one of the other two ways. As a general rule, it’s best to have two site collection administrators for each site collection.
4. Click OK to save your changes.
Site collection administrators can also be granted from within the site collection. To use this option, you must already have access to the site collection as a site collection administrator. So, for example, if a farm administrator does not have access to a site collection and must grant themself access, this approach cannot be used.
To manage site collection administrators from within the site collection, follow these steps:
1. Access the site collection and connect to the top-level website.
2. Select Site Actions ⇒ Site Settings.
3. In the Users And Permissions category, select Site Collection Administrators.
4. Add, change, or remove site collection administrators as needed. As before, only individual users can be specified. More than two administrators can be assigned.
5. Click OK to save changes.
Creating Permission Levels
When assigning permissions to users or groups, you do so by granting permission levels. Each site collection has its own built-in set of permission levels such as Full Control, Design, Contribute, and Read, and you can create custom ones. Recall from the definition in the “Configure Web Application Security” section that a permission level is a collection of base permissions. While you do not grant base permissions directly, you can indirectly do so by creating a custom permission level that includes the base permissions.
A practical example is that you want users to be able to view, create, and edit content but not delete. In other words, you want them to have all of the Contribute base permissions except delete. You can do so by creating a custom permission level and removing the Delete Items base permission. As with all aspects of permission assignments, we advise you to follow the principle of least privilege where possible. This means that you should only grant permissions that are necessary to get the job done.
NOTE SharePoint does allow you to modify the built-in permission levels, but this usually causes confusion and is not recommended.
Here is how you can create a custom permission level.
1. Access the site collection and connect to the top-level website.
2. Select Site Actions ⇒ Site Permissions.
3. In the ribbon, select Permission Levels
4. The current permission levels for this site collection are shown. You can either copy an existing permission level and modify it or create a new one from scratch.
- To copy and modify an existing permission level, click the permission level and then click the Copy Permission Level button.
- To create a new permission level from scratch, click the Add A Permission Level link.
5. Provide the name and description for the permission level.
6. In the list of base permissions, check those that you want to include in this permission level. Keep in mind that some base permissions are mutually inclusive, so that if you include one permission, it may automatically include others.
7. Click Create to save the new permission level.
Managing SharePoint Groups
A group organizes users to simplify permission assignments. For example, if you have 10 users who all need the same access to a website, it is easier to place the users in a group and give the group permission than to give permissions to each user individually.
When granting permissions, SharePoint supports two different types of groups: SharePoint groups and external groups from your authentication provider, such as AD security groups. SharePoint groups are specific to a site collection and are stored in the top-level website. SharePoint groups cannot be nested, so you cannot place one SharePoint group within another. However, external groups can be placed within SharePoint groups.
Default SharePoint Groups
When creating a site collection, default SharePoint groups are created, which vary depending on the site template selected. The most common ones, however, are shown in Table 14.1.
Table 14.1: Default SharePoint groups and their permissions
| SharePoint Group Name | Default Permissions |
| Visitors | Read |
| Members | Contribute |
| Owners | Full Control |
Creating a New SharePoint Group
New SharePoint groups can also be created to suit your needs. Here are the steps to create a new group:
1. Click Site Actions ⇒ Site Permissions.
2. In the ribbon, click Create Group.
3. The Create Group page is displayed. Enter a meaningful name for the group. The name will be seen when granting permissions.
4. In the About Me section, optionally, provide a description.
5. Specify the owner of the group. This field defaults to the website owner. The owner is able to manage group membership.
6. Define who can view the membership of the group—everyone or just group members.
7. Define who can edit the membership of the group—the Group Owner only, or Group Members. (No matter what setting you use here, any user with Full Control access to the top-level website, including site collection administrators, can also manage group membership.)
8. Decide whether users can request to be added or removed from the group.
9. Decide whether membership requests are automatically accepted. For security reasons, this should be used cautiously.
10. If you are allowing requests to join/leave the group, enter an email address where requests should be sent. This is usually the address of the group owner.
11. Optionally, grant the permission levels shown for the current website. These permissions can also be granted after the group is created.
12. Click Create to create the group.
NOTE Regardless of which website you’re working with when you create a SharePoint group, the group is stored in the top-level website and applies to the whole site collection.
Adding Users and Groups to SharePoint Groups
Users and external groups from your authentication provider (for example, AD), can be added to SharePoint groups. Users and groups you add receive the same permissions as other members of the SharePoint group. Here are the steps:
1. Click Site Actions ⇒ Site Settings.
2. In the Users And Permissions category, click People And Groups.
3. In the left navigation area, select the SharePoint group. If the group is not listed, click the More link and then select the group.
4. Click New ⇒ Add Users.
5. In the Grant Permissions dialog box, specify the users and/or external groups that you want to add. These groups can only be groups from your authentication provider, not SharePoint groups.
6. Optionally, send a welcome email to these users.
7. Click OK to save changes.
Users can also be added to groups when granting permissions. This is described in the “Managing Permissions” section later in this chapter.
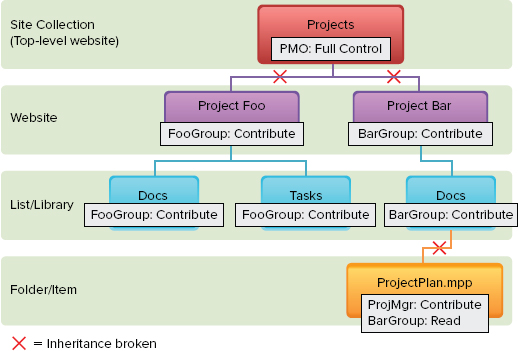
Managing Permission Inheritance
By default, when a site collection is built with subsites, lists, libraries, folders, and items, a single set of permissions is shared throughout. These permissions are set in the top-level website, and they are inherited by all content that falls underneath this top-level website. This concept is called permission inheritance. For example, a user who has Read permissions to the top-level website will also have Read permissions to document libraries throughout the site collection.
While this inheritance is convenient because it’s easy to manage, there will be situations where some content must be secured separately. This requires breaking inheritance. When you break inheritance, you create a new set of permissions which apply to the level where you set them and also to all levels underneath that one.
SharePoint allows you to break inheritance at four different levels: websites, lists/libraries, folders, and individual items. See Figure 14.4 for an example on how this works:
Figure 14.4: Permission inheritance
While breaking inheritance gives you needed flexibility, you don’t want to break permissions more than necessary. There are two primary reasons for this:
- Breaking permission inheritance extensively adds complexity and requires more time to manage permissions and troubleshoot permissions-related problems.
- Breaking inheritance affects SharePoint’s performance. To maintain peak performance, avoid breaking permissions more than 1,000 times within a single level (items in a folder, folders in a library, or same-level subsites). For example, it would be a poor design choice to store thousands of uniquely secured task items in a tasks list.
TIP For more guidance on the performance implications when you break inheritance, see the whitepaper “Best Practices for Using Fine-Grained Permissions,” which you can download from www.microsoft.com/downloads/en/details.aspx?FamilyID=8176a682-45e9-4d28-b161-5aac4056ed53.
Breaking permissions is done exactly the same way for the different objects (websites, lists/libraries, folders, items) once you are on the permissions page for the object. Here is how to get to the permissions page for each type of object:
- Website permissions: select Site Actions ⇒ Site Permissions.
- List or library permissions:
1. Connect to the list or library.
2. Above the ribbon, click the List (or Library) tab.
3. In the ribbon, click List (or Library) Permissions.
- Folder, list item, or document permissions:
1. In the list or library view, hover over the folder or item and click the down arrow that appears.
2. In the context menu, select Manage Permissions.
Once you are on the permissions page for the object, follow these steps to break inheritance for it:
1. In the ribbon, select Stop Inheriting Permissions.
2. SharePoint notifies you that you are about to create unique permissions. Click OK to confirm. SharePoint copies the permissions that are granted to the parent and assigns them to the current object. At this point, you can add and remove permissions as needed.
SharePoint also allows you to reestablish permission inheritance after it has been broken. The steps are the same whether it is a website, list, library, folder, or item object. Here’s what you do:
1. Access the permissions page for the object, as described in the previous steps.
2. In the ribbon, click Inherit Permissions.
3. SharePoint notifies you that you are changing to inherited permissions. Any custom permissions that you assigned to this object will be lost. Click OK to confirm.
Managing Permissions
Managing permissions involves granting and removing permissions on a securable SharePoint object (website, list, library, folder or item) to a user or group (called a principal). Permissions can only be set on the top-level website or an object where permission inheritance has been broken. There are three primary ways that permissions can be granted within a site collection:
- Granting permissions directly to a SharePoint group. We recommend this approach if the SharePoint group already contains appropriate members or membership can be easily changed.
- Granting permissions directly to an external group (for example, an AD global group). We recommend this approach if the group has appropriate members or it will be used across multiple site collections. This is also the best choice from a performance standpoint if you have many users.
- Granting permissions directly to one or more users. We recommend this approach only in special, one-off situations.
The steps are the same, regardless of the object type, once you are on the permissions page for the object. Here are the steps to grant permissions to users:
1. Access the permissions page for the object (as described in the previous section). The current permissions for the object are listed.
2. To grant new permissions, click the Grant Permissions button in the ribbon.
3. The Grant Permissions dialog box appears. For Select Users, enter the users and/or groups (you can select both SharePoint and external groups) that you want to grant permissions to.
4. For Grant Permissions, either add users to an existing SharePoint group or grant permissions directly:
- If you will just be adding users to a SharePoint group, select the SharePoint group and make sure no SharePoint groups are listed in the Select Users section.
- To Grant Users Permissions Directly, click that radio button. The list of permission levels for the site collection will appear. Check the permission levels you with to grant.
5. Optionally, send a welcome email to these new users.
6. Click OK to save changes.
To remove permissions from users or groups:
1. Access the permissions page for the object (as described in the previous section).
2. Select the principals that you want to revoke access from.
3. In the ribbon, click Remove User Permissions.
4. Confirm the action when prompted.
You can also edit existing permissions that have been granted. Here are the steps:
1. Access the permissions page for the object (as described in the previous section).
2. Select the principals that you want to edit.
3. In the ribbon, click Edit User Permissions.
4. In the dialog box, check the new permission levels you want to grant. All existing permissions are removed and these new permission levels are granted.
5. Click OK to save your changes.
Granting Anonymous Access
If the web application is configured to allow anonymous access, you can adjust what permissions should be granted to anonymous users. Granting anonymous access should be used with caution as it allows any user (even Internet users if the web application is accessible) some degree of access to content within the site collection.
Here is how you can grant anonymous access:
1. Access the permissions page for the object (as described in the “Managing Permission Inheritance” section).
2. In the ribbon, click the Anonymous Access button. If this button is unavailable, the web application is not configured to allow anonymous access.
3. Choose what permissions to grant to anonymous users:
- If you are adjusting a website’s permissions, your choices are either Entire Web Site, Lists And Libraries, or Nothing. If you select Entire Web Site, anonymous users will have read access to all content in this website and subsites that inherit permissions. If you select Lists and Libraries, anonymous users have no access to the website and can only directly access lists or libraries where inheritance is broken and anonymous permissions have been granted. If you select Nothing, anonymous users have no access to any content in this website.
- If you are adjusting a list’s permissions, your choices are Add Items, Edit Items, Delete Items, and View Items.
- If you are adjusting a library’s permissions, you can only grant View Items.
4. Click OK to save.
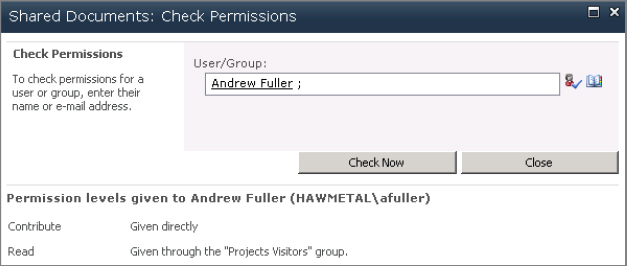
Checking User Permissions
When troubleshooting permission problems or trying to validate access, SharePoint has a very useful Check Permissions report that displays the permissions granted to a user or group. Here is how you can run this report:
1. Access the permissions page for the object (as described in the “Managing Permission Inheritance” section).
2. In the ribbon, click the Check Permissions button.
3. In the dialog box, enter a user or group.
4. Click the Check Now button. The permissions are immediately displayed, as shown in Figure 14.5.
Figure 14.5: Check Permissions report