
The instructions in this and the following sections of this chapter pertain to tasks performed by site collection administrators. Certainly, in many smaller organizations the site collection administrator may in fact be the same person as the farm administrator, but the larger the company and more formal the delegation is, this role may become more decentralized.
That said, a whole book could be written on what tasks a site collection administrator has. It’s a powerful and important role! In this chapter, the objective is to focus on the more technical and less intuitive aspects of site collection administration. So, whether you are just providing technical support to site collection administrators or handling these tasks yourself, you will find value in this section.
NOTE The options you have for managing the site collection will vary depending on whether you’re running SharePoint Foundation (SPF) or SharePoint Server (SPS). Where there are differences, we’ll point them out. When running SPS, options also vary depending on whether the SharePoint Server Publishing Infrastructure site collection feature is enabled. When this feature is enabled, many additional options, such as setting master pages, working with page layouts, and configuring navigation, are made available.
Managing the Site Collection Gallery
A gallery is a collection of SharePoint artifacts that can be shared across multiple websites in a site collection. In many cases, such as the Web Part gallery, the galleries act as special document libraries where files are stored. For the top-level website in a site collection, there are seven visible galleries that can be managed from the Site Settings page. The first three galleries are also visible in websites underneath the top level:
- Site Columns
- Site Content Types
- Master Pages And Page Layouts
- Web Parts
- List Templates
- Themes
- Solutions
Managing Master Pages And Page Layouts
The Master Pages And Page Layouts gallery is available when working with a publishing website that is part of SPS 2010. For SPF or any nonpublishing site, the gallery stores master pages only.
Master Pages Master pages define the core framework of SharePoint’s web pages in a website. They exist to ensure a consistent look and feel across web pages and websites in a site collection and separate a page’s content from its look and feel. For out-of-the-box master pages, they control top and quick launch navigation, the ribbon, breadcrumbs, the Site Actions menu, and much more. In other words, they provide the base functionality of a web page.
Page Layouts Page layouts reference master pages and are used with publishing pages to manage the layout of content stored on the page. Page layouts are available when you are working with a publishing site collection that is part of SPS 2010. For SPF or any nonpublishing site collection, the gallery stores master pages only.
Organizations looking to implement a custom brand do so by developing a custom master page. Those looking to publish pages that have a consistent layout do so by developing a custom page layout. You can share master pages and page layouts across the site collection by uploading them to the Master Pages And Page Layouts gallery.
NOTE SharePoint Designer can also be used to create master pages and page layouts and is able to publish directly to the gallery. Using SharePoint Designer is outside the scope of this book.
To upload a custom master page (.master extension) or a page layout (.aspx extension) to the gallery, follow these steps:
1. Ensure you are signed in as a site collection administrator or as someone who has Design or Full Control permissions.
2. Navigate to the top-level website in a site collection.
3. Click Site Settings ⇒ Site Actions.
4. Within Galleries, select Master Pages And Page Layouts.
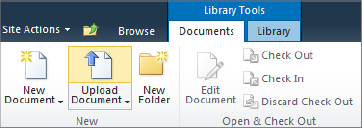
5. In the ribbon, click the Documents tab and then click Upload Document, as shown in Figure 3.11.
Figure 3.11: Uploading a new file
6. Browse to the file and upload it to the gallery.
7. A dialog box pops up asking for the content type which is either page layout or publishing master page. Choose the correct one based on the file uploaded and fill in any metadata. At this point, the file is checked in as a draft (minor) version.
8. To publish the file as a major version, click the down arrow for the file to show the context menu for this file. See Figure 3.12.
Figure 3.12: Publishing a file as a major version

9. Select Publish a Major Version.
10. Before the page is available to all users, it must be approved. From the same context menu for the file, select Approve/Reject.
11. In the dialog box, select Approved.
At this point, the page is ready to be used by all users. For a custom page layout, this layout page can be selected when creating a new publishing page. For a master page, this master can be selected and applied to websites in this site collection. How to apply a master page is covered later in the “Applying a Master Page” section.
NOTE Master pages and page layouts can also be deployed by creating a custom feature. This is usually done by a developer and instructions are outside the scope of this book. One advantage of a custom feature is that you can easily deploy the master page or page layout to multiple site collections.
Managing Web Parts
The Web Part gallery stores the web parts that can be added to pages within the site collection. Each web part available is referenced by a web part definition file that has either a .dwp or a .webpart extension. Web parts that can be added to a page are displayed in the Web Part Picker, as shown in Figure 3.13.
Figure 3.13: Web Part Picker

Each site collection’s Web Part gallery is initially populated only with out-of-the-box web parts. Custom web parts can be developed and deployed, and many third-party web part packages are available as well.
Although a site collection administrator can manually upload a new web part definition file into the gallery, this is rarely done as there are other deployment steps that are needed prior to using a new web part. Deploying web parts along with other forms of custom code is covered in the “Managing the Solutions Gallery” section and in Chapter 6, “Configuring System Settings.”
However, site collection administrators commonly adjust the permissions of web parts. Many organizations want to restrict the web parts that can be added to pages. In other words, they want to remove certain web parts from the picker shown in Figure 3.13. The recommended way to do this is to change the permissions of the definition files in the Web Part gallery. Any user who does not have at least the Read permission to a web part definition file will not see the web part in the gallery. The steps you go through to change permissions are the same as with any item in a list or library. Follow these steps to change permissions for a single web part definition file:
1. From the top-level website, click Site Actions ⇒ Site Settings.
2. Under Galleries, select Web Parts.
3. Items in the site collection’s Web Part gallery are displayed in pages of 30 items. Click the Edit icon next to the web part you want to change.
4. In the dialog box that appears, click the Manage Permissions button in the ribbon.
5. Click the Stop Inheriting Permissions button and click OK to confirm this action. (By default, the web part definition file inherits its permissions from the gallery.)
6. Adjust permissions as necessary.
Managing the Solutions Gallery
User (aka sandboxed) solutions are packages of custom code that can be easily and safely deployed within a site collection. This type of custom code can include web parts, features, event handlers, and others. No manual deployment is needed for this code, and the code is safe—it cannot destabilize a web application. SharePoint ensures this safety by running the code in a special worker process with restricted access.
Each user solution consists of a single file with the .wsp extension. Internally, this is a Windows cabinet file, which is like a Zip file, where the code and configuration files are stored. To deploy the user solution, you perform two tasks:
1. Upload the WSP file to the Solutions gallery.
2. Activate the solution to make it available for use.
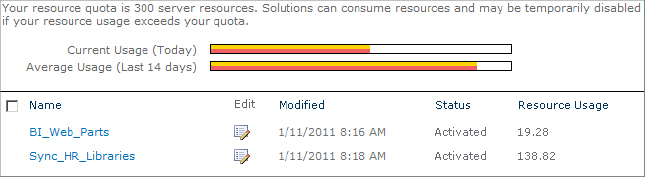
Each user solution is tracked for usage and the total usage for all user solutions is counted against a resource quota on the site collection. Resource usage is measured by looking at many counters, including CPU, RAM, and the number of SharePoint queries issued. This usage is converted into a point total, which is the basis for the resource quota. By default, this is 300 points. You will find more details on how these resource points are calculated in Chapter 6.
The resource quota is a daily quota, and the resource total for all user solutions is reset to zero each day by a timer job. If a quota is in use and the resource point total for that day is reached, user solutions will stop running for that site collection. Figure 3.14 shows how resource points are displayed in the Solutions gallery.
Figure 3.14: User solutions resource quota display
Here is how a site collection administrator can upload and activate a user solution:
1. From the top-level website, click Site Actions ⇒ Site Settings.
2. Under Galleries, select Solutions.
3. Above the ribbon, click the Solutions tab.
4. Click the Upload Solutions button in the ribbon.
5. Browse to and upload a user solution.
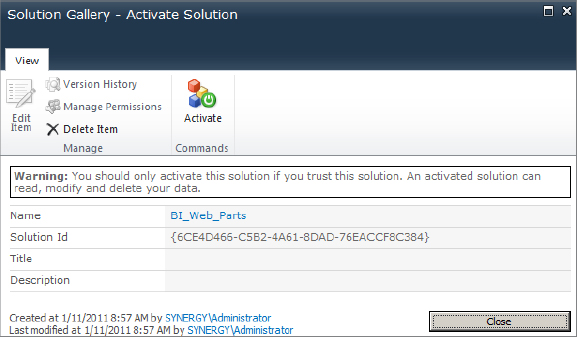
6. After it uploads, click the Activate button as shown in Figure 3.15. This deploys the solution to the site collection and makes it available for use.
Figure 3.15: Activating a user solution
Additional information on managing both user and farm solutions is provided in Chapter 6.
Managing the Look and Feel of Web Pages
This section covers some of the common tasks relating to the cosmetics and functionality of SharePoint web pages. These sections relate to the Look and Feel category found on the Site Settings menu.
Applying a Master Page
In SPS 2010, applying a master page changes the assigned master page for one or more websites in a site collection. When changing the master page, you have the option of cascading the change to all lower-level websites. In SPS 2010, the master page can be applied in two different ways, depending on whether it applies to a publishing or a nonpublishing page:
As a Site Master Page The Site Master Page setting applies the master page to all publishing pages in the website. A publishing page is a page usually found in the pages library within a publishing site. Publishing pages are based on a page layout.
As a System Master Page The System Master Page setting applies to nonpublishing pages, including the following:
- Form pages. An example of a form page is the New Item dialog (NewForm.aspx) for a tasks list.
- View pages, which apply to built-in or custom views on a list or library; for example, the All Documents (AllItems.aspx) view for a document library.
- Application pages, which are special pages that originate from the _layouts virtual directory. SharePoint has hundreds of built-in application pages such as the Site Settings page (settings.aspx).
To change the master page for a website, follow these steps:
1. Ensure you are signed in as a site collection administrator or as someone who has Design or Full Control permissions.
2. Click Site Actions ⇒ Site Settings.
3. Under Look and Feel, select Master Page. You are shown the dialog that is shown in part in Figure 3.16. If you don’t see Master Page as an option, read the note on the next page.
Figure 3.16: Changing the master page for a website
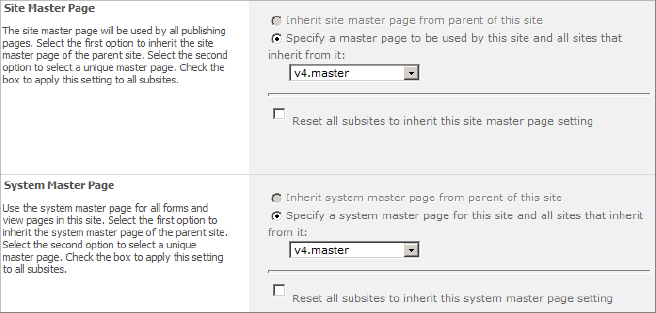
4. Adjust the site master and/or system master page. The pages available come from the master page gallery.
5. Optionally, choose to reset all subsites to match these settings. This will also override the master page setting for all websites beneath this website in the hierarchy.
From this same master page settings screen, you can also apply a custom cascading-style sheet (CSS). CSS adjusts cosmetics such as fonts, borders, certain images, and the positioning of HTML controls.
NOTE Users of SPF do not have this option to change the master page in this way. The SPF master page can only be changed using SharePoint Designer or custom code. If you are using SPS, the site collection must have the “SharePoint Server Publishing Infrastructure” feature activated and the website that you are changing must have the “SharePoint Server Publishing” feature activated.
Changing and Applying a Site Theme
Changing the site theme allows you to adjust certain fonts and colors for your web pages. Unlike changing the master pages or CSS, it does not change the layout or positioning of the content. The site theme gets merged with the master page and CSS to produce the desired cosmetics.
SharePoint has nearly 20 built-in themes, and custom themes can be easily created using a Windows theme-creating program such as PowerPoint 2010. Custom themes have a .thmx extension and must be uploaded into the themes gallery for the site collection.
When applying a theme, you can also make minor changes to the theme such as adjustments to font colors and the body font. The changed theme can automatically be applied to subsites. SharePoint also gives you the ability to preview how the new theme will appear without applying the change. This is helpful when you are trying to find the right theme but don’t want to affect other users currently using the site.
Changing the site theme is quite simple. Here are the steps:
1. Ensure you are signed in as a site collection administrator or as someone who has Design or Full Control permissions.
2. Click Site Actions ⇒ Site Settings.
3. Under Look And Feel, select Site Theme.
4. Select the theme from the list available.
5. Optionally, adjust the colors and fonts as shown.
6. Optionally, preview the theme to confirm the settings.
7. Choose whether to apply this theme to just this one website or this website and all its subsites.
8. Click Apply to save your changes.
Managing Site Collection Navigation
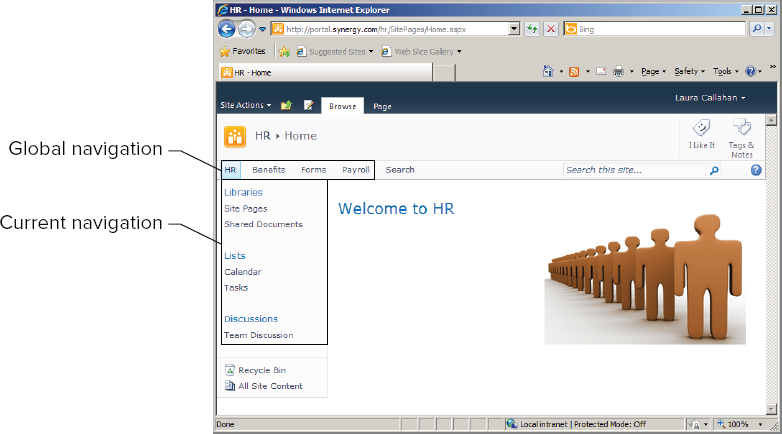
In SharePoint, two primary forms of navigation exist:
Global or Top-Link Navigation Refers to the menu available just above the content area where the ribbon is visible. It is normally used for navigation across a wide number of websites in this site collection. This type of navigation is referred to as global since it can be inherited globally across websites in the site collection.
Current Navigation By default, this is shown in the quick launch area, which is to the left of the content area. It is used to navigate to content commonly used within a single website. For example, you typically see links to lists and libraries here.
Figure 3.17 shows these forms of navigation for a typical team site.
Figure 3.17: Global and current navigation
NOTE Other forms of navigation—such as breadcrumb, tree view, and metadata—also exist. Metadata navigation is covered in Chapter 11, “Configuring the Managed Metadata Service,” but the other forms are not covered in this book.
The options that you have for configuring global and current navigation vary whether you are using SPF or SPS. For SPF, your options are limited and you can only make very basic changes. The limited options also apply to SPS site collections that are not using the publishing feature. This section assumes you are using SPS with the SharePoint Server Publishing site collection feature activated.
To configure navigation for the site collection, follow these steps:
1. Ensure you are signed in as a site collection administrator or as someone who has Design or Full Control permissions.
2. Click Site Actions ⇒ Site Settings.
3. Under Look And Feel, select Navigation.
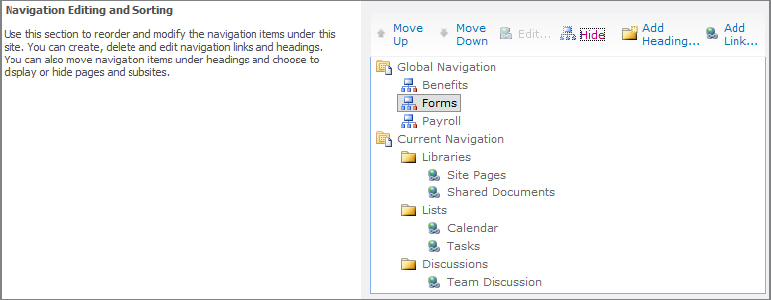
4. Under Global Navigation, adjust the settings as needed. These settings control whether links are dynamically added when new subsites or pages are created.
5. Under Current Navigation, adjust the settings as needed.
6. Optionally choose how links should be sorted.
7. The greatest flexibility is within the Navigation Editing And Sorting section, as shown in Figure 3.18. Here you can manually order, hide, insert, and even create multilevel links.
Figure 3.18: Configuring navigation links and sorting
8. Click OK when you finish to save your changes.
NOTE When you are creating a new website, the default setting is not to inherit global navigation settings from the parent. If you want inheritance, it is best to specify this when creating a new website. Do so by clicking the More Options button (using the Silverlight interface) and then selecting Yes to inherit the top link bar.
Managing Site Administration
This section relates to settings in the Site Administration category found on the Site Settings menu. Although many of these settings apply to just a single website, some apply to the whole site collection. The topics emphasized in this section continue to focus on common tasks that apply to the site collection.
Managing Regional Settings
Regional settings determine the time zone and control how numbers, dates, and time are displayed and sorted on web pages. They are very similar to Windows regional settings. Each website can have its own set of regional settings. As users of websites may be spread across the globe, adjusting these settings ensures an understandable and consistent experience for all. For example, if you have a project site mainly for users in Singapore, you can adjust the regional settings for them.
When you create a new site collection, the time zone used for the top-level site matches the default configured for the web application. If no default for the web application was set, the site collection uses the time zone configured for the operating system on the WFE server. When you create new subsites in the site collection, the regional settings will match those of the parent website.
To adjust the regional settings for a website, follow these steps:
1. Click Site Actions ⇒ Site Settings.
2. Under Site Administration, select Regional Settings.
3. Adjust the regional settings as needed for this website. If this is a top-level site, you can apply these changes to all subsites.
Users can also override a website’s regional settings with their own personal settings. This is useful when users of the website are in different regions. For example, you might have a project in which most of the users are in Singapore but a few are located in Germany.
Personal settings are specific to a site collection. To override a website’s settings and define personal settings for all SharePoint websites in this site collection, follow these steps.
1. Click your login name, located in the upper-right corner, by default.
2. Click My Settings.
3. Select My Regional Settings.
4. Clear the Always Follow Web Settings check box at the top.
5. Adjust the regional settings as needed.
6. Click OK to save.
Managing RSS Settings
Really Simple Syndication (RSS) allows SharePoint to expose list and library content as RSS feeds, which can be consumed by client RSS reader applications. RSS must be enabled both at the site collection level and on the individual website.
To enable RSS for the site collection, follow these steps:
1. Go to the top-level website in the site collection.
2. Click Site Actions ⇒ Site Settings.
3. Under Site Administration, select RSS.
4. Select the Allow RSS Feeds In This Site Collection check box.
5. Optionally, enable RSS for this single website and adjust any of the advanced settings, such as Copyright.
6. Click OK to save.
NOTE To allow the Windows Explorer search engine built into Windows 7 to connect and integrate with SharePoint, you must ensure site collection RSS feeds are enabled. More details on configuring Search for the client are covered in Chapter 9, “Configuring Search Scopes and Search Results.”
Managing Content and Structure
Users of SPS have a powerful website management tool called Site Content and Structure. The following are just some of the useful tasks that can be performed using this gem:
- Get a hierarchical view of all websites in the site collection.
- Copy or move a website to another location.
- Quickly go to the settings or permission page for a website.
- Remove multiple websites, including subsites, lists, and libraries in one operation.
The Site Content and Structure utility is shown in Figure 3.19.
Figure 3.19: SharePoint Site Content and Structure

When working with this tool, take note of the following caveats:
- Only content within the site collection can be managed.
- You cannot move or copy websites between site collections.
- Moving or copying websites can change their permissions depending on how security inheritance is configured.
- Copying websites does not preserve all settings when the site is duplicated. For example, currently running workflow and unique permissions are lost.
There are several ways you can access this utility:
- If the SharePoint Server Publishing Infrastructure site collection feature is enabled, you have a link to it called Content And Structure from the Site Administration menu within Site Settings.
- If the SharePoint Server Publishing website feature is enabled, you have a link to it called Manage Content And Structure from the Site Settings menu.
- If no publishing features are enabled, you can navigate directly to it by entering the website URL followed by _layouts/sitemanager.aspx—for example, http://intranet/HR/_layouts/sitemanager.aspx.
Managing Site Collection Administration
This section applies to settings in the Site Collection Administration category found only at the top-level Site Settings page. Only site collection administrators or those granted Full Control at the web application policy can access these menu items.
The Site Collection Administration category contains many links, and some that are only visible when certain features are activated. This chapter focuses on the common ones that are not covered in other areas of the book.
Managing Recycle Bins
When a user deletes an item, folder, list, or library, the contents are placed in the recycle bin for the website. This is often called the end-user recycle bin or first-stage recycle bin. Items that are removed from this first recycle bin are then moved to a second-stage recycle bin shared at the site collection level.
NOTE Deleting a website is different from deleting an individual item, folder, list, or library. A deleted website is immediately removed from SharePoint and can only be recovered by doing a restore, as covered in Chapter 16.
Regular users with at least Contribute permissions can restore items from the first-stage recycle bin. Only site collection administrators can restore from the second-stage recycle bin.
To restore items from the first-stage recycle bin, follow these steps:
1. Access the website and click the Recycle Bin link found in the quick launch navigation menu.
2. Select the item(s) to recover and click the Restore Selection link.
To restore items from the second-stage recycle bin, follow these steps:
1. Click the Recycle Bin link from the Site Collection Administration menu. (This initially takes you to a virtual view showing all files that are stored in all first-stage recycle bins. A site collection administrator can also restore from the first-stage recycle bin from this view.)
2. Click Deleted From End-User Recycle Bin to see all items deleted from all first-stage recycle bins. This is the second-stage recycle bin.
3. Select the item(s) to recover and click the Restore Selection link.
Restoring from either recycle bin puts the file back in the location it was before it was deleted. In other words, restoring from the second-stage recycle bin does not put the file back into the first-stage recycle bin.
In addition to these site collection options, recycle bins can be administered at the web application level. Settings here apply to all site collections in the web application. Here are the steps to manage this from Central Administration:
1. Click Application Management, then select Manage Web Applications.
2. Select the desired web application and click the General Settings button in the ribbon.
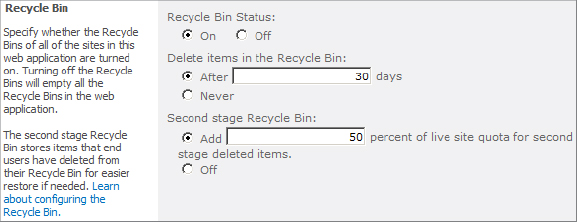
3. In the resulting dialog, scroll down to the Recycle Bin settings, as shown in Figure 3.20.
Figure 3.20: Recycle Bin settings
Here are some tips to remember when working with recycle bins:
- Turning off the recycle bin as shown in Figure 3.20 will immediately empty all recycle bins for all site collections in the web application.
- Space used by all first-stage recycle bins counts against your site collection quota.
- The second-stage recycle bin also has a size quota, which is configured as a percentage of the site collection quota (by default, 50 percent, as shown in Figure 3.20).
- Files that are aged from the first-stage recycle bin are automatically deleted and do not go into the second stage.
- The age countdown for an item begins when it is initially deleted. For example, assume that items are only kept for the default of 30 days, as shown in Figure 3.20. If an item is deleted on June 1 and then moved from the first-stage recycle bin to the second-stage recycle bin on June 30, it will only stay in the second-stage recycle bin for one more day.
Managing Portal Site Connection
As covered in the “Managing Site Collection Navigation” section, each site collection independently maintains its own global navigation. This can be a problem if multiple site collections are being used and need to be linked together. For example, say each business unit has its own site collection and they can be accessed from the master portal. When navigating into the HR portal, the HR site collection navigation takes over, and you have lost your link back to the master portal. This can easily cause confusion and frustration among users.
Portal site connection is a feature that provides one simple solution to this problem. From each “subordinate” site collection (e.g., each business unit), you add a portal site connection back to the “top level” site collection. This feature is also used frequently with My Sites to link back to a separate portal since each My Site is a separate site collection.
NOTE The words “subordinate” and “top level” are used with quotes here since, technically, all site collections are peers and no hierarchy among them exists despite what the URL might suggest.
To add a portal site connection to link from one site collection to another, follow these steps:
1. Access the subordinate site collection that needs to link back to another.
2. Navigate to the top-level website.
3. Click Site Actions ⇒ Site Settings.
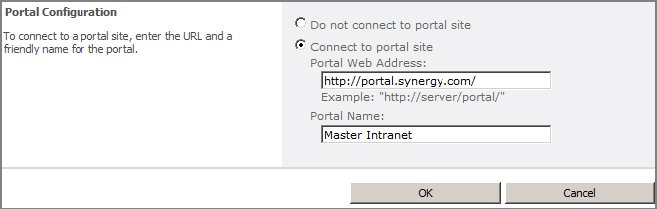
4. In Site Collection Administration category, select Portal Site Connection.
5. Specify the name and the URL for the other site collection and click OK to save. See Figure 3.21.
Figure 3.21: Configuring the portal site connection
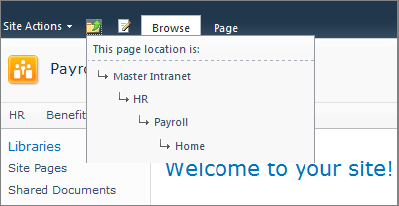
After you add the connection, Figure 3.22 shows how this appears from the up navigation control. Prior to adding the portal site connection, the HR link was the topmost link in the hierarchy.
Figure 3.22: Link to top-level portal
Managing SharePoint Designer
The “Disabling SharePoint Designer” section in Chapter 2 covers how SharePoint Designer can be used across a web application. See Figure 2.17 in Chapter 2 for a screen shot of this.
The same four settings that can be set at the web application level can also be set at the site collection level, giving a lower level of granularity. However, any setting that is disabled at the web application level takes precedence over the site collection setting.
To adjust SharePoint Designer’s capabilities within a site collection, follow these steps:
1. Navigate to the top-level website of the site collection.
2. Click Site Actions ⇒ Site Settings.
3. In Site Collection Administration category, select SharePoint Designer Settings.
4. Disable as needed.
5. Click OK to save.