
From time to time you will need to apply a hotfix, cumulative update, or service pack to your farm. How each of these is installed and applied to your farm can vary in SharePoint 2010. Before going through the specific steps to apply an update, it helps to first understand how updates are designed.
Understanding Update Types
In general, Microsoft makes two types of SharePoint updates available: service packs and cumulative updates.
Service Packs (SPs) Just as with most systems, SPs are a collection of fixes and sometimes new features that go through a rigorous testing process prior to release. SPs in SharePoint 2010 are expected to be cumulative. For example, SP2 should include all the fixes that were part of SP1. How often SPs are released can vary widely, but it’s reasonable to expect one every 12–18 months or so.
Cumulative Updates (CUs) CUs are regular updates, released every two months. A CU addresses issues that have been resolved since the last SP or CU. In some cases, CUs may be a collection of individual hotfixes rolled up into one download. In other cases, they may be hotfixes that are released at the same time but downloaded and installed separately. Unlike SPs, these updates have not been as thoroughly tested, and you should only consider installing them if you are building a new farm or you need to fix a specific problem that a CU addresses.
In rare cases, perhaps to correct an urgent security issue, Microsoft may release a critical on-demand fix. In most cases, these are applied the same way as a CU.
Here is a common question: “I’m running SPS 2010. Do I need to install both the SPF and the SPS update?” The answer varies on a case-by-case basis, but the safe reply to this question is yes. Take the October 2010 CU, for example. In this case, the SPS update includes the SPF update. However, it does not hurt to apply both, so if you are ever in doubt, apply both. Just make sure that you install the SPF update before the SPS one.
Understanding the Update Process
When you are applying SPs or CUs to SharePoint, there are two primary aspects to the process:
- Install the update’s binary files
- Upgrade the database schema
In some cases these steps need to be performed together and in other cases compatibility mode applies, which means the steps can be performed at different times.
Understanding Primary Aspects of the Update
Installing the update’s binary files is the easy part. You simply run the update (normally an EXE), and it installs the necessary files. This process usually takes just a few minutes or so per server.
Upgrading the database schema is the more involved operation, in terms of time. This step is usually done with the SharePoint Configuration Wizard and involves upgrading the database to align with the build of the new binary files that were installed. How long this takes depends on several factors, but the two primary factors are the size of your content databases and the speed of your SQL servers (in particular the disk channel).
Understanding Compatibility Mode
In prior versions of SharePoint, administrators were required to perform both of these update operations together. That is, after you installed the update on each server, you had to then immediately run the Configuration Wizard to upgrade the database.
In SharePoint 2010, some updates will fall within a “compatibility mode boundary.” In other words, they are backward compatible. This means that you can just install the update to all servers and then defer the database upgrade until a later date, usually as part of scheduled downtime. How long can you defer? There is no firm rule, but you are advised to defer no longer than a few weeks.
In general, it is expected that most hotfixes and CUs will fall within this compatibility mode, assuming you are running the most recent SP. This means that you can apply these types of updates and defer the database upgrade. SPs, since they are much larger and complex, are not expected to be backward compatible. When this happens, a new boundary is established. So, when you apply an SP, you will need to run the database upgrade immediately after installing the update’s binaries. How this works is shown in Figure 1.16.
Figure 1.16: Compatibility mode boundaries

Installing Updates to a Farm
Now that you have an understanding of the types of updates, here are the steps you need to go through depending on whether or not the update is backward compatible.
WARNING SharePoint updates that have been applied cannot be rolled back. Thus, before applying any type of update to the farm, you should run a complete farm backup.
Installing a Service Pack
Applying an update that is not backward compatible (e.g., a service pack) must be done during scheduled downtime. Here are the steps:
1. If you are load balancing your WFE servers, pause the load balancer. If not, you can just stop the World Wide Web Publishing Service (W3SVC) on each WFE server.
2. Install the update on the server hosting Central Administration.
3. Install the update on the remaining servers.
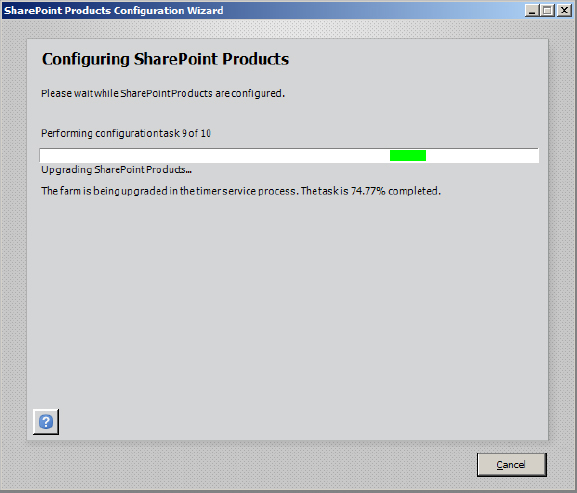
4. Run the Configuration Wizard on the server hosting Central Administration to upgrade all databases. Much welcomed in SharePoint 2010, you now have a percentage complete status bar, as shown in Figure 1.17.
Figure 1.17: Percentage complete
5. Verify the upgrades were successful.
6. Run the Configuration Wizard on the remaining servers. These can all be run in parallel.
7. Resume the load balancer or restart the W3SVC services.
8. Test and validate.
Installing a Backward-Compatible Update
Applying an update that is backward compatible involves two parts. One is to install the binaries, and the second (which can be deferred) is running the upgrade. The first part can be done with minimal downtime if you are load balancing your WFE servers.
If you are load balancing, follow these steps to install the binaries:
1. Remove approximately half of your servers from the load balancer. If you have three servers, you can just remove one.
2. Install the update on the server(s) removed. Do not run the Configuration Wizard.
3. After confirming the update installed successfully, remove the remaining server(s) from the load balancer.
4. Add the server(s) that were removed in step 1 to the load balancer.
5. Install the update on the server(s) removed in step 3. Do not run the Configuration Wizard.
6. Install the update on the remaining servers in the farm. Do not run the Configuration Wizard.
7. Add the server(s) that were removed in step 3 to the load balancer.
8. Test and validate.
If you are not load balancing, follow these steps to install the binaries:
1. Install the update on the server that is your WFE. Do not run the Configuration Wizard.
2. After confirming the update installed successfully, install the update on the remaining servers in the farm. Do not run the Configuration Wizard.
3. Test and validate.
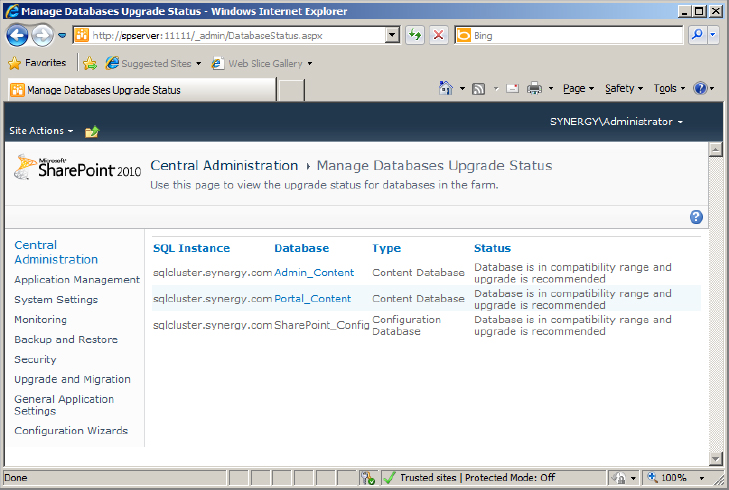
At this point, your binaries have been applied, and your databases will be flagged as needing an upgrade. If at this point in Central Administration you choose Upgrade And Migration and then select Review Database Status, you will see what’s shown in Figure 1.18. You are now running in a deferred upgrade state. During your next scheduled maintenance window, you should complete the upgrade.
Figure 1.18: Content databases in compatibility range
To complete the upgrade and align the database schema with binaries, follow these steps:
1. If you are load balancing your WFE servers, pause the load balancer. If not, you can just stop the W3SVC service on each WFE server.
2. Run the Configuration Wizard on the server hosting Central Administration to upgrade all databases. Check the percentage complete status bar, as shown in Figure 1.17, earlier in this section.
3. Verify the upgrades were successful.
4. Run the Configuration Wizard on the remaining servers. These can all be run in parallel.
5. Resume the load balancer or restart the W3SVC services.
6. Test and validate.