
Configure Versioning and Approval
As documents are created and evolve, they usually go through different stages. Document versioning allows you to store and recall historical versions of a document. SharePoint’s versioning system lets you store each and every version from the beginning, or you can choose to store just some of the most recent versions. Or, if you don’t need the feature, you can turn off versioning and only the most recent version is stored.
SharePoint also supports document approval. Approval allows you to use a formal document-publishing process. For example, if HR personnel are working on a new employee manual, the document may need to be formally approved by the vice president of HR.
NOTE This chapter will frequently use the term document. The term does not refer to just Microsoft Word documents. In the context of SharePoint, a document is any electronic file type that can be stored and managed within a library.
Enabling Document Versioning
Most libraries in SharePoint have versioning turned off by default. For example, if you create a new team site, the Shared Documents library will not have versioning enabled. Conversely, if a Document Center site (a template that comes with SharePoint Server) is created, the Documents library has versioning enabled. These default settings can be adjusted as needed.
When working with versioning, you’ll notice that two types of versions are supported:
A Major Version (e.g., 1.0) A published version of the document that is ready for dissemination
A Minor Version (e.g., 0.1) A draft that is still going through various edits and not ready to be published yet
Having SharePoint manage both the draft and published versions of files gives you a great deal of flexibility.
Let’s say that the HR department is writing an employee manual. This document could easily go through 10 or more draft versions before it is ready to be published. It is best to keep draft versions in SharePoint (and not in, say, My Documents stored locally) for easy access by others who also collaborate on the document. Storing a draft version in SharePoint also helps in restoring the document if contents in a file has been accidentally erased or the file becomes corrupted.
To enable document versioning for a library, follow these steps:
1. Access the library.
2. Just above the ribbon, click the Library tab (underneath Library Tools).
3. Click the Library Settings button in the ribbon.
4. In the General Settings section, click Versioning Settings.
5. As shown in Figure 10.1, select either Create Major Versions or Create Major And Minor (Draft) Versions.
Figure 10.1: Enabling document versioning
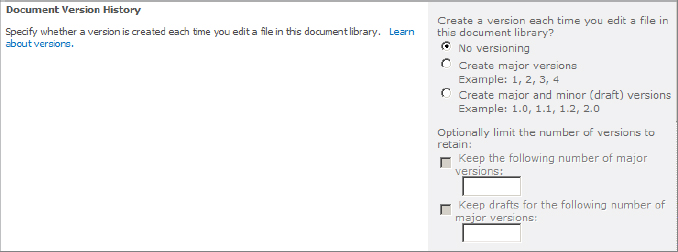
6. Optionally, specify how many previous versions SharePoint should keep by selecting the “Keep the following number of major versions” check box and entering a number. For instance, if the current version is 3.0 and you enter 2, SharePoint keeps the 1.0 and 2.0 versions. When 4.0 is saved, version 1.0 will be removed.
7. Optionally (if you have enabled both major and minor versions), select the “Keep drafts for the following number of major versions” check box and enter a number.
8. Click OK to save changes.
SharePoint creates a new version automatically in these cases:
- Modifying the metadata for document—for example, changing the title
- Uploading another document with the same filename
- Opening and saving a file
- Explicitly checking out and then checking in the file
Only by explicitly checking out and then checking in a file can a user control whether a newly saved version becomes a major or minor version.
NOTE When storing major and minor versions, SharePoint stores complete copies of the file, and not just the changes from the previous version. So, if just one bullet in a 2 MB PowerPoint file changes, it will store another full copy of the 2 MB file. This becomes a space concern, which is one reason versioning is turned off by default for most libraries. When turning on versioning, remember that there may be a site collection quota that is restricting the amount of space available for storing versions. (See Chapter 3, “Creating and Managing Site Collections.”)
Restoring a Document Version
Restoring or viewing a previous document version is easy, assuming versioning has been enabled. For Microsoft Office files, such as an Excel worksheet, you can do so inside the client application in versions 2007 and 2010. You can also accomplish this from the browser by following these steps:
1. Access the document’s context menu from one of the library views and select Version History.
2. The document’s version history is shown in a pop-up window (see Figure 10.2).
Figure 10.2: Viewing a document’s version history
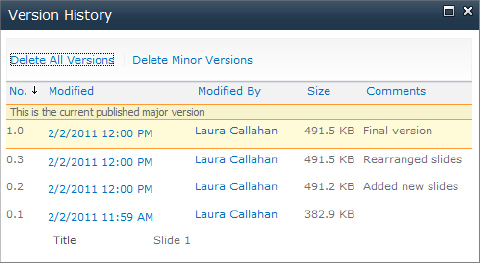
3. To restore an old version, select the document version (e.g., 1.0 or 0.3 from Figure 10.2) and from the context menu, choose Restore. (You can also view the version from this menu.)
4. Confirm the action by clicking OK.
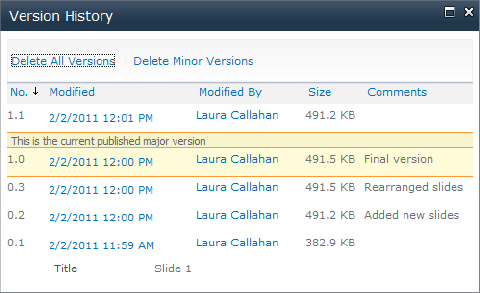
When restoring a previous version, the current version is not replaced. Instead, the version to be restored is copied and inserted as a new version. If draft versions are enabled, the restored copy becomes a draft; otherwise, it becomes the latest major version. In Figure 10.3, version 0.2 from Figure 10.2 has been restored and now also appears as version 1.1.
Figure 10.3: Version history after restoring a prior version
Requiring Explicit Checkout
SharePoint has two types of checkout: implicit and explicit.
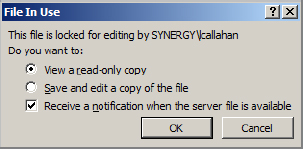
Implicit (or short-term) checkout happens automatically when you open and edit a document in a SharePoint-aware application such as Microsoft Word 2007. When a file is opened for edit, SharePoint internally locks the item as being edited. In most cases, the lock is kept for 60 minutes. Each time the file is saved, the lock’s timer is reset back to 60 minutes. If there is no save activity after 60 minutes, the lock is removed. A lock is also removed when the file is closed. If another user tries to edit the file while another user has a short-term checkout, they will see the message shown in Figure 10.4.
Figure 10.4: Message displayed when attempting to edit a locked file.
Implicit checkout has some advantages. For example, it is compatible with the co-authoring feature of Office 2010, which allows multiple users to edit the same file at the same time. But it’s not a robust checkout mechanism and is prone to errors. One common problem is that two people can unintentionally edit the same file concurrently and whoever saves it last overwrites the other user’s changes.
With explicit checkout, a more robust mechanism, the user must specifically check out a document from the browser or a SharePoint-aware application prior to editing. Only one user at a time can explicitly check out a file. A user with full control permissions to the library can require explicit checkouts for all edit operations. This setting will prevent implicit checkouts.
Here is how to require explicit checkouts within a library:
1. Click the Library Settings button in the ribbon.
2. Click Versioning Settings.
3. In the Require Check out area (see Figure 10.5), click Yes to require checkout.
Figure 10.5: Click Yes to require checkout

4. Click OK to save.
While requiring explicit checkouts is a useful feature to prevent concurrent editing, there are a few caveats you should be aware of:
- Required checkout also means required check-in. When you add one or more new files to a library, they will remain in a checked-out state until you explicitly check them in.
- The datasheet view becomes read only.
- Requiring checkout disables co-authoring for a library.
Taking Ownership of Checked-Out Files
While requiring checkout is recommended to avoid accidental overwrites by other users, here’s a common problem it can cause:
Manager: Be sure to have those new TPS reports uploaded into SharePoint by the end of the day.
Employee: Sure thing, boss. I’m working on them right now.
(As employee is rushing out of the office at 6 p.m., he quickly uploads the files into a document library. The document library has Require Checkout enabled. At 7 p.m., the manager is looking for the files and cannot find them.)
Manager (angrily calling the employee at home): Where are those reports I told you to upload?
Employee: I did upload them right before I left.
Manager: Well, I’m looking right now and I don’t see them.
When documents have been uploaded but not checked in, the documents are invisible to other users, including administrators. There are two solutions to this problem:
- The user who uploaded must check in the files.
- An administrator (or anyone with full control on the library) must take ownership of the files and check them in. Any unsaved changes will be lost.
To take ownership of files created by other users:
1. Click the Library Settings button in the ribbon.
2. Click “Manage files which have no checked in version.” You are presented with the screen shown in Figure 10.6.
Figure 10.6: Taking ownership of checked-out files
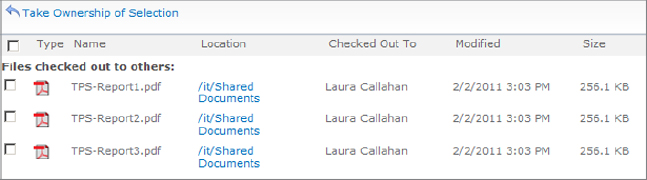
3. Select the files you want to take ownership of, and click Take Ownership Of Selection.
4. Confirm the action by clicking OK.
5. Return to the regular view. You should now be able to see the files and check them in as if you had uploaded them.
Configuring Draft Item Security
By default, users who have read permissions to a library are also able to read a document’s draft versions. In some cases, this could present a security problem. For example, a link to the current employee manual may be placed on HR’s home page in SharePoint. While this document is going through draft edits, you do not want any non-HR personnel to be able to see these unpublished versions. Instead, they should only see the most recent published (i.e., major) version.
To restrict who has access to a document’s draft versions:
1. Click the Library Settings button in the ribbon.
2. Click Versioning Settings.
3. In the Draft Item Security section shown in Figure 10.7, adjust the permission as needed. You can restrict visibility of drafts to users with edit permissions or to approvers. (Approving documents is covered in the next section.)
Figure 10.7: Configuring draft item security

4. Click OK to save.
Enabling and Configuring Content Approval
Content approval means that one or more designated users must explicitly approve a document before it can be published as a major version. Without content approval, the publishing life cycle looks like this:
1. Draft (minor) version
2. Published (major) version
Any user with edit permissions on the file can publish it as a major version. With content approval enabled, the publishing life cycle has a third step:
1. Draft (minor) version
2. Pending (minor version awaiting approval)
3. Approved published (major) version
By default, content approval is turned off.
Enabling Content Approval
To enable content approval on a library, follow these steps:
1. Click the Library Settings button in the ribbon.
2. Click Versioning Settings.
3. In the Content Approval section shown in Figure 10.8, select Yes.
Figure 10.8: Enabling content approval

4. Click OK to save.
Configuring Content Approval
The content approval requirement can be handled in one of two ways:
Publish as a Major Version Pending Approval Any user that has the Approve permission level can approve documents. This is the only supported way in SharePoint Foundation and it also works in SharePoint Server. To submit a document for approval, select “Publish as a major version” in the context menu for the draft item, or check in the file as a major version. Either way, the file’s approval status changes to Pending, and the file is still listed as a draft version.
To approve a document that is pending:
1. Click the Approve/Reject option in the item’s context menu.
2. In the pop-up dialog box, choose Approved.
3. Optionally, enter comments.
4. Click OK.
Approve Content Using a Workflow The approval workflow method is supported only in SharePoint Server. This is done by configuring an approval workflow and associating it to the library that has content approval enabled. Users defined in the workflow will have the authority to approve.
NOTE For more information on configuring approval workflows, see the article “Understand Approval Workflows in SharePoint 2010” located at http://office.microsoft.com/en-us/sharepoint-designer-help/understand-approval-workflows-in-sharepoint-2010-HA101857172.aspx.
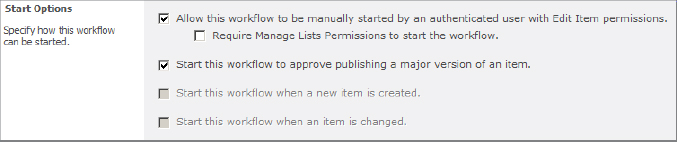
To create an approval workflow to be used for document approval, follow these steps:
1. Access the library.
2. Just above the ribbon, click the Library tab (underneath Library Tools).
3. In the ribbon, click Workflow Settings ⇒ Add A Workflow.
4. In the Add A Workflow dialog box, select the Approval - SharePoint 2010 workflow template.
5. In the Name text box, type a unique name for the workflow.
6. Optionally, adjust the task and history lists to be used for this workflow.
7. In the Start Options section, select “Start this workflow to approve publishing a major version of an item,” as shown in Figure 10.9.
Figure 10.9: Starting a content approval workflow
8. Click Next to continue to the next page.
9. Assign people as workflow approvers and specify whether the approval should be serial (each person must approve in a defined order) or parallel (approvers can approve in any order).
10. As needed, configure the remaining options that are supported by the approval workflow.
11. Click Save to associate this approval workflow with the library.
When the next request to publish as a major version occurs, SharePoint automatically starts this workflow. Only upon successful approval does the document become a published major version.