
Sometimes when we conduct a search we don’t know if the content we’re looking for exists on the network and we’re just trying to find out what is there. If we get a useful result then we count it as a bonus, but we’re not overly disappointed when we don’t find anything relevant. However, it is much more frustrating for users when they know that a file or page exists and know that it contains the information they need but they cannot locate it quickly. It is equally frustrating for managers, knowing that users resort to re-creating documents that may already exist somewhere but that can’t be located quickly enough.
When users are searching for a known document, they often know some details about the document that could help them find it, such as the author, the department that produced it, an associated metadata value, or the server it should be on. Allowing users to apply these types of criteria in their search can dramatically narrow the range of results that are returned.
A search scope is a predefined subset of the index that users can target their search in. Searching within a scope still allows users to apply keywords in their queries, but the keywords are evaluated only within the content covered by the scope.
Creating Shared Search Scopes
Shared search scopes are created by farm administrators and are available to every site collection associated with the search service that the scopes are created in. A shared search scope is not automatically applied and is not automatically available to users. It must be exposed by a site collection administrator via a search site in the site collection. We’ll cover configuring the search site later in this chapter in the section “Assigning a Search Scope.”
To create a shared search scope, do the following:
1. From SharePoint 2010 Central Administration, under Application Management, click Manage Service Applications.
2. Click the link representing your search application, or click the row that the application is on and click the Manage button on the toolbar.
3. Under Queries and Results, click the Scopes link.
4. The View Scopes page opens. Click New Scope.
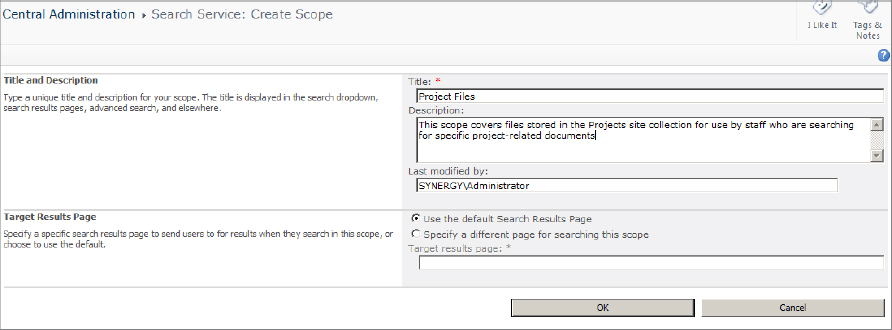
5. On the Create Scope page, shown in Figure 9.1, enter the title and description for this scope. You can also specify a search results page, which can be predefined to use only this scope when displaying results. A custom results page can also be created and assigned to the scope later. Click OK.
Figure 9.1: Create Scope page
6. The next step is to add filter criteria to narrow the results returned by the scope. On the View Scopes page, click the Add Rules link in the new scope row.
7. On the Add Scope Rule page, select which option you wish to use to filter the content. These rules are described further in the next section, “Understanding Scope Rules.” You can add multiple rules to each scope to create highly focused results for users.
8. Select the behavior to apply to this rule. The behavior determines how the rule will be applied in conjunction with other rules:
- Include acts as a logical OR operator and the items covered by this rule will be added to the total result set but can be excluded by other rules.
- Require acts as a logical AND operator and will only allow items in the result set that match this rule.
- Exclude acts as a logical NOT operator and any items that match this rule will not appear in the result set.
9. Click OK.
10. Once the scope has updated, it can be used for searching. Scope updates are covered in the section “Updating Search Scope.”
Understanding Scope Rules
Here are the types of scope rules you can create:
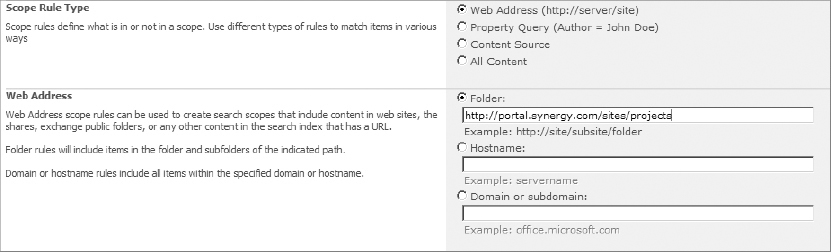
Web Address Scope Rule The Web Address scope rule is used to reference any content address and includes SharePoint sites, non-SharePoint websites, file servers, and Exchange public folders. Rules of this type can be used to target searching of a small subsection of the enterprise. For example, a site collection containing project files may be searched quickly for critical project-related materials. By combining several Web Address scope rules, you can bind the results from different locations in the network into one logical location. (See Figure 9.2.)
Figure 9.2: Creating a Web Address scope rule
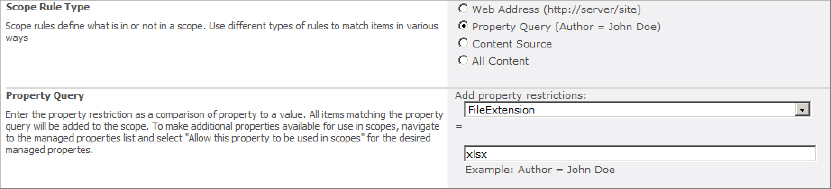
Property Query Scope Rule The Property Query scope rule allows you to restrict the search results to a specific property value. For example, a property query set to FileExtension with a value of xlsx would allow users to search within all Excel files having that extension. Additional rules could be added to cover other file extensions to create a scope that targets all spreadsheet files. (See Figure 9.3.)
Figure 9.3: Creating a Property Query scope rule
Content Source Scope Rule The Content Source scope rules are a convenient method of exposing a specific content source for searching. For example, a content source may have been created to crawl specific file shares on the company’s file servers. Since a large number of older files are stored on these servers, users might be struggling to locate files there. A search scope that targets this content source can give users the immediate benefit of being able to search this legacy content quickly and easily. (See Figure 9.4.)
Figure 9.4: Creating a Content Source scope rule

All Content Scope Rule The All Content scope rules have no additional configuration options associated with them and may at first glance appear to be redundant since SharePoint automatically creates a scope for searching all content called “All Sites.” However, the All Content scope rule allows you to create a scope that is based on the entire content but that uses Exclude rules to eliminate selective content.
Updating Search Scope
Once you’ve created a scope and configured it with rules, you need to update it for it to be searchable. Updating a scope is not the same as conducting a content crawl, because it is only calculating what portions of the index will be included within the scope. The index does not need to be rebuilt and therefore the update is relatively fast. By default, search scopes update every 15 minutes, but they can also be updated manually. To force an update, do the following:
1. From within the Search Service Administration site, click the Search Administration link, which will open the main search administration page.
2. In the center of the page, the Scopes Needing Update setting will indicate how many scopes have yet to be updated.
3. Click the Start Update Now link to trigger an update. In a few minutes the update will complete.
Generally, it is advisable to allow SharePoint to update scopes automatically. However, there is an option that disables the automatic update and requires that scopes be updated manually. To change this setting, next to the Scopes Update Schedule setting, click the Automatically Scheduled link and change the value to On Demand Updates Only.
Creating a Site Collection Search Scope
Site collection administrators can create search scopes at the site collection level. These scopes function the same way as shared scopes except that they can only be used within the site collection they are created in. Unlike shared scopes, site collection scope rules can only be created for web addresses, managed properties, and all content. They cannot be created for content sources.
To create a site collection search scope, do the following:
1. Navigate to the home page at the root of a site collection for which you are the administrator.
2. Select Site Actions and click Site Settings.
3. In the Site Collection Administration section, click Search Scopes.
4. On the View Scopes page, click the New Scope link and follow steps 5–10 in the previous section, “Creating Shared Search Scopes.”
Assigning a Search Scope
Once search scopes have been created, they need to be assigned, or exposed to the user in a convenient manner. Search scopes can be assigned to the existing drop-down list controls that are built into the SharePoint pages, or they can be connected into the Enterprise Search Site as visible tabs. We’ll describe the tabbed approach later in this chapter in the section “Configuring Search Center Tabs for Search Scopes.”
Assigning Scope to a Search Drop-down
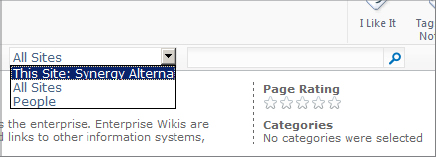
SharePoint 2010 contains a search scope drop-down list that is connected to the search box visible at the top of most SharePoint site pages, as shown in Figure 9.5.
Figure 9.5: Site collection search drop-down
The drop-down list is hidden by default and must be enabled in Site Settings. To configure the search drop-down, do the following:
1. Navigate to the home page at the root of a site collection for which you are the administrator.
2. Select Site Actions, and then click Site Settings.
3. In the Site Collection Administration section, click Search Settings. The Search Settings page appears, partially shown in Figure 9.6.
Figure 9.6: Site Collection Search Settings page
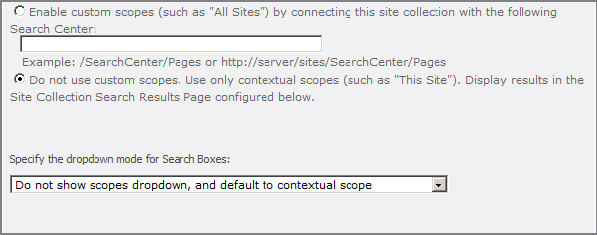
4. Select the option Enable Custom Scopes.
5. In the Search Center box, enter the path to a valid results page in a site based on one of the search site templates (Basic Search Center or Enterprise Search Center).
- If you have configured the site collection with an Enterprise Search Center, then in the Search Center box, enter the path to the site as follows: http://sitecollectionurl/searchsite/pages.
- If your search site is based on the Basic Search Center, then enter the URL to the search site without /pages at the end.
6. In the menu labeled “Specify the drop-down mode for Search Boxes,” select Show Scopes Drop-down.
7. Click OK.
8. Under Site Collection Administration, click Search Scopes. The View Scopes page will open.
9. At the top of the page, click Display Groups.
10. Click the context menu on the Search drop-down and select Edit Display Group. The Edit Scope Display Group page is displayed (partially shown in Figure 9.7).
Figure 9.7: Edit Scope Display Group page
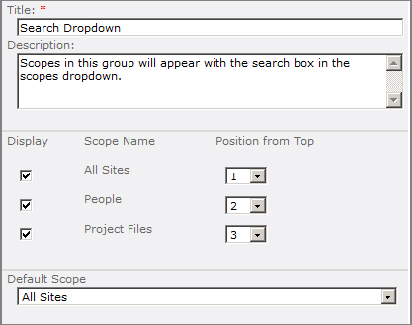
11. Check the box next to the custom scope you want to include in the drop-down list and select which scope should be the default value in the list.
12. Click OK.
13. Return to the home page in the site and click the search drop-down to access the scope.
The scope drop-down list may take a minute or so to show your custom scope. This is normal behavior and only happens at the time of configuration.
Assigning Scope to Advanced Search
You can also configure the Advanced Search page to display custom scopes. This allows users to take advantage of the powerful querying capabilities of the Advanced Search feature in combination with a targeted scope. Configuring this involves editing the Advanced Search page as well. To begin, follow steps 1–9 listed in the previous section, “Assigning Scope to a Search Drop-down,” to configure a custom scope for the search drop-down, and then edit the Advanced Search display group. After configuring the scope setting, do the following:
1. Navigate to the search center site in your site collection (typically it is configured with the URL /search or /searchcenter).
2. Click the Advanced link to go to the Advanced Search page.
3. From the Site Actions menu, select Edit Page.
4. On the Web Part Tools Options ribbon tab, click Web Part Properties.
5. In the Properties pane on the right, expand the Scopes section and check the box next to Show The Scope Picker.
6. At the bottom of the Properties pane, click OK.
7. On the Page ribbon tab, click Save And Close or Stop Editing. The custom scopes should appear as a set of check boxes on the page.
Configuring Search Center Tabs for Search Scopes
The Enterprise Search Center site template is specially designed to host custom search scopes by displaying a tab that allows users to select and query a scope. The site template is configured with two tabs by default:
- The All Sites tab and scope includes all content indexed by SharePoint in any content source in the search service.
- The People tab and scope searches only the user profiles.
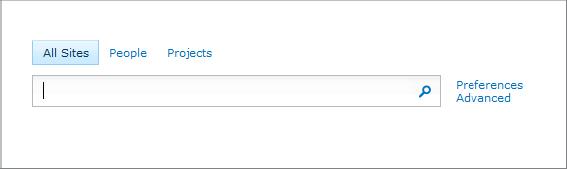
The SharePoint interface supports creating custom tabs that link to custom search scopes, both those created in Central Administration and those created at the site collection level. Figure 9.8 shows the tabs on a search page with a custom scope tab added for Projects. In this section, we will explain how to configure custom search tabs.
Figure 9.8: Enterprise Search Center with custom tab
While the Basic Search Center allows searching of all indexed content, it does not support custom scope tabs. The Enterprise Search Center is a publishing site and therefore requires that the SharePoint Server Publishing Infrastructure feature be enabled in the site collection. Configuring a search scope as a tab on the site involves creating both a custom search page and a custom search results page, as described next.
Creating a Search Page with Tabs
The first step in configuring a custom scope tab is to create a custom search page as follows:
1. Navigate to the home page of an Enterprise Search Center site for which you are a site administrator.
2. Select Site Actions, click View All Site Content, and then click the Page library.
3. On the Documents ribbon tab, click the New button.
4. On the Create Page screen, enter a name and URL for the page that relates to the scope that it will be associated with. For example, for the Projects scope a suitable page name would be ProjectsSearch.aspx.
5. In the Page Layout list, select the (Welcome Page) Search box.
6. Click Create.
7. Open the page you just created and, on the Page tab, click the Edit button.
8. Click inside the Search box; then, on the Web Part Tools Options ribbon tab, click Web Part Properties.
9. Expand the Miscellaneous section and locate the Target Search Results Page URL box. Enter a name for the search results page. For example, the results page for the Projects scope might be called ProjectsSearchResults.aspx. Don’t worry if the page doesn’t exist yet—we’ll create the page in the next exercise.
10. Click OK to save the change and close the Web Part Properties pane.
11. With the page still in Edit mode, above the search box, click the Add New Tab link.
12. On the New Item page, in the Tab Name field, enter the display name of the tab (it is best to keep the name short to avoid crowding other tabs). Then enter the name of the search page that you are currently editing—in our example, ProjectsSearch.aspx.
13. Click Save. The new tab will appear on the search page.
14. On the Page ribbon tab, click Save And Close.
Creating a Search Results Page with Tabs
The Enterprise Search Center requires two pages to support user queries:
- The Search page, where users enter their query
- The Search Results page, which executes the search and displays the results
To complete the configuration of the tabbed search scope, you need to create a custom search results page to reference the custom scope:
1. Follow steps 1–4 in the previous section, “Creating a Search Page with Tabs.”
2. In the Page Layout list, select (Welcome Page) Search Results.
3. Follow steps 6–8 in the previous section.
4. Expand the Miscellaneous section and locate the Target Search Results Page URL box. Enter a name for the search results page that you just created. This will allow the results page to accept search keywords directly and reload the same page.
5. Click OK to save the change and close the Web Part Properties pane.
6. With the page still in Edit mode, locate the Search Core Results web part and check the box in the upper-right corner of the web part. Then, on the Web Part Tools Options ribbon tab, click Web Part Properties.
7. Expand the Location Properties section and, in the Scope box, enter the name of the custom search scope that you want to use. This should be entered exactly as it appears on the View Scopes page.
8. Click OK to save the change and close the Web Part Properties pane.
9. With the page still in Edit mode, above the search box, click the Add New Tab link.
10. On the New Item page, in the Tab Name field, enter the same display name of the tab that you entered previously on the search page. Then enter the name of the search results page that you are currently editing—in our example, ProjectsSearchResults.aspx.
11. Click Save. The new tab will appear on the search page.
12. On the Page ribbon tab, click Save And Close.
Now you can return to the main page of the search site and click the new scope tab to conduct a search. The results page should only display results from the custom scope.