
Configure the Built-in Service Applications
Once you create a service application, you can begin configuring it. This section describes the configuration steps and settings for the following applications:
- Access Services
- Business Data Connectivity Services
- Excel Services
- PerformancePoint Services
- Secure Store Service
- State Service
- Visio Graphics Service
- Web Analytics Service
- Word Automation Service
- PowerPoint Service
- Word Viewing Service
NOTE Not all service application configuration is covered in this section. The User Profile Service is covered in Chapter 7, “Configuring the User Profiles and My Sites Service.” The Search Service will be covered in Chapter 8, “Configuring the Search Service,” and the Managed Metadata Service will be covered in Chapter 11, “Configuring the Managed Metadata Service.”
Configuring the Access Services Application
Access Services allows Access 2010 databases to be imported into SharePoint and converted to online, web-based applications that retain all the functionality of the offline version. Data tables, forms, and reports become accessible via a SharePoint Access website, which can be shared among multiple users. This service requires that the server service Access Database Service be started on at least one server using the Services On Server screen. Starting and stopping services are covered in Chapter 5, “Scaling and High Availability.”
Once the Access Services application has been created and the service started, the service is ready to use. In cases where this service will be used extensively, performance and scalability issues may occur. You can address such issues by modifying the service settings. To do so, use the following steps:
1. From SharePoint 2010 Central Administration, under Application Management, click Manage Service Applications.
2. On the Manage Service Applications page, click the link for the Access Services application.
3. Change the appropriate settings as described next.
4. Click OK to save the settings.
You can configure the following types of elements:
Lists and Queries You can restrict the complexity and size of the data tables and queries executed within the database.
The Types of Objects an Access Services Application Can Contain The Application Objects section controls the Maximum Application Log Size, which defaults to 3,000 records but can be increased to retain additional entries over time by setting it to a larger value. You can make it unlimited in size by setting it to −1.
Behavior of Sessions The Session Management section controls the amount of RAM and open connection resources that can be used. These settings can be lowered to reduce the memory consumption on the server.
Memory Utilization This section controls the total physical memory available to Access Services. The default value of –1 sets the limit to 50 percent of the memory on the server. This value can be reduced to minimize contention with other processes.
Templates The Maximum Template Size setting limits users, by default, to 30 MB Access Template (.accdt) files. This value can be changed to any positive number or set to –1 for unlimited size.
For the full list of configurations available, see the article “Set Up and Configure Access Services (SharePoint Server 2010)” at:
http://technet.microsoft.com/en-us/library/ee748653.aspx
Configuring the Business Data Connectivity Service Application
Business Connectivity Services (BCS) provides a middle tier of data services to SharePoint sites and custom applications. Once configured with external content types, the BCS acts as an object broker for abstracted data objects that encapsulate the query and authentication parameters of connections to external data sources. This service requires that the server service Business Data Connectivity Service be started on at least one server using the Services On Server screen. Connections are defined as external content types, each of which represents a query to a database or web service along with the parameter definitions and authentication details. External content types can then be displayed on site pages as external lists, which give users the ability to display and, in some cases, edit the data exposed by the connection.
Most of the creation and configuration of external content types is done through SharePoint Designer 2010, but the configuration of permissions and management is handled at the service level. You can perform the following configuration tasks through the Manage Service Applications interface:
- Import a BDC (Business Data Connectivity) model
- Set permissions for external content type objects
- Set permissions on the metadata store
To modify these settings, do the following:
1. From SharePoint 2010 Central Administration, under Application Management, click Manage Service Applications.
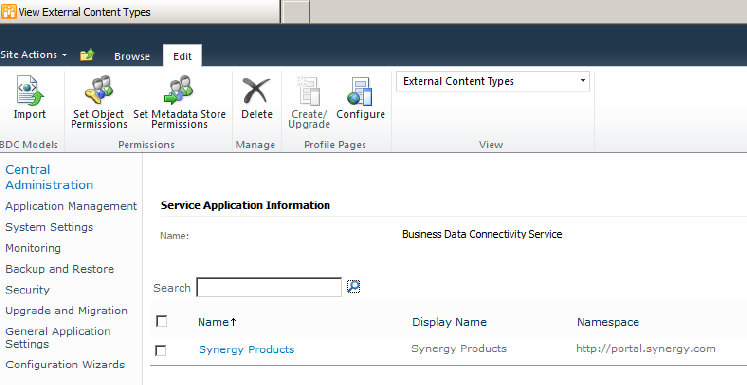
2. On the Manage Service Applications page, click the link for the Business Data Connectivity Service application. A portion of the View External Content Types page is shown in Figure 4.5.
Figure 4.5: View External Content Types
Importing a BDC Model
Business data connections are defined through external content types managed by the BDC. A farm administrator can import a BDC Model XML file created by a developer that contains one or more external content types. Perform the following steps:
1. On the ribbon, click the Import button.
2. Click Browse, navigate to the XML file, and click Open.
3. Click Import.
4. The service will validate the file and import it into the service database.
Setting Object Permissions
Once you’ve either imported an external content type or created one using SharePoint Designer 2010, you must set permissions to allow users to query data through the object.
While developers and data analysts may create external content types, only BCS administrators can assign permissions. Use these steps to configure external content type permissions:
1. To configure object permissions, check the box next to an External Content Type; then, from the Ribbon, click Set Object Permissions.
2. In the resulting dialog box, do one of the following:
- Enter the name of a user or group and click Check Names.
- Browse for a user or group account.
3. Click Add.
4. Check the box next to the permissions you want to assign to this user or group, as shown in Figure 4.6.
Figure 4.6: Set Object Permissions dialog box
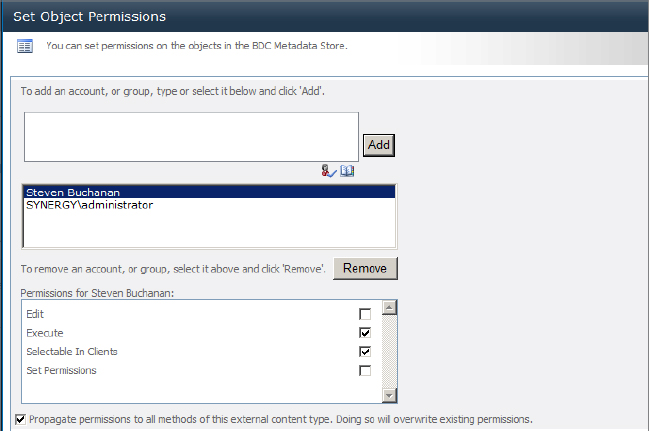
Edit Create external content types and import models.
Execute Create, read, update, delete, or query an external content type.
Selectable In Clients Create and configure an external list from an external content type, allowing it to be displayed on a page.
Set Permissions Change the permissions of the object. You must grant at least one account the Set Permissions right.
5. Click OK.
Setting Metadata Store Permissions
The Set Metadata Store Permissions are similar to the Set Object Permissions described in the previous section. Using this command, farm or service administrators can set permissions on the entire metadata store:
1. To configure metadata store permissions, from the ribbon select Set Metadata Store Permissions.
2. In the resulting dialog box, do one of the following:
- Enter the name of a user or group and click Check Names.
- Browse for a user or group account.
3. Click Add.
4. Check the box next to the appropriate permissions for the object
The permissions for the metadata store are the same as the permissions for an external content type, as described in the previous section.
Configuring the Excel Services Application
Excel Services enables SharePoint 2010 to load, execute, and recalculate Excel workbooks in a server-side process and render a workbook as a web page. The service lets you view large workbooks without downloading and opening them on the client and allows elements of workbooks to be displayed in Excel Web Access web parts as part of a business intelligence dashboard. This service requires that the server service Excel Calculation Services (ECS) be started on at least one server using the Services On Server screen.
You can configure the following settings for Excel Services:
- Global settings for security, memory, and load balancing
- Trusted file locations
- Trusted data connection libraries
- Trusted user-defined function assemblies
Configuring Global Settings
The Global Settings configuration page is used to modify security, memory, and load balancing settings for Excel Services. Use the following steps to configure these settings:
1. From SharePoint 2010 Central Administration, under Application Management, click Manage Service Applications.
2. On the Manage Service Applications page, click the link for the Excel Services application.
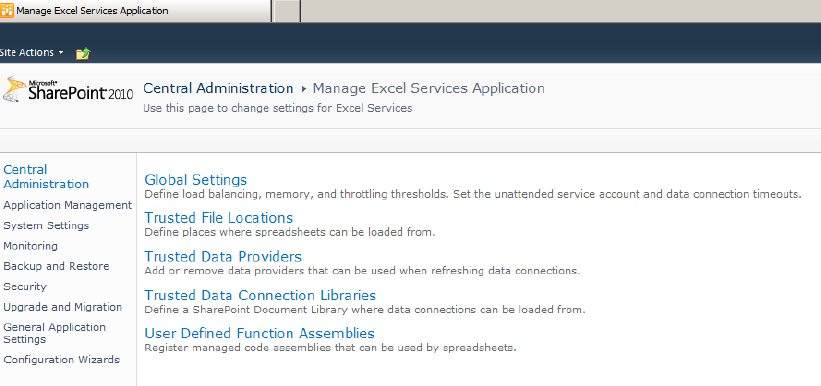
3. On the Manage Excel Services Application page, click Global Settings, as shown in Figure 4.7.
Figure 4.7: Manage Excel Services Application page
4. In the Security section of the Excel Services Application Settings page, configure the following settings:
File Access Method Two methods are available. The Impersonation method opens files outside of SharePoint using the account of the user logged onto the site. The Process Account method uses the service account. In most cases, you should select Process Account. The Impersonation method should only be used when Kerberos authentication has been configured in SharePoint. For more details on Kerberos, see the article “Configure Kerberos Authentication (SharePoint Server 2010)” at http://technet.microsoft.com/en-us/library/ee806870.aspx.
Connection Encryption This setting determines whether Excel Services should require a Secure Sockets Layer (SSL) connection to the SharePoint front end. You should require encryption if it is possible to configure SSL or IP Internet Protocol Security (IPsec) over the connection and you want to prevent usernames and passwords from being exposed on the network.
Allow Cross Domain Access This setting determines whether files from one HTTP domain can be displayed on a page in a different HTTP domain. This setting should be turned on only when necessary in multidomain environments.
5. In the Load Balancing section, choose one of the following options:
Workbook URL The workbook URL is used to select the ECS process used to open the workbook. This ensures that the same ECS session is used for all requests made to that workbook. This option is selected by default and is the generally recommended setting.
Round Robin With Health Check A round-robin load-balancing model is used to select the ECS process used to open a workbook. This setting is useful when multiple Excel Services application servers are configured and a small number of workbooks will be accessed by a relatively large number of users.
Local If an ECS session is available on the local SharePoint server, then it is used; otherwise, a round-robin model is used. Local is a hybrid setting that is appropriate when multiple Excel Services instances are running on SharePoint web front end servers.
6. In the Session Management section, enter the Maximum Sessions Allowed Per User value. The default is 25. When the maximum number of sessions is exceeded, additional sessions for that user will be blocked until some sessions expire. Enter −1 for unlimited sessions.
7. In the Memory Utilization section, configure the following settings:
Maximum Private Bytes The maximum amount (in MB) of memory allocated for the ECS process. The largest amount you can enter is equivalent to 50 percent of the physical memory on the machine.
Memory Cache Threshold The percentage of the Maximum Private Bytes value that is used for objects that are no longer in use. Retaining objects in cache longer may allow them to be reused more often but will consume more space. Enter 0 to disable caching.
Maximum Unused Object Age The maximum time (in minutes) that an object not in use in a session will remain in memory. Valid values: –1 (no maximum); from 1 through 34560 (24 days).
8. In the Workbook Cache section, configure the following settings:
Workbook Cache Location The file system location of the workbook file cache on the SharePoint server. If this value is empty, SharePoint creates a subdirectory in the system temporary directory.
Maximum Size Of Workbook Cache The maximum disk space (in MB) that can be allocated to workbooks that are currently in use by ECS. The default is 40 GB.
Caching Of Unused Files Select this check box to enable caching of files that are no longer in use by ECS sessions.
9. In the External Data section, configure the following settings:
Connection Lifetime The maximum time (in seconds) a connection may remain open. When a connection exceeds this time it is closed.
Unattended Service Account The Unattended Service Account is used for authentication when no authentication is provided in an Office Data Connection (ODC) file. Enter the Application ID defined in the Secure Store Service (SSS) that holds the credentials.
10. Click OK to save the settings.
Configuring Trusted File Locations
Specifying trusted file locations is essential for Excel Services to function. Excel files will not be loaded and processed by Excel Services unless they are in a trusted location. Use the following steps to configure a trusted location:
1. From SharePoint 2010 Central Administration, under Application Management, click Manage Service Applications.
2. On the Manage Service Applications page, click the link for the Excel Services application.
3. On the Manage Excel Services Application page, click Trusted File Locations, as shown in Figure 4.7, earlier in this chapter.
4. Click Add Trusted File Location.
5. In the Location section, configure the following settings:
Address Enter the URL or UNC path of the site or directory that holds Excel files that Excel Services is allowed to execute.
Location Type Choose the protocol used by Excel Services to connect to the location. The options are Microsoft SharePoint Foundation (which is a SharePoint library), a UNC path pointing to a Windows file share, or an HTTP URL pointing to a web address.
Trust Children Specify whether all subsites and subfolders underneath the location are to be trusted as well.
Description Add a text description of the location to explain the purpose of trusting it.
6. In the Session Management section, configure the following settings:
Session Timeout The length of time (in seconds) that a session will remain in memory after the last request is received. If no further requests are received in this time, the session is shut down. Valid values: from –1 (no timeout) through 2,073,600 (24 days). The value 0 means that the session expires at the end of a single request.
Short Session Timeout Similar to Session Timeout, except that the time is measured from the first request and applies only if no further requests are made. Valid values: from –1 (short session timeout is disabled) through 2,073,600 (24 days). The value 0 means that the session expires at the end of a single request.
New Workbook Session Timeout Similar to the Session Timeout, except that it applies only to new workbook sessions. Valid values: from –1 (no timeout) through 2,073,600 (24 days). The value 0 means that the session expires at the end of a single request.
Maximum Request Duration The maximum duration (in seconds) of a single request in a session. Valid values: from –1 (no timeout) through 2,073,600 (24 days).
Maximum Chart Render Duration The maximum time (in seconds) spent rendering any single chart. Valid values: from –1 (no timeout) through 2,073,600 (24 days).
7. In the Workbook Properties section, configure the following settings:
Maximum Workbook Size The maximum size (in MB) of a workbook that can be opened by ECS. Valid values: from 1 through 2,000.
Maximum Chart or Image Size The maximum size (in MB) of a chart or image that can be opened by ECS. Valid values: any positive integer.
8. In the Calculation Behavior section, configure the following settings:
Volatile Function Cache Lifetime The maximum time (in seconds) that a computed value for a volatile function is cached for automatic recalculations. Valid values: –1 (calculated once on load); 0 (always calculated); from 1 through 2,073,600 (24 days).
Workbook Calculation Mode Determines the calculation mode for the workbook. The modes are as follows: File uses the mode specified in the workbook. Manual recalculates only when a Calculate request is received. Automatic forces recalculation any time a dependent value is changed. Automatic Except Data Tables is like Automatic but ignores values in data tables.
9. In the External Data section, configure the following settings:
Allow External Data The None setting allows no connections to data outside the workbook. Trusted Data Connection Libraries Only allows only ODC files stored in Data Connection Libraries that are also trusted by Excel Services. Trusted Data Connection Libraries And Embedded allows both trusted Data Connection Libraries and ODC files embedded inside workbooks.
Warn On Refresh When enabled, this setting displays a warning before refreshing external data for files in this location.
Display Granular External Data Errors When enabled, this setting displays detailed error messages when an external connection to data fails.
Stop When Refresh On Open Fails When this setting is enabled, if a file is set to refresh data connections when it is opened and the file refresh fails and the user does not have Open Item permissions on the workbook, then the Open operation will abort.
External Data Cache Lifetime The maximum time (in seconds) that the system can use external data query results. There are separate settings for Automatic refresh (Periodic/On-Open) and Manual refresh. For both, valid values are –1 (never refresh after first query); from 0 through 2,073,600 (24 days).
Maximum Concurrent Queries Per Session The maximum number of external data queries that can execute concurrently in a single session. Valid values: any positive integer.
Allow External Data Using REST When enabled, requests from the REST API can refresh external data connections. This setting has no effect if Allow External Data is set to None.
10. In the User-Defined Functions section, choose whether external assemblies containing user-defined functions may be called from workbooks in this trusted location.
Configuring Trusted Data Connection Libraries
A data connection library holds Office Data Connection (ODC) or Universal Data Connection (UDC) files. Excel Services can be configured to trust specific libraries that hold connection files that have been approved as safe to use. To add a trusted library, follow these steps:
1. From SharePoint 2010 Central Administration, under Application Management, click Manage Service Applications.
2. On the Manage Service Applications page, click the link for the Excel Services application.
3. On the Manage Excel Services Application page, click Trusted Data Connection Libraries, as shown in Figure 4.7, earlier in this chapter.
4. Click Add Trusted Data Connection Library.
5. On the Add Trusted Data Connection Library page, enter the URL of the library and a description that explains its purpose.
6. Click OK.
Configuring User-Defined Function Assemblies
Excel Services does not support macros or Visual Basic for Applications (VBA) code inside Excel files. For any code to execute, it must be compiled into a .NET assembly that exposes user-defined functions that can be called in a workbook much like normal Excel functions can. The assemblies must be registered in order to be recognized by Excel Services. To register a user-defined assembly, follow these steps:
1. From SharePoint 2010 Central Administration, under Application Management, click Manage Service Applications.
2. On the Manage Service Applications page, click the link for the Excel Services application.
3. On the Manage Excel Services Application page, click User-Defined Function Assemblies, as shown in Figure 4.7, earlier in this chapter.
4. On the User-Defined Functions page, click Add User-Defined Function Assembly.
5. On the Add User-Defined Function Assembly page, the values you enter depends on the location where the assembly is stored.
- If the assembly is installed in the global assembly cache (GAC), then select that option for the location and enter the strong name of the assembly in the Assembly text box.
- If the assembly is installed in a folder on the server or a file share, select the File Path option and enter the path to the file in the Assembly text box.
6. Select the Assembly Enabled check box to permit the assembly to be loaded by Excel Services.
7. Click OK.
Configuring the PerformancePoint Services Application
PerformancePoint Services is a new service in SharePoint 2010 that includes features previously shipped under the separate product PerformancePoint Server 2007. The service allows business analysts to design and publish charts, graphs, and key performance indicators (KPIs) that display business data in visual form. PerformancePoint Services comes with a dashboard designer that allows business analysts to assemble the data graphics into pages that can show a large amount of information on a single screen.
You can configure the following aspects of PerformancePoint Services:
- Global application settings
- Trusted content locations
Configuring PerformancePoint Services Application Settings
The Application Settings page allows administrators to configure the global settings for PerformancePoint Services. Among these, the most important are the Secure Store Service Application and Unattended Service Account settings. The service needs these values to connect to external sources. To configure the application service settings, use the following steps:
1. From SharePoint 2010 Central Administration, under Application Management, click Manage Service Applications.
2. On the Manage Service Applications page, click the link for the PerformancePoint Services application.
3. On the Manage PerformancePoint Services Application page, click PerformancePoint Services Application Settings.
4. On the PerformancePoint Services Application Settings page, configure the following settings:
Secure Store Service Application PerformancePoint Services uses the Secure Store Service (SSS) to store credentials used to authenticate to data sources. Enter the name of an existing SSS.
Unattended Service Account Click the Edit User button and enter the username and password for the account that will be used for data access.
Comments Select the Enable Comments check box to allow comments on scorecard cells and enter the maximum number of annotated cells per scorecard.
KPI Icon Cache Enter the number of seconds that the cache will be retained. The default of 10 seconds can be lengthened to reduce the graphics that are downloaded with each page refresh. The data underlying the KPIs changes less frequently than the cache timeout.
Data Source Query Time-Out Enter the number of seconds that a data query will wait for a response before it is cancelled. The 300-second default is generally sufficient but may be reduced to increase the responsiveness of pages. However, this may mean that some data does not display.
Remember User Filter Selections For Enter the number of days that user filter selections will be retained. This setting defaults to 90 days, which is generally recommended, but you could reduce it to purge unneeded settings more frequently.
Maximum Members To Load In Filter Tree Enter the number of members to retrieve into a filter of type tree. The default of 5,000 is set to allow a relatively large set of items to be displayed without putting undue load on the SharePoint server and SQL server. This number can be increased if there are sufficient server resources or relatively few users.
Maximum Measures To Load In Select Measure Control Enter the number of measures that can be loaded into a dashboard’s Select Measure control. The default is 1,000 items and should be increased only when necessary and if sufficient server resources are available.
Initial Retrieval Limit Enter the number of rows returned when a user clicks Show Details. This setting defaults to 1,000, which can be increased if it does not impact performance.
Maximum Retrieval Limit Enter the maximum number of rows that can be returned or allow Analysis Services to manage the number. The default of 10,000 can be increased to match increases in the Initial Retrieval Limit.
Maximum Number Of Items Enter the maximum number of items (per level) returned to the decomposition tree. The minimum value is 0. The maximum is 1,000,000.
5. Click OK.
Configuring Trusted Content Locations
A trusted content location is a site or list within SharePoint that is allowed to host dashboards and scorecards. The default setting is for all locations to be trusted. This setting can be overridden and only specific locations trusted.
1. From SharePoint 2010 Central Administration, under Application Management, click Manage Service Applications.
2. On the Manage Service Applications page, click the link for the PerformancePoint Services application.
3. On the Manage PerformancePoint Services Application page, click Trusted Content Locations.
4. On the Trusted Content Locations page, select the option Only Specific Locations and click Apply.
5. Click Add Trusted Content Location.
6. On the Edit Trusted Content Location page, enter the full address to the location and select the option that identifies the type of location as a site collection, a site, or a list.
Configuring the Secure Store Service Application
The Secure Store Service (SSS) replaces the Single Sign-On Service from previous versions of SharePoint. It provides an encrypted credential store and brokering service to allow applications to store and retrieve credentials for external data sources and systems in a highly secure manner. A common use for this service is to store the logon accounts and passwords used by other services to connect to external databases.
You can configure the following settings of the SSS:
- Generate A New Encryption Key
- Create An Application Definition
Generating a New Secure Store Service Encryption Key
The Secure Store Service Encryption Key is used by SharePoint to encrypt and decrypt credentials stored within the SSS database. In cases where security concerns are high, this key can be rotated periodically to make it more difficult for attackers to crack. To change the key, use the following steps:
1. From SharePoint 2010 Central Administration, under Application Management, click Manage Service Applications.
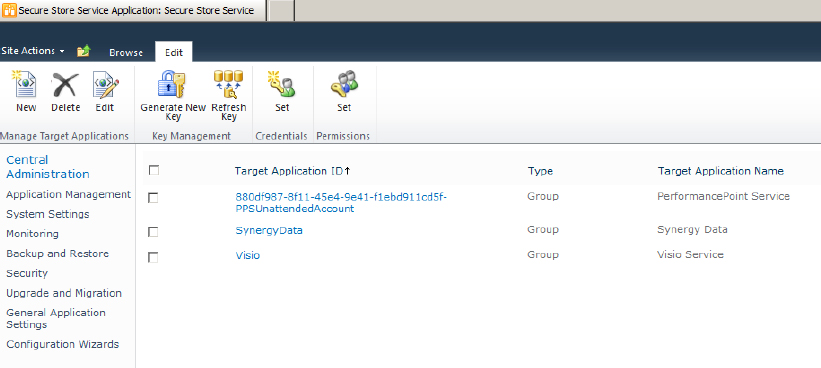
2. On the Manage Service Applications page, click the link for the Secure Store Service application. A portion of the Secure Store Service page is shown in Figure 4.8.
Figure 4.8: Secure Store Service
3. From the ribbon, select Generate New Key.
4. Enter a passphrase and confirm it. The passphrase is used to generate a new encryption key and will be required again when you are restoring a Secure Store database.
5. Click OK.
Creating a Secure Store Service Application Definition
Use the following steps to create an entry in the SSS to track a specific set of credentials for one or many users. This set of credentials is called an application definition. Developers will use the application definition to request credentials at runtime.
1. From SharePoint 2010 Central Administration, under Application Management, click Manage Service Applications.
2. On the Manage Service Applications page, click the link for the Secure Store Service application.
3. On the ribbon, click New and enter the following details:
Target Application ID You will use this ID whenever an application needs to query the SSS to update or retrieve the specific credentials associated with it. This ID can be any term or phrase that is unique within the SSS applications list.
Display Name This value is displayed as a label for the application on the SSS management page and helps to identify the purpose of each application.
Contact E-mail Enter an email address for the primary contact for the application.
Target Application Type There are two sets of options: Group, which maps all the users in one or more groups to a single set of credentials stored in the SSS database, and Individual, which maps each user to a unique set of credentials stored just for that user.
For both Individual and Group options, there are two settings: Ticket (the SSS can issue a ticket that can be redeemed by another process to access the same credentials), and Restricted (only code that is Fully Trusted under the .NET Code Access Security model can request credentials).
4. Click Next.
5. On the Credential Fields page, specify the names of the credential storage fields this application will use. For a Windows Active Directory account, leave the Field Type settings at Windows User Name and Windows Password. For a SQL server or other database logon, change the Field Type settings to User Name and Password, respectively. Other field types may be used as needed.
6. Click Next.
7. On the Membership Settings page, enter the users or groups that have Administrative rights on this application. If you selected one of the Group options (see step 3) as the application type, then you must also define the users or groups who can use the credentials to retrieve data into SharePoint.
8. Click OK.
9. For a Group type application, you must also set the User Name and Password values. On the Secure Store Service Application page, check the box next to the application you want to set and, on the ribbon, click Set Credentials.
10. Complete the User Name, Password, and Confirm The Password fields, and then click OK.
Configuring the State Service Application
The State Service in SharePoint 2010 is used by specific services such as InfoPath Forms Services to maintain session information for a user between server requests. The service can be configured through the Farm Configuration Wizard (see “Running the Farm Configuration Wizard,” earlier in this chapter) or through PowerShell.
The Enable-SPSessionStateService cmdlet will enable the State Service in a farm. The following example enables the State Service using default values—the database is hosted on the configuration database SQL Server, using Windows Authentication, and with a 60-minute session timeout:
Enable-SPSessionStateService -DefaultProvision
The following example uses a custom database name, database server name, a session timeout of 120 minutes, and the default Windows Authentication:
Enable-SPSessionStateService -DatabaseName "DB_State_Service"
-DatabaseServer "sqlcluster" -SessionTimeout 120
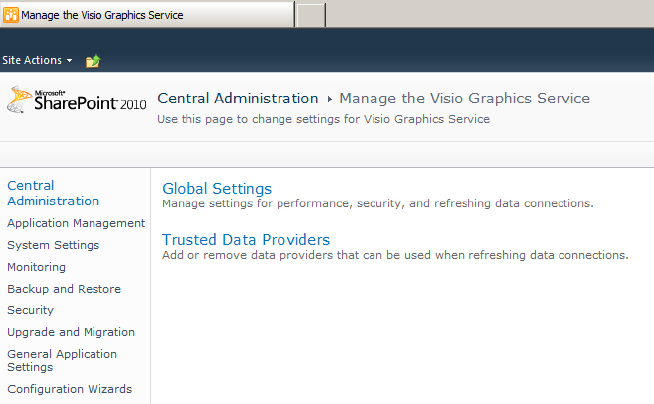
Configuring the Visio Graphics Service Application
The Visio Graphics Service allows SharePoint 2010 to load and render a Visio VDW file on the server and display it as a web page to the user. The service also supports dynamic data refresh of external data connections.
The global settings for this application are used to control the amount of server resources that SharePoint can consume when loading and rendering Visio files.
While most of the settings can remain at their default values, the Unattended Service Account must be configured to allow files to be processed:
1. From SharePoint 2010 Central Administration, under Application Management, click Manage Service Applications.
2. On the Manage Service Applications page, click the link for the Visio Graphics Service application.
3. On the Manage Visio Graphics Services Application page, click Global Settings, shown in Figure 4.9.
Figure 4.9: Manage the Visio Graphics Services Application page
4. On the Global Settings page, configure the following settings:
Maximum Web Drawing Size The maximum size in MB (between 1 and 50) of a web drawing that can be rendered. The default value is 5 MB.
Minimum Cache Age The minimum number of minutes (between 0 and 34,560) that a web drawing is cached in memory. The default value is 5 minutes.
Maximum Cache Age The number of minutes (between 0 and 34,560) after which cached web drawings are purged. The default value is 60 minutes.
Maximum Recalc Duration The number of seconds (between 10 and 120) before data refresh operations time out. The default value is 60 minutes.
Unattended Service Account – Application ID In order for Visio Services to retrieve data from an external connection, it requires a Secure Store Service Application ID, which must be configured separately. See “Configuring the Secure Store Service Application,” earlier in this chapter.
Configuring the Web Analytics Service Application
The Web Analytics Service is responsible for gathering and reporting site usage statistics such as the number of times a page has been viewed and the number of times a search term has been queried.
By default, the Web Analytics Service retains all statistics for 25 months. To reduce the data retention period:
1. From SharePoint 2010 Central Administration, under Application Management, click Manage Service Applications.
2. On the Manage Service Applications page, click the row for the Web Analytics Service application; then on the ribbon, click the Properties link.
3. Change the Data Retention Period value.
4. Click Next, and then click Next again.
Configuring the Word Automation Service Application
The Word Automation Service is designed to allow server-side processing of Word documents without the need to install Word components on the server. The application is multithreaded and scalable; it can be used to convert from one format to another and to perform text operations within documents.
Most of the default settings for the Word Automation Service are suitable for general use. If the service seems to be taking up too many resources on the server, you can adjust the settings lower.
1. From SharePoint 2010 Central Administration, under Application Management, click Manage Service Applications.
2. On the Manage Service Applications page, click the link for the Word Automation Services Application. The page shown in Figure 4.10 appears.
Figure 4.10: Word Automation Services page
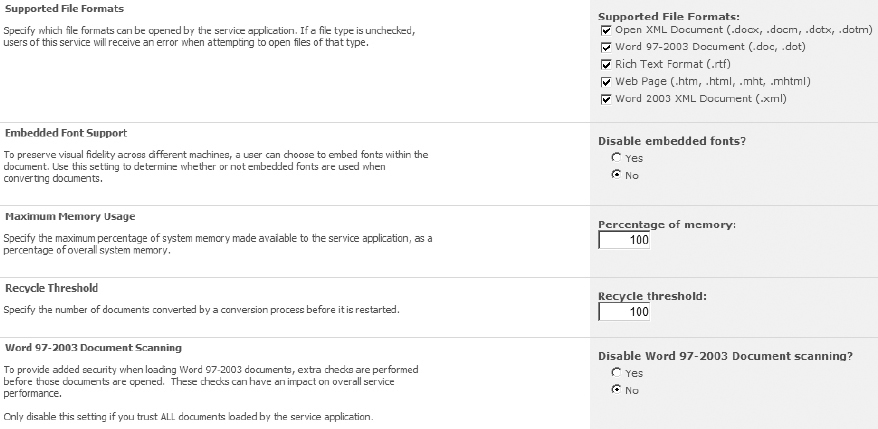
3. On the Word Automation Services page, configure the following settings:
Supported File Formats Check the box for each file format that will be enabled. All formats are enabled by default.
Disable Embedded Fonts? Choose whether to disable embedded fonts. Embedded fonts are disabled by default.
Percentage Of Memory Enter the percentage of memory that can be used by the service. The default setting is 100 percent.
Recycle Threshold Enter the number of documents that can be converted by a conversion process before it is restarted.
Disable Word 97-2003 Document Scanning? To improve performance when processing older Word documents, you can choose to disable the automatic security scanning. Unlike the DOCX file format, the older Word format can contain embedded VBA code that could be executed by the Word Automation Service. The security scan prevents the execution of such code. Disabling the security scan may allow malicious code to execute.
Frequency With Which To Start Conversions (Minutes) Enter the frequency with which groups of conversions are started. The default is 15.
Number Of Conversions To Start (Per Conversion Process) Enter the number of conversions to start within each group. The default is 300.
Length Of Time Before Conversion Status Is Monitored (Minutes) The length of time before conversions are monitored and, if necessary, restarted. The default is 5.
Maximum Conversion Attempts The maximum number of times a conversion is attempted before its status is set to Failed. The default is 2.
4. Click OK.
Configuring the PowerPoint Service Application
The PowerPoint Service Application is new to SharePoint 2010 and supports several new features. As part of the Office Web Applications installation, the PowerPoint Service supports online viewing and editing of PowerPoint files. The service also provides the PowerPoint Broadcast feature, which delivers a PowerPoint presentation in a multicast mode.
To configure the application’s settings, follow these steps:
1. From SharePoint 2010 Central Administration, under Application Management, click Manage Service Applications.
2. On the Manage Service Applications page, click the link for the PowerPoint Services Application.
3. On the PowerPoint Services page, configure the following settings:
Supported File Formats Check the boxes to enable Open XML Presentation (.pptx) and PowerPoint 97-2003 Presentation (.ppt).
PowerPoint 97-2003 Presentation Scanning Check the box to enable the scanning of earlier PowerPoint formats for dangerous content.
Configuring the Word Viewing Service Application
The Word Viewing Service is installed with the Office Web Applications and enables the online viewing and editing of Word documents in SharePoint. To change the settings, follow these steps:
1. From SharePoint 2010 Central Administration, under Application Management, click Manage Service Applications.
2. On the Manage Service Applications page, click the link for the PowerPoint Services Application.
3. On the PowerPoint Services page, configure the following settings:
Supported File Formats Check the boxes to enable Open XML Presentation (.docx) and Word 97-2003 Presentation (.doc).
Disable Embedded Fonts? Choose whether to disable embedded fonts.
Disable Word 97-2003 Document Scanning? To improve performance when processing older Word documents, you can choose to disable the automatic security scanning. Unlike the DOCX file format, the older Word format can contain embedded VBA code that could be executed by the Word Viewing Service. The security scan prevents the execution of such code. Disabling the security scan may allow malicious code to execute.
Recycle Threshold Enter the number of documents converted by a conversion process before it is restarted.
Total Worker Processes Enter the total number of worker processes dedicated to viewing Word documents. This value can range from 1 to 1,000 but the recommendation is for no more than two worker processes per core processor.
4. Click OK.