
Configure In-Place Records Management
To achieve the goal of preserving information as a record (which includes preventing unauthorized changes to the information), SharePoint 2010 offers two primary mechanisms:
In-Place Records Management In this approach, information is kept in the location it was last edited but is locked to prevent further editing. In-place records management is designed for scenarios in which a document or list item is finalized and ready for preservation, and the document must remain in its original context. For example, when a project is completed and the final report is sent to the customer and approved by them, the project is brought to an official close. There may be a number of documents associated with the project (e.g., working files, diagrams, or unused material), but only a few, such as the final report, are critical from a legal point of view. The project manager might decide to keep the entire site, including the final report, in place for future reference. SharePoint 2010 does not support declaring an entire site or library as a record; only documents and list items can be declared. But if the final report is declared a record, this will prevent both the document and the library it is in from being deleted.
Records Center The Records Center site template allows you to create a separate site collection that acts as a records repository. This approach is discussed later in the chapter in the section “Configure a Records Center.”
Activating the In-Place Records Management Feature
In-place records management is configured through a site collection feature and is not enabled by default. Once it is enabled, records will be supported in all lists and libraries in the site collection. To enable in-place records management:
1. Open the site collection you want to configure.
2. From the Site Actions menu, select Site Settings.
3. Under the Site Collection Administration section, click Site Collection Features.
4. Next to In Place Records Management Feature, click Activate.
Configuring Record Declaration Settings
Once in-place records management has been enabled, a new command becomes available on the Site Settings page that allows you to configure the record declaration settings. To configure these settings, follow these steps:
1. Open the site collection you want to configure; then, from the Site Actions menu, select Site Settings. Under the Site Collection Administration section, click Record Declaration Settings. The Record Declaration Settings page opens, as shown in Figure 12.1.
Figure 12.1: Recording Declaration Settings page
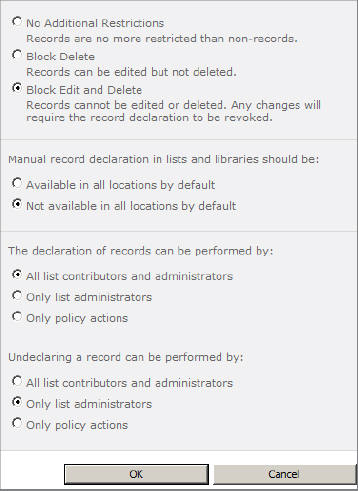
2. Define what type of controls will be applied to items declared as records:
- Block Edit And Delete is the default setting and makes the record read-only.
- No Restrictions does not control access to the record but marks it for future action via workflow or policy.
- Block Delete allows users to edit the item but blocks them from moving or deleting it. This is similar to removing the delete permission, but it is much easier to administer.
3. Define whether users will be able to manually declare records by default:
- Not Available In All Locations By Default prevents users from manually declaring records. This is the default setting.
- Available In All Locations By Default allows users to declare records manually. This setting is rarely used because the best records management strategies usually rely on workflows, policies, or custom code to avoid problems with user error. However, in situations where only a few documents need to become records and the people editing them are the best authorities to make the decision, then this setting may be appropriate.
4. Determine who is allowed to declare records and undeclare records.
By default, all list contributors and administrators can declare records. You can limit this to only list administrators or only policy actions.
By default, only list administrators can “undeclare” a record. You can change this setting to All List Contributors And Administrators or Only Policy Actions.
NOTE The term list administrator is not a formal security role in SharePoint but refers to any user who is assigned the Manage Lists granular permission. All users with the Full Control permission level are granted this right by default.
Configuring Lists and Libraries for Records Management
By default, lists and libraries are configured to inherit the records declaration settings defined at the site collection level, but these settings can be overridden through list settings.
To configure records declaration settings on a list or library, follow these steps:
1. Browse to the list or library and, on the ribbon, click the List or Library tab; then click the List Settings or Library Settings button.
2. Under Permissions And Management, click Record Declaration Settings. The list or library Record Declaration Settings page displays, as shown in Figure 12.2.
Figure 12.2: Recording declaration settings for a list or library
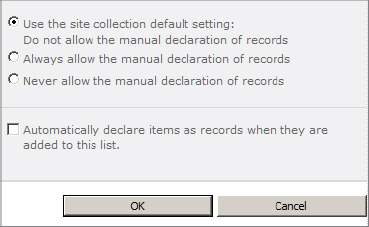
3. Specify whether to allow records to be declared manually.
The default option is Use The Site Collection Default Setting. You can override that setting, but do so with caution because these settings also affect the ability to undeclare items as records. Choosing Never Allow The Manual Declaration Of Records will also prevent administrators from undeclaring items as records.
4. Decide whether to automatically declare items as records when they are added to this list by checking or unchecking the appropriate check box. Use this setting when it is necessary to ensure that all items are considered to be read-only once they are created or uploaded.
Declaring an item as a record will also prevent the list or library from being deleted (but not the site or site collection). You will notice that the link to delete the list or library disappears from the settings page. In order for you to be able to delete a list or library, all the items in it must first be undeclared as records. However, even when this is done, the link to delete the list or library may not appear right away. This is because SharePoint uses a scheduled timer job to periodically survey all lists and libraries to look for declared records or holds that should prevent the list or library from being deleted. To force SharePoint to review the list or library immediately, open SharePoint 2010 Central Administration and click Monitoring. Then click Review Job Definitions, select Hold Processing And Reporting for the web application that the list or library is in, and click Run Now.
Declaring and Undeclaring Records Manually
Declaring records manually is the simplest approach. It allows users to declare records based on an individual judgment and to force a record when an item did not meet the criteria for a policy or workflow. To declare a record manually:
1. Open the list or library and locate the document or item that should be declared. Then use one of these two techniques:
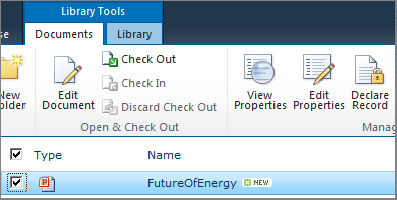
- Click the check box next to the item to select it, and then from the Documents tab on the ribbon, click the Declare Record button, as shown in Figure 12.3. Click OK in the confirmation dialog box.
Figure 12.3: Declaring a record
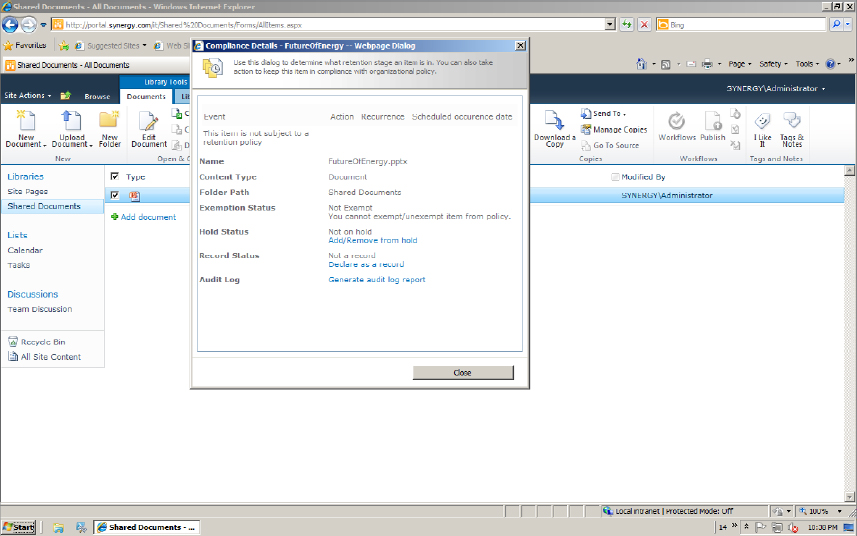
- Click the drop-down context menu on the item and click Compliance Details. In the Compliance Details dialog box, shown in Figure 12.4, click the Declare as a record link. Click OK in the confirmation dialog box.
Figure 12.4: Specifying compliance details
2. Once the record has been declared, refresh the view of the list and you will see that in libraries the file icon will now display a gold lock in the image, as shown in Figure 12.5.
Figure 12.5: Icon indicating record file
Undeclaring records manually can be done only if manual declaration has been enabled on the list or library. (By default, only list administrators have the right to undeclare records.) To undeclare a record:
1. Open the list or library and locate the document or item that should be undeclared.
2. Click the drop-down context menu on the item and click the Compliance Details link. In the Compliance Details dialog box, click the Undeclare Record link. Click OK in the confirmation dialog box.
Declaring Records Through Workflow
SharePoint 2010 includes native support for workflows that can declare records. However, SharePoint does not include a workflow template with the capability to declare a record built into it. So any approach to using workflows to declare records will require that a custom workflow be built. Fortunately, Microsoft provides a product called SharePoint Designer 2010, which is free to download from the Microsoft website. This product is, among other things, a workflow development tool that can be used to build custom workflows which can declare records. There are other tools available from software vendors that also include the ability to declare records, but we will only be using SharePoint Designer in our example.
The advantage of using a workflow to manage record declaration is that organizations can configure multiple conditions and steps involved in the process that result in an item being declared a record. For simplicity’s sake, the steps that follow assume that a library has the Versioning and Require Approval options configured. You will create a list workflow to declare a record when a document has been approved:
1. Open the site you want to configure.
2. From the Site Actions menu, select Edit In SharePoint Designer.
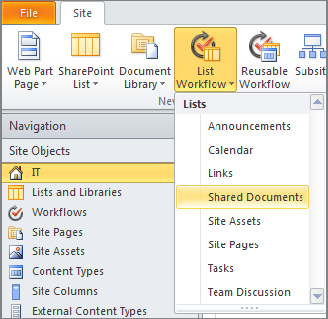
3. Inside SharePoint Designer, from the Site tab, click the List Workflow menu and select the list or library on which you wish to configure the workflow, as shown in Figure 12.6.
Figure 12.6: List Workflow menu
4. In the Create List Workflow dialog box, enter a name and a description for the workflow, and then click OK.
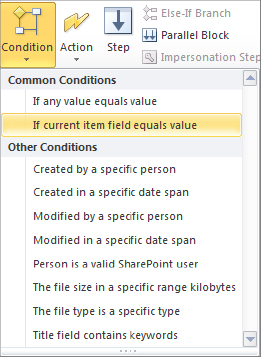
5. From the Workflow tab, click the Condition menu and select the item labeled “If current item field equals value,” as shown in Figure 12.7.
Figure 12.7: Condition menu
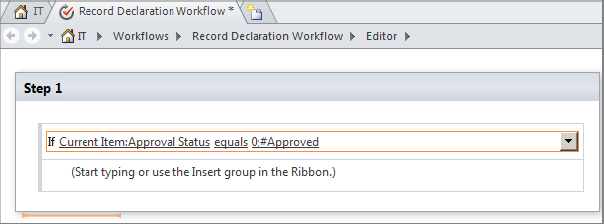
6. On the condition row, click the Field link and select Approval Status from the drop-down list, then click the Value link and select 0;#Approved from the drop-down list. The result is shown in Figure 12.8.
Figure 12.8: Condition Editor
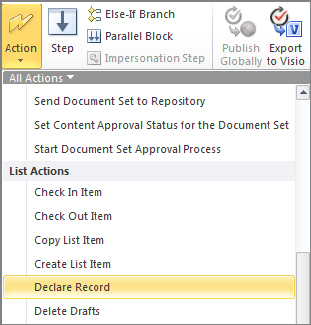
7. From the Workflow tab, click the Action menu and, under the List Actions category, select Declare Record, as shown in Figure 12.9.
Figure 12.9: Action Editor
8. From the Workflow tab, click the Workflow Settings button
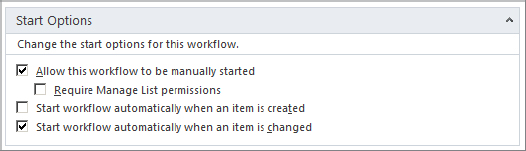
9. On the Workflow Settings page, check the box labeled “Start workflow automatically when an item is changed,” as shown in Figure 12.10.
Figure 12.10: Start Options
10. From the Workflow tab, click the Save button, and then click the Publish button.
When a document in the library is checked in as a major version and then approved, the workflow automatically declares it as a record.
Declaring Records Through a Retention Policy
A retention policy is a built-in function of SharePoint and requires only configuration to use. A retention policy is a procedure defined in SharePoint by a list or site administrator to perform some action on an item after a number days, months, or years. One of the actions that can be performed is to declare the item as a record. While the retention policy does not support the sophisticated conditional criteria of a workflow, it can include multiple retention stages of which declaring as a record is only one. For more details on policies, see the section “Configure Information Management Policies” later in this chapter.