
Now that you understand the farm and have created your service accounts, you are ready to install. As you will learn in this section, there are three main steps to installing SharePoint 2010:
1. Installing prerequisites
2. Installing SharePoint binaries
3. Creating or joining the farm
This section assumes the OS and SQL Server have already been installed and configured as per the requirements listed previously. This installation section applies to all farm sizes, from a single server to a multiserver farm.
NOTE Before starting the installation, be sure to log into the server with the install account that you created.
This section won’t go into detail on how to configure the OS or SQL Server, but here are a few quick tips:
- For your WFE and application servers, create two partitions, C: and D:. Make C: a minimum of 40 GB with the balance of space on D:.
- For your WFE and application servers, there is no need to add any roles or features. This will be done automatically for you.
- For your SQL server, format the partitions that will be used for data and log with a 64KB allocation unit size.
- For your SQL server, set the database default location to appropriate drive partitions with ample space.
Other than these, there are no special SharePoint configuration requirements to keep in mind when installing the OS or SQL Server.
Each of these installation steps covered below applies to all WFE and application servers that will make up your farm. The steps do not apply to any dedicated SQL servers that you will use.
SharePoint allows you to add servers to and remove servers from the farm with relative ease. Thus, when installing SharePoint, you do not have to have all the servers prepared and ready. To start, you will just need SQL Server and the first WFE that will be part of the farm ready to go.
TIP Assuming you are creating a multiserver farm, we recommend that your database server(s) be dedicated to the database role. In other words, do not run WFE or application server roles on your SQL server. This is why you do not install SharePoint on your database servers. Furthermore, if possible, it’s best to have your SQL server dedicated to your SharePoint farm and not be shared with other non-SharePoint applications.
Installing Prerequisites
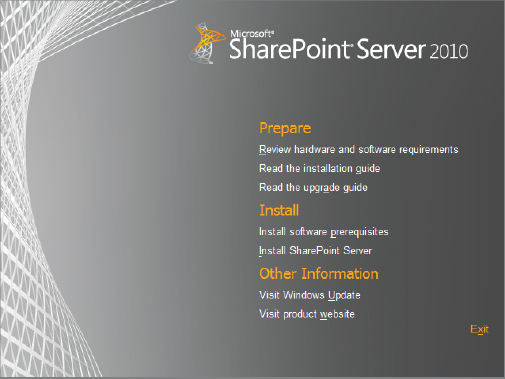
Installing prerequisites is the first step in the installation process. In addition to the basic OS requirements covered already, SharePoint requires a number of additional items prior to starting the basic installation. Fortunately, there is an automated process that handles all of these for you. This process is called the Prerequisites Installer, and it can be started from the SharePoint Server installation splash screen.
Figure 1.2 shows SharePoint Server’s installation splash screen. You can start the installation program by running setup.cmd or by using AutoPlay from the DVD. If you are installing SharePoint Foundation (SPF), you should run SharePointFoundation.exe.
Figure 1.2: SharePoint Server installation splash screen
When you start the Prerequisites Installer, a separate program will start and greet you with the wizard shown in Figure 1.3.
Figure 1.3: SharePoint Preparation Tool wizard
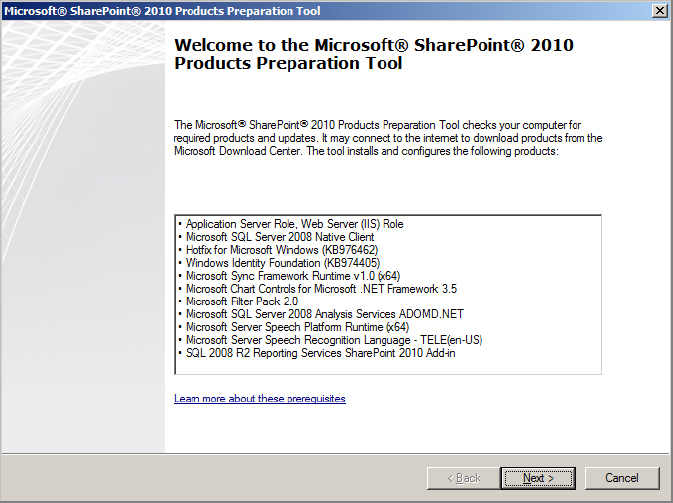
For most of the components, the installer will try to download the appropriate version from the Internet. Components that are already installed in a matching version are skipped. During the installation of these components, the server may need to be rebooted. If it does, after you log back in, the installer will resume from where it left off.
NOTE If the server does not have an active Internet connection, the download will fail and the installer will stop. The workaround for this is to predownload these components from another machine. We explain how to do this in the “Automate the Installation” section, later in this chapter.
The installer keeps a detailed log of each activity, which can be used to troubleshoot any problems. This log file is stored in the folder specified by the TEMP environment variable. To easily find this folder, click Start and type in %temp%. Inside this folder, look for a file named PrerequisiteInstaller.<DateTimeStamp>.log. You can open and view this file in Notepad.
Installing SharePoint Binaries
Once the prerequisites are successfully installed, you are ready for the second step. This step will install all of the SharePoint binaries into the file system and otherwise prepare the server to be part of a farm.
This part of the installation can also be launched from the splash screen in the Install section (see Figure 1.3, earlier in this chapter) or manually via the setup.exe program found in the folder for the DVD.
When you install SharePoint binaries, you have the option of automatically applying a service pack or cumulative updates. This process is called slipstreaming. For more information on how to do this, see www.toddklindt.com/blog/Lists/Posts/Post.aspx?ID=230.
Installing SharePoint Foundation
If you are installing SPF, here are the steps you follow:
1. From the splash screen, choose Install SharePoint Foundation.
2. Accept the Software License Terms.
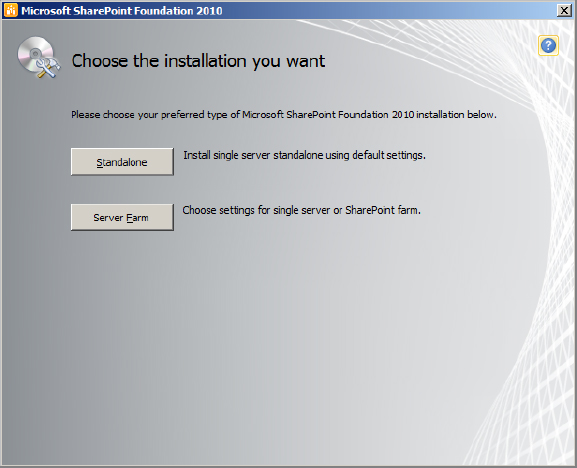
3. Assuming you are not installing SharePoint onto a domain controller, you are prompted whether you want to create a stand-alone or a server farm. In almost all cases, you’ll want to create a server farm. See Figure 1.4.
Figure 1.4: Choose Standalone or Server Farm
4. On the Server Type tab, select Complete. Be careful as the default is Stand-alone even though you avoided it in the previous step. See Figure 1.5.
Figure 1.5: Choose Complete or Stand-alone
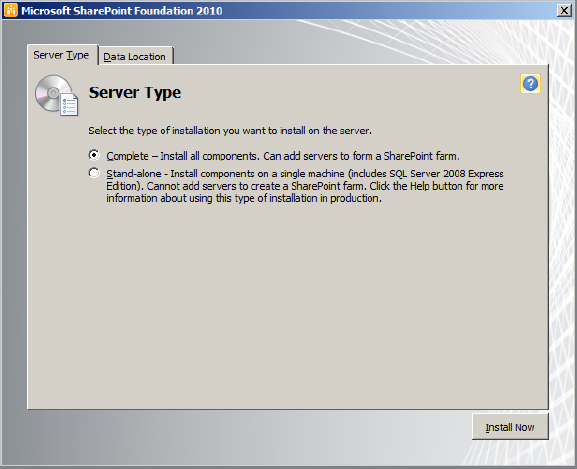
WARNING Creating a stand-alone farm is seldom recommended. It is a special farm that always contains a single server and it can never scale out to multiple servers. Installing a stand-alone farm also installs SQL Server Express locally and cannot use a separate SQL installation you may already have.
5. On the File Location tab, enter a data location. This is the folder to where SPF’s search index files are stored. By default, these are stored on the C: drive. If you expect SharePoint to index a lot of content, it is best to move this storage location to a separate partition (e.g., D:).
Installing SharePoint Server
Installing SharePoint Server (SPS) is similar to installing SPF. Here are the steps you follow:
1. From the splash screen, choose Install SharePoint Server.
2. Enter your standard or enterprise license key.
WARNING No matter which type of license key you enter, SPS’s installation program installs the same set of files. SharePoint simply enables or disables features according to the license type. If you enter in a standard key, you can upgrade to enterprise at a later date to unlock the additional features. However, you cannot downgrade from enterprise to standard without rebuilding the farm.
3. Accept the Software License Terms.
4. Assuming you are not installing SharePoint onto a domain controller, you are prompted whether you want to create a stand-alone or server farm. In almost all cases, you’ll want to create a server farm. See Figure 1.4 in the previous section.
5. On the Server Type tab, select Complete. Be careful as the default is stand-alone even though you avoided it in the previous step. See Figure 1.5 in the previous section.
6. On the File Location tab, choose a file location. These are folders where a portion of SharePoint Server’s binary files are stored. By default, these are stored on the C: drive. If your C: drive is smaller than the 40 GB recommendation, you should move this storage location to another drive letter.
After you provide all this input, the SharePoint binaries are installed. During installation, a detailed log of each activity is made, which can be used to troubleshoot any problems. These log files are stored in the same folder as the prerequisite installer log files, based on the TEMP environment variable. Inside this folder, look for a file named SharePoint Server Setup (<long_number>).log or Microsoft SharePoint Foundation 2010 Setup (<long_number>).log. These files can be opened and viewed in Notepad.
TIP SharePoint 2010 has the ability to track or block installations, which helps you prevent unauthorized deployments. For more information, see “Track or Block SharePoint Server 2010 Installations” located at http://technet.microsoft.com/en-us/library/ff730261.aspx.
Creating or Joining a Server Farm
With prerequisites and the SharePoint binaries installed, you are ready for the final and most important part of the installation: creating a new or joining an existing server farm. Both of these can be done from either a wizard or the command line.
The wizard is called the SharePoint 2010 Products Configuration Wizard. You can automatically launch this wizard at the end of the previous installer stage. The wizard is the easiest way to create or join a farm.
Creating a Server Farm
You must create a farm if this is the first server in the farm. Creating a farm creates a new configuration database in SQL Server. SharePoint also creates the Central Administration web application, which is used to administer the farm. Finally, this step installs services, registers SharePoint’s features, and secures the server and the farm.
Creating a Farm Using the Configuration Wizard
When using the SharePoint 2010 Products Configuration Wizard to create a farm, here are the steps you go through:
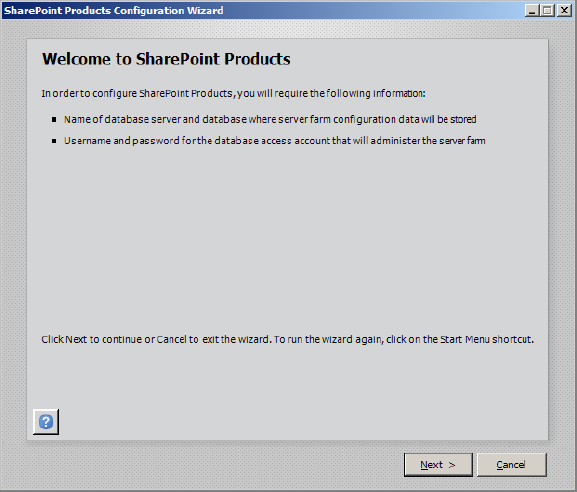
1. Start the Configuration Wizard. This wizard can be run from the end of the previous installer phase or by choosing Start ⇒ All Programs ⇒ Microsoft SharePoint 2010 Products ⇒ SharePoint 2010 Products Configuration Wizard.
You are greeted with the initial screen shown in Figure 1.6.
Figure 1.6: Starting the Configuration Wizard
2. Acknowledge the warning that services may be restarted.
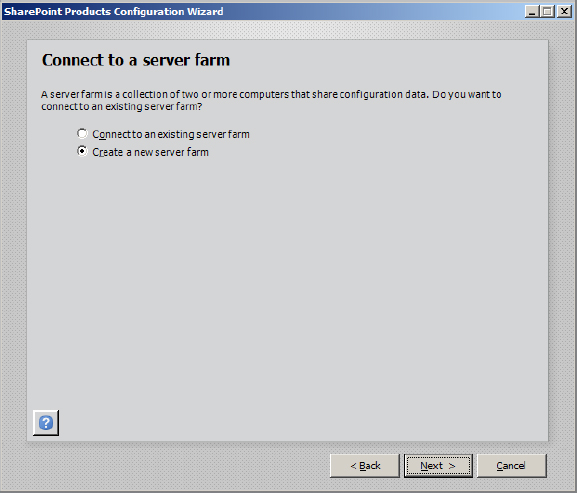
3. Specify whether you wish to create a new server farm by selecting Create A New Server Farm, as shown in Figure 1.7.
Figure 1.7: Create or connect to an existing farm
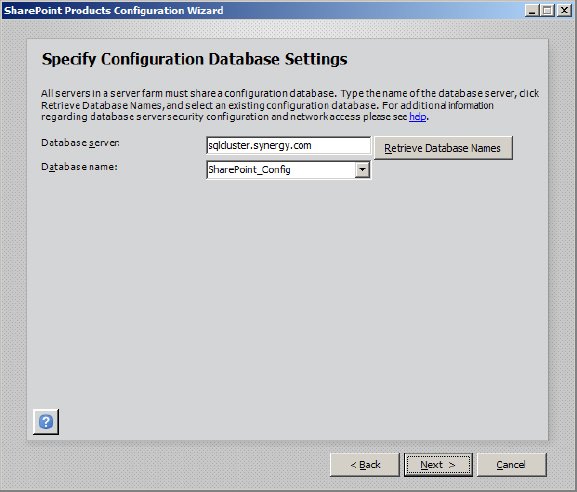
4. Specify the name of your database server and a name for the configuration database, as shown in Figure 1.8. When specifying the database server name, it’s best to create a SQL Alias, which allows you to use an alternate name instead of the actual SQL server name. This can ease maintenance especially if you need to move databases to a different server. To learn how create a SQL Alias, see the article titled “How to Setup and Use a SQL Server Alias” available at http://www.mssqltips.com/tip.asp?tip=1620
Figure 1.8: Specify configuration database settings

5. In the second half of the Specify Configuration Database Settings screen, specify the farm account (also known as the database access account) and password. This is one of the service accounts mentioned in the “Understanding the Creation of Service Accounts” section. Among other things, this account is used to create new databases on the SQL server.
6. Create a farm passphrase, as shown in Figure 1.9. The passphrase is an extra level of security. Whenever a new server is added to this farm, the passphrase must be entered. The passphrase must be in the form of a complex password.
Figure 1.9: Create a farm passphrase

A complex password has a minimum of eight characters and includes at least three of the following:
- English uppercase letters (A–Z)
- English lowercase letters (a–z)
- Numerals (0–9)
- Non-alphanumeric characters (such as !, $, #, %)
7. Provide the TCP port number for the Central Administration Web Application. By default, a random port is shown; you can either keep this or change it. See Figure 1.10.
Figure 1.10: Configure the Central Administration Web Application
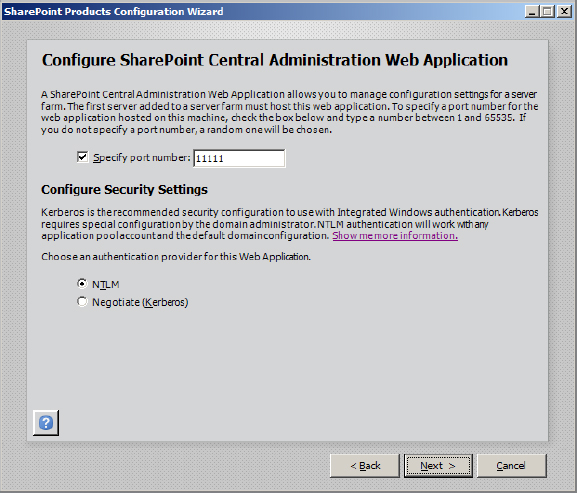
8. On the same screen, choose the security settings (authentication type) for your web application. Your two options are NTLM (Windows NT LAN Manager) and Kerberos. Kerberos is a better choice security-wise and also more efficient, but it requires additional configuration in your domain to be in place.
9. Review your settings to begin creating the farm, as shown in Figure 1.11. Click Next to start the creation.
Figure 1.11: Review configuration settings
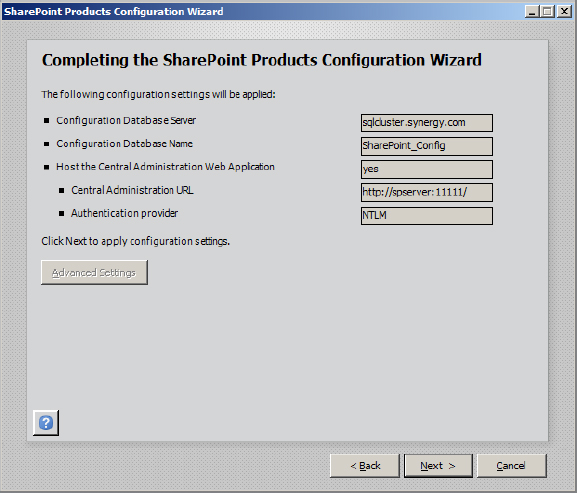
10. Wait a few minutes and click Finish when the process completes.
The farm is now created and Central Administration will start.
Creating a Farm Using PSCONFIG.EXE
The command-line program used to create or join a farm is PSConfig.exe. There are two key advantages to using this command instead of the graphical wizard:
- You can automate this step through script.
- You can specify the name for the Central Administration Web Application content database.
In contrast, when you use the wizard, it will autogenerate a not-so-friendly name like SharePoint_AdminContent_48cedae2-4d1f-42f8-8293-f19b621dc0fa.
To create a farm using PSConfig.exe, follow these steps:
1. Change into the directory Program FilesCommon FilesMicrosoft SharedWeb Server Extensions14BIN.
TIP A SharePoint administrator frequently runs commands from this BIN folder. This folder is located in what is called the SharePoint Root, or 14 Hive. By adding a new entry to your PATH environment variable, you can run these commands from any command prompt (including PowerShell) without having to manually enter this long folder path.
2. Run the following command, substituting the correct values for those shown in angle brackets:
psconfig -cmd configdb -create -server <SqlServerName>-database <ConfigDatabaseName> -user <FarmAccount>
A sample of this command and its output is shown in Figure 1.12.
Figure 1.12: Creating farm using PSConfig.exe
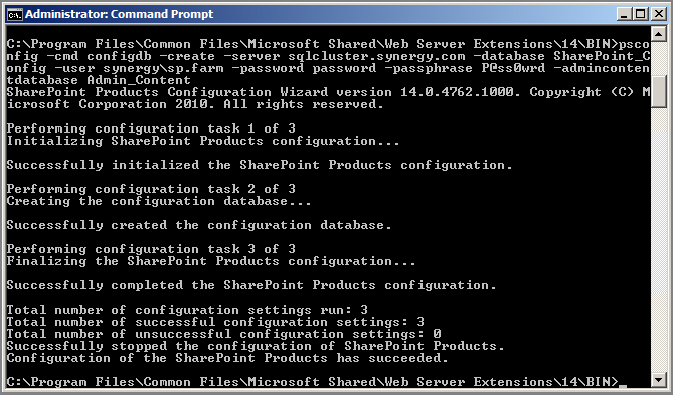
NOTE If you get a permissions error running this command, be sure that you are running the command as an administrator. To do so, right-click the Command Prompt shortcut and select Run As Administrator.
3. Run the Configuration Wizard to finish creating the farm (Start ⇒ All Programs ⇒ Microsoft SharePoint 2010 Products ⇒ SharePoint 2010 Products Configuration Wizard). This part can also be scripted with PSConfig.exe, but the resulting configuration is the same.
4. When prompted, choose Do Not Disconnect From This Server Farm.
5. Provide the TCP port number for the Central Administration Web Application.
6. Choose the authentication type for your web application: NTLM or Kerberos.
7. Review your settings and click Next.
8. Wait a few minutes and click Finish when the process completes.
The farm is now created and Central Administration will start. By default, log files for the Configuration Wizard and PSConfig.exe are stored in the Program FilesCommon FilesMicrosoft SharedWeb Server Extensions14LOGS folder. You can consult these logs to troubleshoot any problems you have. The filename format is PSCDiagnostics_<Date-Time>_<Random Number>.log.
Joining an Existing Server Farm
Any new server that will become a WFE or application server must be added to the farm. Here’s what you will need in order to join a new server to an existing farm:
- Server OS installed and joined to the domain
- SharePoint prerequisites installed
- SharePoint binaries installed
- Name of your SQL Server where the farm configuration database is stored
- Name of your configuration database
- Farm passphrase (this can be reset if unknown)
- Must be logged in with the domain installer account, which is a local administrator
Here are the steps to join a server into an existing farm:
1. Start the Configuration Wizard by choosing Start ⇒ All Programs ⇒ Microsoft SharePoint 2010 Products ⇒ SharePoint 2010 Products Configuration Wizard.
You are greeted with the initial screen in the wizard, as shown in Figure 1.6 earlier in this chapter.
2. Acknowledge the warning that services may be restarted.
3. Select the Connect An Existing Server Farm radio button, as shown in Figure 1.7.
4. Enter the name of the database server where the configuration database is stored and click the Retrieve Database Names button. Confirm that the right configuration database is selected. See Figure 1.13.
Figure 1.13: Specifying configuration database settings
If you cannot connect to the database server, check the following areas:
- Be sure you are logged in with the installer account.
- Check the incoming firewall settings on the SQL server.
- Ensure Named Pipes and/or TCP/IP Protocols are enabled for the SQL Server Network Configuration. (This is specified in SQL Server Configuration Manager on the SQL server.)
5. Enter the passphrase for the farm (the one you defined when you created the farm). See Figure 1.14.
Figure 1.14: Specifying the farm passphrase
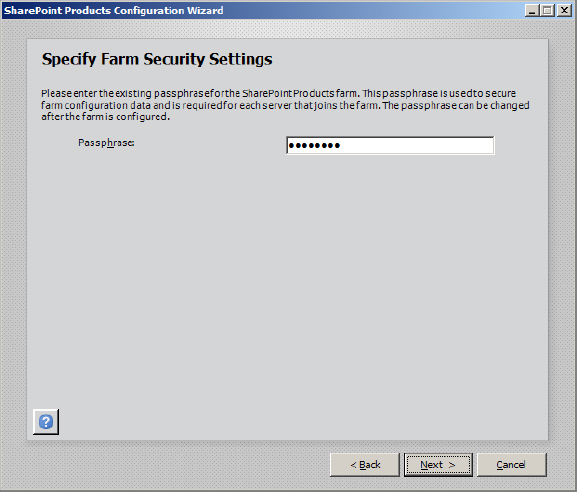
NOTE If the passphrase is unknown, you can reset it from any of the other farm servers by using the Set-SPPassPhrase PowerShell cmdlet.
6. Review your settings. Clicking the Advanced Settings button allows you to host the Central Administration Web Application on this server. By default, the Central Administration Web Application is hosted only on the first machine that created the farm, but you can move it to another server or run it on multiple servers. How to run the Central Administration Web Application on another server is covered in Chapter 5, “Scaling and High Availability.”
When the process completes, you have joined the farm.