
SharePoint is an extensible platform that allows developers and third-party software vendors to integrate custom applications into the product. In fact, the sole focus of many companies is to sell products that build on top of SharePoint. This makes SharePoint much more flexible as a base product.
Deploying custom code manually to SharePoint is a risky and burdensome task. You typically need to copy files manually to multiple servers, edit web.config files, and manually make UI changes. And that’s not all—when new servers are added to the farm, these changes need to be applied all over again. When performing a disaster recovery or an upgrade, you may also need to re-apply the custom changes.
Fortunately, SharePoint is able to automate all of this manual effort, making it a simple and painless experience. The way SharePoint does this is through something called a SharePoint solution package. A solution package is a file that contains all the files to deploy. It also contains the deployment instructions.
A solution package has the extension .wsp (WSS Solution Package) and is just a Windows Cabinet file in disguise. Deploying custom code using a solution package is not just a best practice—it should be a required practice, especially for code that is written by an internal team of developers.
NOTE In some cases, custom code may come in the form of a Windows Installer file (with the extension .msi). This is also an acceptable form of deploying code since it is also automated. However, there is a distinct advantage to using a solution package, especially when adding or replacing servers in the farm, because the solution package is automatically deployed when needed without any intervention.
Managing Farm Solutions
As a SharePoint administrator, you do not need to know how to create a solution package—you just need to know how to deploy one. When you’re working with solution packages, there are four steps to the solution package life cycle:
- Add
- Deploy
- Retract
- Remove
Most of these steps can be done with Central Administration, and all of them can be done using PowerShell. Each step is covered in the subsequent sections.
Adding a Solution Package
Adding a solution package is easy, but it cannot be done using Central Administration. It’s the only one of the four life-cycle steps that requires PowerShell. Adding a solution package places the WSP file into the solution store, which resides in the configuration database and is used to keep track of all custom enhancements to SharePoint. Think of this step as getting the solution package ready to deploy.
To add a solution package to the store, you need to use PowerShell from one of the WFE servers. Here is the syntax:
Add-SPSolution <LiteralPath>
Here is an example of how it is used:
Add-SPSolution c: empBIWebParts.wsp
That’s it. The solution package is now ready to be deployed.
Deploying a Solution Package
Deploying a solution package is where the actual installation is done. This involves copying code files to locations like the global assembly cache (GAC) or the SharePoint root (aka “14 Hive”). Changes to web.config can also be made. Remember, you’re not doing the actual installation—you’re just telling SharePoint to deploy for you.
If the solution package contains custom features (covered in the “Manage Features” section later in this chapter), they are automatically installed. Deployment is done automatically for each WFE server in the farm.
Before a package can be deployed, it must be added to the solution store (see the previous section).
A solution package can be deployed using Central Administration or PowerShell. For some solution packages, you have the option of deploying to one or more individual web applications rather than to the whole farm. This flexibility allows you to scope the custom code to specific web applications. Other solution packages are always deployed to the whole farm. This is called a global solution. Which option you have depends on how the package was put together and where it deploys code.
Here are the steps to deploy a solution package using Central Administration:
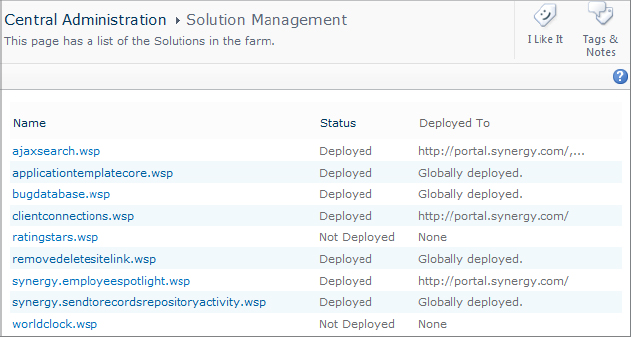
1. Click System Settings, and then select Manage Farm Solutions. You are presented with the solution store, as shown in Figure 6.8. On newly-created farms, this list is empty.
Figure 6.8: Solution packages in the solution store
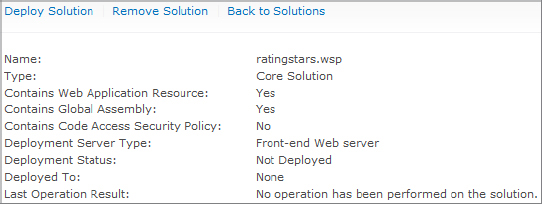
2. Click on the WSP package filename you want to deploy. You see the screen shown in Figure 6.9. This screen displays the current status of the solution package along with where it has been deployed.
Figure 6.9: Status of this solution package
3. To deploy this package, click the Deploy Solution link. You are now taken to the screen shown in Figure 6.10.
Figure 6.10: Deploying a solution package
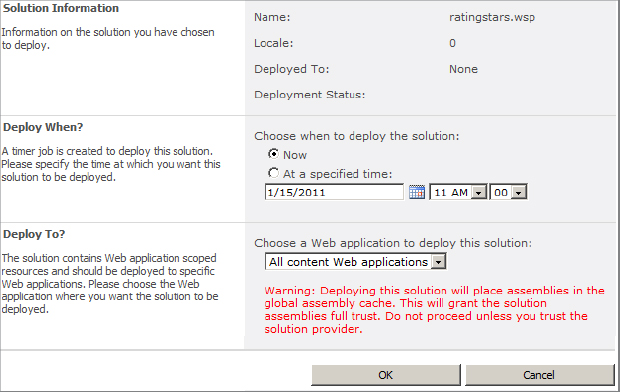
4. If this package supports web application-specific deployment, choose the web application in the Deploy To section, as shown in Figure 6.10. If this solution package is placing code into the GAC, you will see a red warning. For security reasons, only code that is from known and trusted sources should be deployed into the GAC.
5. Optionally, specify a time when this package should be deployed in the Deploy When section.
6. Click OK to run or schedule the deployment.
NOTE When deploying and retracting a solution package, the application pool for the web application is recycled. This process causes a momentary outage while a new pool is started and warmed up. This outage is one reason why you might want to schedule the deployment to occur after hours.
When you deploy solutions, a timer job is created on each WFE server. If you specify that a package is to be deployed now, it may take a minute or so for the deployment to finish.
NOTE As soon as the deployment finishes, you should do a basic test of the web application to ensure that its pages still display. This applies whether you scheduled the deployment to take place now or later. Do not schedule the deployment for 2 a.m. if no one is there to confirm that the deployment succeeded.
To deploy a solution package using PowerShell, use the Install-SPSolution cmdlet. Here is the basic syntax:
Install-SPSolution <package name> [-WebApplication <URL>][-GACDeployment] [-confirm]
Here is a sample form:
Install-SPSolution biwebparts.wsp -WebApplication
http://intranet -GACDeployment
The -GACDeployment switch must be used if code is deployed into the GAC.
Retracting a Solution Package
Retracting a solution package uninstalls a deployed solution package from one or more web applications. You retract a solution package when you are no longer using it, or if you need to deploy a newer version. Solution packages must be deployed before they can be retracted. Retracting can be done from Central Administration or PowerShell. Here are the steps when using Central Administration:
1. Click System Settings, and then select Manage Farm Solutions.
2. Select the WSP package you wish to retract.
3. Click Retract Solution.
4. If this solution was deployed to an individual web application, select the web application. For a global solution, you won’t have this option.
5. Optionally, choose a time for the retraction to take place.
6. Click OK.
To retract a solution package using PowerShell, use the Uninstall-SPSolution cmdlet. Here is the basic syntax:
Uninstall-SPSolution <package name>
Here is a sample uninstall script that retracts this solution from one web application and suppresses the confirmation prompt:
Uninstall-SPSolution biwebparts.wsp -WebApplication
http://intranet -confirm:$false
Removing a Solution Package
The fourth step in the life cycle is to remove a solution package. As you can guess, it removes the WSP solution package from the store. In most cases, you should make sure that the package has been retracted from all web applications prior to removal.
To remove a solution package using Central Administration, follow these steps:
1. Click System Settings, and then select Manage Farm Solutions.
2. Select the WSP package you wish to remove.
3. Click Remove Solution and confirm the action.
To remove a solution using PowerShell, use the Remove-SPSolution cmdlet. Here is the basic syntax:
Remove-SPSolution <package name> [-confirm] [-force]
The optional -force parameter is useful for removing a package that is still installed. This parameter should only be used to remove packages that are in an error state and cannot be properly retracted.
NOTE The Install-SPSolution and Uninstall-SPSolution cmdlets use timer jobs for the actual work. When running multiple SPSolution commands using a PowerShell script, the command processor does not wait for these timer jobs to complete before continuing to the next line of the script. This can cause problems, for example, if you have a script that runs both Uninstall-SPSolution and Remove-SPSolution in succession. The Remove-SPSolution cmdlet produces an error if the uninstall hasn’t finished yet. You can work around this issue by using a Start-Sleep cmdlet in between. For those who need a more intelligent script, see the article “Deploying SharePoint 2010 Solution Packages Using PowerShell” on the SharePoint Automation blog at http://blog.falchionconsulting.com/index.php/2010/06/deploying-sharepoint-2010-solution-packages-using-powershell/.
Managing User Solutions
User solutions, also called sandboxed solutions, are introduced in Chapter 3, which covers how a site collection administrator can upload and activate a user solution for a single site collection. This section focuses on how the farm administrator can manage user solutions across the farm.
A user solution package is nearly identical to a farm solution. The contents of the WSP package are the same, but there are restrictions on what a user solution can do and differences in how the code is run. User solutions are designed so that the potential risk of running custom code is mitigated. For example, if a faulty web part is deployed from a user solution and added to a web page, only the web part itself is broken but the page still displays. If this same web part is deployed as a farm solution, it can prevent the whole page from displaying, or, worse-yet, cause farm-wide problems.
Both built-in SharePoint code and custom code from farm solutions together run inside the application pool for the web application. Code from user solutions, however, runs in a separate process, which protects SharePoint from potentially harmful code. This separate process and its security settings constitute the sandbox.
Configuring Load Balancing for Sandboxed Code
Before code originating inside user solutions can be run, the Microsoft SPF Sandboxed Code Service must be running on at least one server in the farm. To start this service from Central Administration, follow these steps:
1. Click System Settings, and then click Manage Services On Server.
2. Choose the correct server.
3. For the Microsoft SPF Sandboxed Code Service, click Start.
As a farm administrator, you have control over which WFE(s) or application server(s) are able to run this type of code. When configuring these load balancing settings, you have two primary options:
- All sandboxed code runs on the same machine as a request. This is the most efficient option, but it requires that all of the WFE servers have the sandboxed code service running. This approach works well if you have a small farm or do not use many user solutions.
- Requests to run sandboxed code are routed by solution affinity. This choice tells SharePoint to direct requests only to those servers that are running the sandboxed code service. This option gives you more flexibility in choosing which servers are used. It’s also better if you have several user solutions or if the code running in user solutions is resource heavy.
To configure these load balancing settings from Central Administration, follow these steps:
1. Click System Settings, and then select Manage User Solutions.
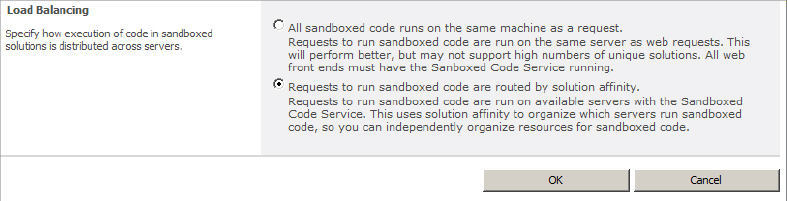
2. In the Load Balancing setting, select one of these two choices as shown in Figure 6.11.
Figure 6.11: Configuring load balancing for user solutions
3. Click OK to save the settings.
TIP A common problem when working with sandboxed solutions is this error: “The sandboxed code execution request was refused because the Sandboxed Code Host Service was too busy to handle the request.” For some troubleshooting guidance on this problem, see the SharePoint Developer Team Blog at http://bit.ly/eftSoH.
Adjusting How Quota Points Are Calculated
In addition to a disk space quota, a site collection has a resource quota on the usage of user solutions. The quota prevents excessive use from certain site collections and also opens opportunities for chargeback based on resource usage. Resource usage is calculated by looking at counters, such as CPU and memory. SharePoint attempts to normalize each counter’s usage by translating it into a point count. The total point count for all counters for all user solutions in a site collection becomes the resource usage for the day. Thus, user solution quotas are based on daily usage. Once the usage for the day is reached, no more user solution code can run until SharePoint resets the count via the Solution Daily Resource Usage Update timer job.
As a farm administrator, you can adjust how these quota points are calculated. For example, if CPU is limited, you can make CPU usage more “expensive.” Or if RAM is abundant, you can make memory usage “cheaper.” These counters can only be adjusted by using PowerShell. Changes to these counters apply to the farm as a whole, so the calculation rules apply the same to all site collections.
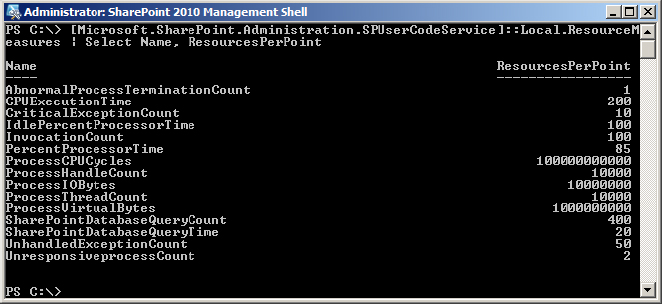
To view all the counters, you can run this short script.:
[Microsoft.SharePoint.Administration.SPUserCodeService]
::Local.ResourceMeasures | Select Name, ResourcesPerPoint
The default settings for a farm are shown in Figure 6.12.
Figure 6.12: Resource quota calculation settings
To make CPU execution time “less expensive,” just increase this number. The default value is 200, and the following script increases it to 400:
$cpu=[Microsoft.SharePoint.Administration.
With this new setting, 400 units of CPUExecutionTime now equals one point. Similarly, to make CPUExecutionTime more expensive, use a smaller number. Other counters work in the same way.
TIP Until you know what your real needs are, you should not arbitrarily change quota point numbers.
Timer jobs (Solution Resource Usage Log Processing and Solution Resource Usage Update) are used to calculate the points. Any changes made to the counters may take up to 15 minutes for the updated totals to be reflected in each site collection.