
Configure the User Profile Service Application
Public social networking sites such as Facebook and LinkedIn have gained popularity because they allow an open and relatively unstructured form of communication that encourages users to share ideas and insights. Some organizations have begun to see the value in this type of interaction and have started endorsing the use of some of these technologies during the workday as part of their corporate communications strategy. While public Internet sites are suitable in some cases, most organizations require that information relating to their business be kept within a closed environment that can be monitored and controlled.
With My Sites, organizations can give employees a personal SharePoint site where they can store and share documents, pictures, and other details that don’t belong in departmental team sites. More importantly, users have complete control over the security and exposure given to this information, allowing them to exchange confidential information with select sets of users.
We need to be clear that there is a difference between personal information and private details and that corporate social networking is not necessarily intended for both. An employee may feel comfortable sharing something personal, such as a hobby or a book recommendation, with others in the workplace but not want to share something private like their birthday or cell phone number.
SharePoint 2010 allows organizations to import employee details from Active Directory and other data sources, to present this information as user profiles, and to set policies on who is allowed to see which data. Users can update some of their own profile details and control the amount of information they want to share.
One of the advantages of storing many details about employees in their user profiles is that these details can be used to create custom audiences that content publishers can use to target information to groups of users. Audiences can be based on details such as a staff member’s office location or a code stored in their position title and then used to show or hide pages in a site based on which audience a user belongs to.
The following steps are required to deploy the User Profile service application:
1. Configure accounts and permissions to prepare for synchronization of the User Profile service.
2. Set up the User Profile service application.
3. Start the User Profile service.
4. Set up and perform synchronization.
This section describes the first three tasks in detail. Synchronization is covered in “Configure User Profile Synchronization,” later in this chapter.
Configuring Accounts and Permissions
The User Profile service manages data by synchronizing with Active Directory or another data source. This service requires specific permissions to be in place in order to perform synchronization. Some of these permissions must be configured before you attempt to perform synchronization.
SharePoint 2010 Farm Account This is the identity account of the SharePoint Central Administration application pool and must be made a member of the local Administrators group on the synchronization server. The account must also have the Log On Locally right on the synchronization server. (Instructions for selecting the synchronization server are in the section “Creating the User Profile Service Application,” later in this chapter.)
When the Forefront Identity Manager (FIM) services start, they will automatically adopt this account as their service account. Once the configuration process is complete, the permission can be removed.
Synchronization Account In preparation for configuring the User Profile service, you must create an Active Directory account, or choose an existing one, to be the synchronization account. The synchronization account is used by the service to connect to Active Directory or another data source to import user details into the profiles. Following the principle of least privilege, we recommend creating a separate account. This account must then be granted at least the Replicating Directory Changes right. If you intend to replicate content back into Active Directory, it must also have the Create Child Objects right.
To configure these permissions:
1. Log onto the Active Directory Domain Controller and open Active Directory Users And Computers.
2. Right-click the domain and then click Delegate Control.
3. In the Delegation Of Control wizard, click Next.
4. On the Users Or Groups page, click Add.
5. Enter the name of the synchronization account, click Check Names, and then click OK.
6. Click Next.
7. On the Tasks To Delegate page, select Create A Custom Task To Delegate, and then click Next.
8. On the Active Directory Object Type page, select “This folder, existing objects in this folder, and creation of new objects in this folder,” and then click Next.
9. On the Permissions page, check the boxes next to Write, Create All Child Objects, and Replicating Directory Changes; then click Next.
10. Click Finish.
Preparing the Farm for Supporting My Sites
As part of the configuration of the User Profile service application, several steps need to be performed to prepare the farm for supporting My Sites. You need to perform the following steps in order:
1. Create or select a web application to host My Sites.
2. Create the managed paths for My Sites.
3. Create a My Site host.
4. Set up self-service site creation.
Creating or Using an Existing Web Application
Each My Site will be created as a separate site collection in a specific web application. While SharePoint can be configured to create My Sites in almost any web application, it is a best practice to create a dedicated web application to hold the My Sites content. This separate web application will automatically have a dedicated database to keep the My Sites content distinct from other site content. It will also allow farm administrators to configure settings and policies at the web application level to apply only to the My Sites web application.
There is nothing unique in the way that a web application is created for use by My Sites as compared to other web applications created for intranet purposes—except for the URL used. We recommend that the URL be one that is distinctive and recognizable by users, for example, http://mysites.company.com. For the steps to create a new web application, see Chapter 2, “Creating and Managing Web Applications.”
Creating the Managed Paths
Managed paths allow web applications to support multiple site collections under a common root URL. In the case of My Sites, SharePoint requires that two managed paths be created:
Explicit Managed Path This path is used for the My Site Host site collection. The My Site Host managed path is a dedicated site collection that is the entry point for all users to the My Sites.
Wildcard Managed Path This path is used for all the user site collections. The wildcard managed path will allow multiple new My Site site collections to be created under the My Site Host managed path without conflicting with any other URLs.
For more details on managed paths, see Chapter 3, “Creating and Managing Site Collections.”
To create the My Site managed paths, perform the following steps:
1. From SharePoint 2010 Central Administration, under Application Management, click Manage Web Applications.
2. Click the row for the web application created to hold the My Sites.
3. From the ribbon, click the Managed Paths button. Notice that there is already a managed path called (root), which is automatically created with an Explicit inclusion. This path can be used as the path for the My Site Host or a new path can be created. To create a new host site path, in the Path box enter the name of the relative URL, such as my, and from the Type drop-down, select Explicit Inclusion. Then click Add Path.
4. In the Path box, enter the name of the relative URL to be used as the root for all user site collections, such as personal, and, under the Type drop-down, select Wildcard Inclusion. Then click Add Path.
5. Click OK.
Creating a My Site Host
The My Site Host site collection serves as the “landing page” for all users browsing to their My Site and also supports the automatic redirect that creates a new My Site for a user who does not have one already.
To create the My Site Host site, follow these steps:
1. From SharePoint 2010 Central Administration, under Application Management, click Create Site Collections.
2. From the Web Application drop-down menu, select the My Site web application you created earlier.
3. In the Title box, enter a title, such as My Sites, which will appear to users. In the Description box, enter the purpose of this site.
4. In the Web Site Address drop-down list, select the path created in the previous section as the Explicit inclusion for the My Site host. By default, the URL root (/) will be selected.
5. In the Template Selection section, click the Enterprise tab, and then select My Site Host.
6. In the Primary Site Collection Administrator box, enter the username for the user who will be the site collection administrator; use the pattern domainusername.
7. Click OK.
Setting Up Self-Service Site Creation
Once the My Site hosts site has been created, Self-Service Site Creation must be enabled on the My Sites web application. Normally, the only way to create a new site collection is for a farm administrator to create it from within Central Administration. But this would be an impractical way of creating site collections for every user. When Self-Service Site Creation is turned on, users receive the right to create a site collection on their own in the My Site web application and are automatically designated as the site collection administrator of their new site collection. Users don’t need to know anything about this right because SharePoint handles all the processing for them when they navigate to their My Site for the first time.
To enable Self-Service Site Creation, perform the following steps:
1. From SharePoint 2010 Central Administration, under Application Management, click Manage Web Applications.
2. Click the row for the web application created to hold the My Sites.
3. From the ribbon, click the Self-Service Site Creation button.
4. Click the On option and click OK.
NOTE Enabling Self-Service Site Creation has the side effect that any user with permission to create a My Site will also be able to navigate to a page exposed by this feature at the relative address _layouts/scsignup.aspx under the My Site host and create an additional site collection. The good news is, there is no link to this page published anywhere in the site, so most users will never find it. The bad news is, there is no way of restricting access to this page, short of renaming the file itself.
Creating the User Profile Service Application
To support all the social networking features of SharePoint 2010, the farm requires that at least one User Profile service application be created.
You must create this application before you start the User Profile service and the User Profile Synchronization service.
The SharePoint 2010 User Profile service makes use of two FIM services. This fact makes its configuration and operations distinctly different from those of SharePoint 2007. The services are exposed in Central Administration under Services On Server. They are called the User Profile service and the User Profile Synchronization service.
TIP If you run into problems following the steps in this section and services fail to provision correctly, don’t panic. This is actually a common experience with the RTM version of the product. Simply stop the User Profile service on the server, delete the service application and any databases created, and try again. In many cases, the same steps will work on the second try. For more information on creating and deleting service applications, refer to Chapter 4, “Creating Service Applications.”
The following steps assume that the My Site host site and managed path have already been created. The steps for creating them are found earlier in this section.
1. From SharePoint 2010 Central Administration, under Application Management, click Manage Service Applications.
2. From the ribbon, click the New menu and select User Profile Service Application.
3. At the top of the dialog box, enter a unique name for this service as you want it to appear in the Service Applications list.
4. In the Application Pool section, you need to either choose an existing application pool or create a new one. If you choose to create a new application pool, enter a unique name for the pool; then, in the Configurable field, either select an existing managed account or click Register New Managed Account to create a new one. (We don’t recommend that you use predefined accounts for production installations.)
The application pool serves as the process space for executing the operations of the service. While it is not necessary to create a dedicated application pool for the User Profile service, it is considered a best practice and provides better isolation and security.
5. In the Profile Database section, enter the name of the SQL server where the database will be created and the name of the database you want to create, as shown in Figure 7.1. Then either select Windows Authentication to use the application pool account to access the database, or enter specific SQL Server logon credentials if Windows Authentication to the SQL server is blocked. Enter the name of the failover database server if you are implementing fault tolerance through database mirroring.
Figure 7.1: Profile database settings
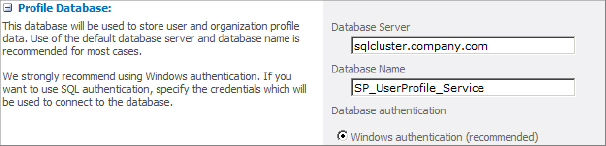
The Profile database holds the details about all the users and organizations imported from Active Directory.
6. In the Synchronization Database section, enter the name of the SQL server where the database will be created and the name of the database you want to create, as shown in Figure 7.2. Then provide authentication and fault tolerance settings, as in step 5.
Figure 7.2: Synchronization database settings
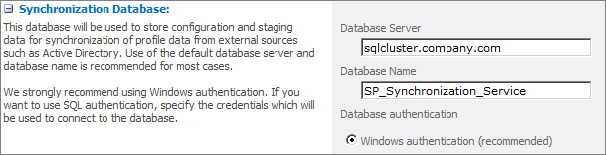
The Synchronization database holds the configuration and processing details for connections to Active Directory and other data sources.
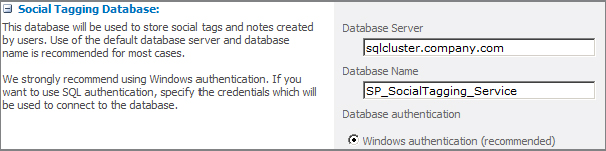
7. In the Social Tagging Database section, enter the name of the SQL server where the database will be created and the name of the database you want to create, as shown in Figure 7.3. Then provide authentication and fault tolerance settings, as in step 5. The Social Tagging database holds the tags (enterprise keywords) and personal notes entered by users and made available through their user profile.
Figure 7.3: Social Tagging database settings
8. From the Profile Synchronization Instance drop-down list, select the SharePoint server that will execute the profile synchronization processing. While not a very intensive process in itself, the synchronization should be run on a machine that will not be heavily engaged in other processes at the scheduled synchronization time.
9. In the My Site Host URL box, shown in Figure 7.4, enter the fully qualified URL to the site collection that has been created using the My Site Host site template. See the “Creating a My Site Host” section earlier in this chapter for more details.
Figure 7.4: My Site Host URL and My Site Managed Path settings
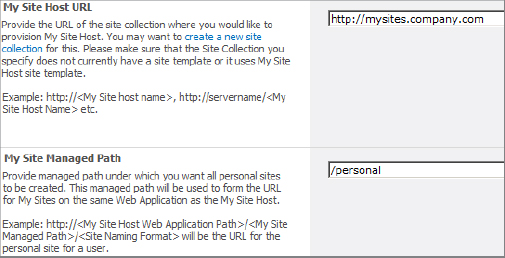
10. In the My Site Managed Path box, shown in Figure 7.4, enter the managed path that has been created for provisioning new My Sites under the “Creating a My Site Host” section.
11. In the Site Naming Format section, choose the format for the site name that will be created for each user. For details on the formats, see “Setting Up My Sites,” later in this chapter.
12. The Default Proxy Group setting specifies whether this service will automatically be part of the group of services assigned to all web applications or whether this service will be created independently. If the service is created independently, it must be assigned manually through a custom association. In most cases, when you only plan to have one User Profile service, it is appropriate to leave the default value set to Yes to include it in the Default Proxy Group.
13. Click Create to create the User Profile service application.
Starting the User Profile Services
Starting the User Profile service in Central Administration also starts the corresponding Windows services on the synchronization server.
1. From SharePoint 2010 Central Administration, under System Settings, click Manage Services On Server.
2. From the Server drop-down, select Change Server and set it to the synchronization server selected in step 8 in the previous exercise.
3. Next to User Profile Service, click Start under the Action column.
4. Next to User Profile Synchronization Service, click Start under the Action column. The service startup screen appears, as shown in Figure 7.5.
Figure 7.5: User Profile Synchronization Service startup screen
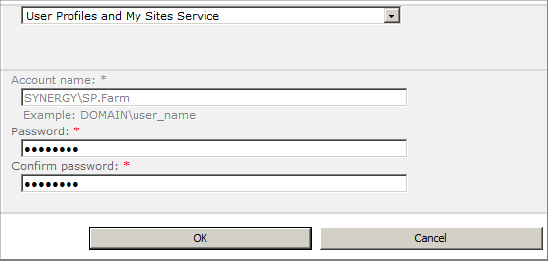
5. Select the User Profile service application that you created in the previous exercise.
6. Enter the password for the farm account, and then confirm the password.
7. Click OK.
The User Profile Synchronization Service status will change to Starting and will remain so for up to 15 minutes as the FIM service is configured. Once it is completed, the status will change to Started.
To confirm that the services are fully configured:
1. Open the Services applet under Administrative Tools on the synchronization server.
2. Locate the Forefront Identity Manager Service and the Forefront Identity Manager Synchronization Service.
3. Confirm the following for both services:
- They have the status of Started.
- They have been configured to start automatically.
- They have their logon account set to the farm account.
4. As a final step to prepare for configuring a synchronization connection, restart IIS by opening a command prompt and typing IISRESET.