
Create a Web Application Using Central Administration
Web applications can be created from the Central Administration GUI or PowerShell. To create a web application using Central Administration, follow these steps:
1. Open Central Administration (Start ⇒ All Programs ⇒ Microsoft SharePoint 2010 Products ⇒ SharePoint 2010 Central Administration).
2. Click Application Management, then choose Manage Web Applications
3. In the ribbon, click New. The Create New Web Application dialog box appears.
4. Specify each of the settings and click OK. You need to configure the following settings:
- Authentication Type
- IIS Web Site Settings
- Security
- Public URL
- Application Pool
- Content Database
- Service Application Connections
We’ll explain how to configure each setting in the next few sections. It may take a minute or longer for the web application to be created. While it is running, SharePoint is creating and configuring a new IIS website on each WFE server. It is also creating a new content database on the SQL server specified.
Choose an Authentication Type
The first setting in the Create New Web Application dialog box asks you to choose the authentication method to be used. (See Figure 2.2.) You have two choices here: Claims-Based Authentication or Classic Mode Authentication.
Figure 2.2: Choose an authentication type
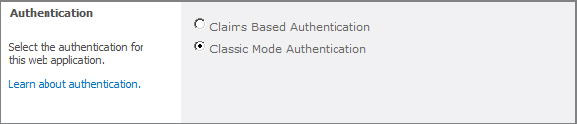
Claims-Based Authentication (CBA) Also called Claims, Claims-Based Authentication is new to SharePoint 2010 and is based on Windows Identity Foundation. If you will be using Forms-Based Authentication (FBA) or a trusted identity provider such as Windows Live (e.g., Hotmail), you must use Claims. It can be used with Active Directory or Lightweight Directory Access Protocol (LDAP) authentication as well and even allows you to have multiple authentication types based on the same URL. Claims works by exchanging Security Assertion Markup Language (SAML)-based tokens between identity providers.
Classic-Mode Authentication This is the mechanism that was supported in previous versions of SharePoint. It is the easiest to configure but you should choose it only if you will be using Windows Authentication alone. If you plan on using SharePoint only as an intranet and will be integrating with Active Directory, Classic mode works just fine.
Configure IIS Website Settings
As shown in Figure 2.3, the IIS Web Site section of the Create New Web Application dialog box allows you to configure the IIS website’s bindings. In most cases, you will be creating a new IIS website, but SharePoint also lets you convert an existing IIS website into a SharePoint web application. This option is helpful if you have removed SharePoint from an IIS website and need to re-extend it. How and why you might want to do this is covered in the section “Extend or Delete a Web Application,” later in this chapter.
Figure 2.3: Configuring IIS website settings
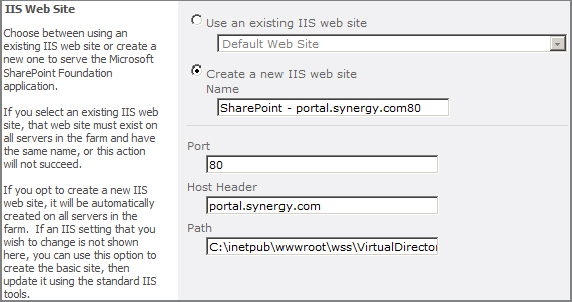
IIS uniquely identifies each website it manages by using three different settings: IP Address, Host Header, and TCP Port. Each IIS website (and SharePoint web application) must have at least one unique value out of these settings. When creating a SharePoint web application, however, you cannot specify the IP address. Initially, SharePoint will bind the IIS website to all unassigned addresses. If you need to bind it to a specific IP address, then you must modify the bindings in IIS after the web application has been created. Be sure to make this modification on all WFE servers.
The host header becomes the friendly name or fully qualified domain name (FQDN) that you will use for the web application. Within Domain Name System (DNS), you will need to be sure that this name resolves to the address of your WFE server or, if you are using network load balancing (NLB), the cluster IP address for your WFE cluster. Configuring an NLB cluster is covered in Chapter 5, “Scaling and High Availability.”
Optionally, you can change the website path. By default, this points to a folder path on the C: drive. It only takes a small amount of space, however, so there is no reason to change it.
Configure Security
The security options available depend on whether you chose Claims or Classic authentication. Both types of authentication support anonymous users and Secure Sockets Layer (SSL). You turn these settings on and off in the Security Configuration section of the Create New Web Application dialog box (see Figure 2.4).
Figure 2.4: Security Configuration settings
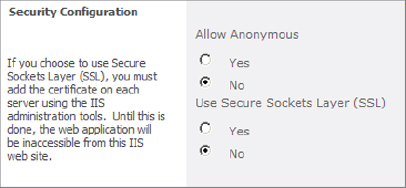
Anonymous users are guest users who do not log in. It is common for public-facing Internet websites to allow anonymous users. For more detail, see Chapter 14, “Managing Security.”
SSL is used to encrypt traffic from the client across the Internet to your web servers. If you choose to use SSL, you must load and bind an SSL certificate to the website in IIS after you create the web application. You cannot do this through SharePoint, however; you must use IIS Manager. These steps are covered in the “Configure IIS Settings” section later in this chapter.
Configuring Claims-Based Authentication
Claims is the most flexible form of authentication. With it, you can configure multiple authentication types associated to a single URL on a web application. For example, employees can authenticate using Active Directory, and contractors can authenticate using FBA.
The options available when you choose Claims-Based Authentication are shown in Figure 2.5.
Figure 2.5: Claims Authentication Types security settings
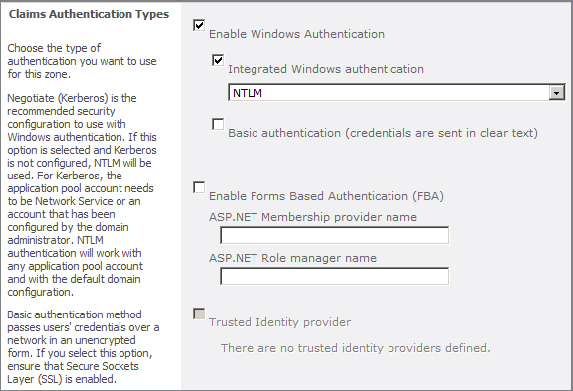
With Claims, you have the option of selecting from one to three primary forms of authentication: Windows, FBA, and Trusted Identity provider. While Claims-Based Authentication is much more powerful than Classic authentication, configuring Claims is a bit more complex.
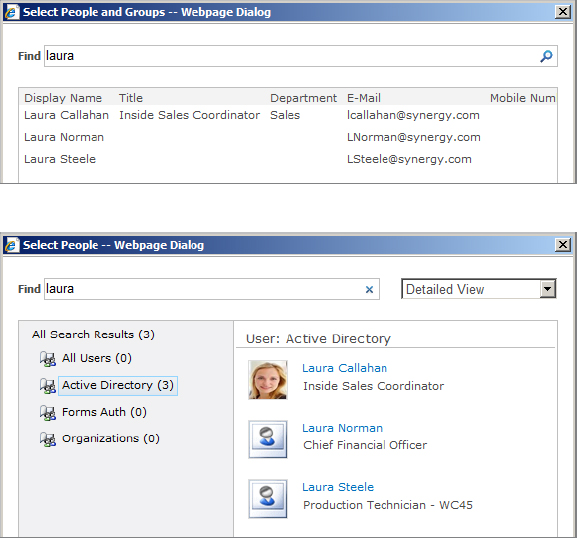
There are minor differences between Claims and Classic from the user’s perspective. For example, the People Picker (the screen where users and groups are granted permissions) is slightly different. If Claims-Based Authentication is configured, users can see and choose users and groups from multiple security realms. For example, both users who exist in Active Directory and users who exist in an external LDAP provider might show up in the People Picker.
Figure 2.6 shows the People Picker when using Classic authentication (top) and when using Claims (bottom) with both Windows Authentication and FBA.
Figure 2.6: People Picker when using Classic (top) and Claims (bottom) authentication
Configuring Windows Authentication
When you enable Windows Authentication, you need to choose whether to use NTLM (Windows NT LAN Manager) or Kerberos. NTLM works with Active Directory and doesn’t require any additional configuration. While it’s easier to configure, it has three main drawbacks in comparison with Kerberos:
- It is less secure.
- It requires more network packets when authenticating.
- It doesn’t support delegation.
Kerberos is an industry-standard form of authentication and also works with Active Directory. It overcomes the limitations associated with NTLM but requires additional configuration. It can be hard to troubleshoot and confirm Kerberos is working unless you have a solid grasp of how it works.
If you choose Kerberos, you need to configure service principal names (SPNs) for SQL Server and each SharePoint web application. For more information on configuring Kerberos with SharePoint, see the article “Configure Kerberos Authentication (SharePoint Server 2010)” here:
http://technet.microsoft.com/en-us/library/ee806870.aspx
NOTE You might be curious why the dialog box says Negotiate (Kerberos). Negotiate means that IIS tells the client that both Kerberos and NTLM are supported, and the client determines which method to use.
If you choose Windows Authentication, you also have the option of enabling Basic Authentication. This is a simple authentication scheme where the user’s credentials are sent unencrypted. It is normally used with older browsers. If you select this option, be sure that SSL is in place to ensure that passwords cannot be obtained by devices listening on the network.
Configuring Forms-Based Authentication
FBA is only available when using Claims-Based Authentication. FBA presents users with a web page where they enter their username and password. A default web page is available (see Figure 2.7), or you can design a custom web page.
Figure 2.7: FBA login web page
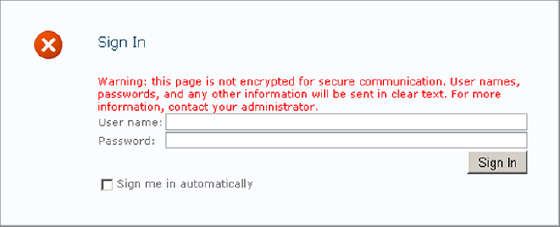
If you enable FBA, you must define which providers will be used for authenticating membership (i.e., users) and managing roles (i.e., groups). For these, you can use Active Directory, LDAP, SQL Membership Provider, or any custom provider that can plug into ASP.NET membership services. FBA works by taking the username and password received from the web page and passing it off to the provider for validation.
To use FBA, you must edit various web.config files with the settings to be used for the membership and role provider. Here is a brief overview of the steps that you must complete on each WFE server:
1. Edit the web.config file for the Central Administration Web Application and add the settings for the membership and role manager that will be used.
2. Edit the web.config file for the Security Token Service Application (located in Program FilesCommon FilesMicrosoft SharedWeb Server Extensions14WebServicesSecurityToken). The changes you make here are exactly the same as with step 1.
3. Create your new SharePoint web application. For the FBA section, as shown in Figure 2.5 earlier in this chapter, enter the ASP.NET membership provider name and the role manager name. These names were specified in steps 1 and 2.
4. Edit the web.config file for the newly created web application and add the same membership and role manager settings used in steps 1 and 2.
When modifying these web.config files, you should make backups first and be very careful—the syntax is complex and varies depending on the provider that is used. For two different examples on how to configure FBA, see the following articles:
- “Configure Forms-Based Authentication for a Claims-Based Web Application (SharePoint Server 2010)”:
http://technet.microsoft.com/en-us/library/ee806890.aspx
- “Configuring Forms Based Authentication for SharePoint 2010 Using IIS7” on Donal Conlon’s blog:
http://donalconlon.wordpress.com/2010/02/23/configuring-forms-base-authentication-for-sharepoint-2010-using-iis7
TIP You can download a configuration utility that can help you configure and push out these web.config changes to all your WFE servers. To read more and download the utility, see the article “SharePoint 2010 Forms Based Authentication Configuration Manager” at http://blogs.technet.com/b/speschka/archive/2010/07/28/sharepoint-2010-forms-based-authentication-configuration-manager.aspx.
Configuring a Trusted Identity Provider
A trusted identity provider allows SharePoint to use a custom or third-party claims provider. For example, you can use Windows Live ID accounts to authenticate users to SharePoint. Before you can select an identity provider, you must first configure one using PowerShell. This process is somewhat complex and the details are beyond the scope of this book. For more information, see the article “Configure Claims-Based Authentication Using Windows Live ID (SharePoint Foundation 2010).” This article contains steps to configure SharePoint to use Live ID as a claims provider. It is available here:
http://technet.microsoft.com/en-us/library/ff973114.aspx
Configuring Classic Authentication
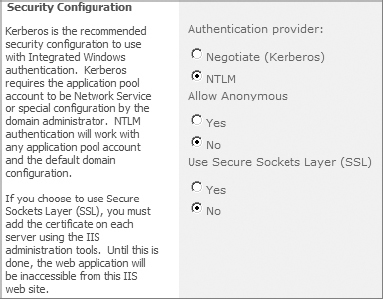
Compared to Claims, configuring Classic authentication is much easier. You must specify whether NTLM or Kerberos will be used. Configuring Kerberos with Classic authentication is the same as with Claims and is discussed in the “Configuring Windows Authentication” section earlier in this chapter. The other setting defines whether SSL is to be used. Figure 2.8 shows the settings for creating a web application with Classic authentication selected.
Figure 2.8: Security Configuration settings for Classic authentication
Configure the Public URL
The public URL is the web application URL that SharePoint recognizes and uses when generating links on web pages. The public URL can also be changed after creating the web application. More details on how and when to adjust this setting are found later in this chapter in the “Managing Alternate Access Mappings” section.
Configure the Application Pool
As described earlier, the application pool is the worker process and account that executes client requests on the WFE server. When creating a web application, you can either create a new application pool or reuse an existing one. The interface for configuring the application pool is shown in Figure 2.9.
Figure 2.9: Configuring application pool settings
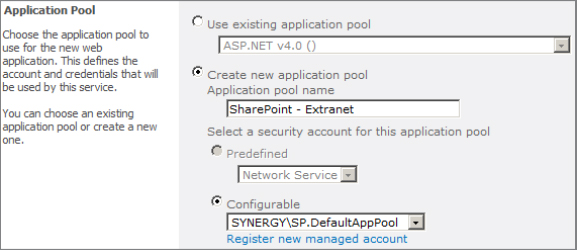
Reusing an application pool is more efficient in terms of memory usage but introduces a small security risk, because a single application pool account has access to multiple web applications. Another small risk with sharing application pools is that if the application pool is recycled (restarted), it momentarily affects requests from all web applications sharing it.
When creating a new application pool, you must specify the name of the Windows account to be used as a security account for the application pool. An application pool account is almost always a domain user account, like other service accounts, as discussed in Chapter 1, “Installing SharePoint 2010.” The account to be used for the application pool must first be configured as a managed account (this means that SharePoint can manage the account’s password). Managed accounts are covered in more detail in Chapter 14.
Configure the Content Database
As described in the “Understand Web Applications” section, content databases hold site collections that are associated with the web application. When creating a web application, you must create a new content database. The interface for configuring the content database is shown in Figure 2.10.
Figure 2.10: Configuring the content database
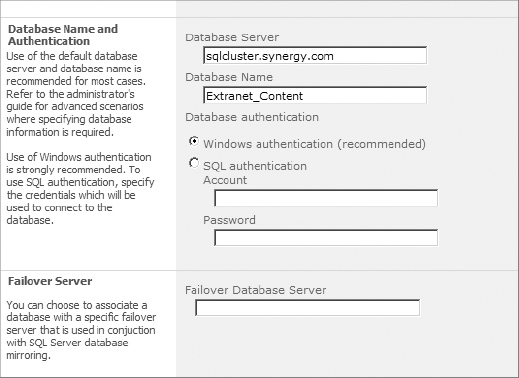
TIP Using a consistent database naming convention is important when creating new content databases. The main reason is for disaster recovery purposes if you ever need to restore a content database. Consistent names are also much easier and cleaner to follow when viewing the list of databases from SQL Server. The default database name of WSS_Content is too generic and not indicative of what or whose content is stored there. Better examples are HR_Content, Projects_Content_DB_1, or MySites_Content_1. The use of _1 is just a numbering convention, allowing you to track multiple content databases associated to the web application.
In the Database Server field shown in Figure 2.10, you can specify the SQL server to be used for this database. Choosing a different SQL server allows you to scale your database tier to multiple servers if needed. Just make sure your SharePoint farm account (defined when the farm was created, as covered in Chapter 1) has securityadmin and dbcreator permissions on the SQL server.
In the Failover Server section, you can specify the server name of a mirrored SQL server. To use this setting, you must have database mirroring configured. Scaling out multiple database servers and database mirroring is introduced in Chapter 5.
The Database Authentication settings shown in Figure 2.10 specify how the application pool account connects to the SQL server. Windows Authentication is recommended because no password information is sent over the wire. If you use SQL authentication, you must make sure that the SQL server is configured to allow SQL authentication and a login account has already been created.