
Configure SharePoint 2010 Caching
Publishing sites are typically accessed far more frequently by viewers than by editors. One quality that helps contribute to the acceptability and success of a publishing site is the speed with which it loads and can be viewed. Publishing sites also tend to host more pictures and media content than collaboration sites do, which can slow down the load time and responsiveness of the site. For this reason, a publishing site in SharePoint supports sophisticated cache management settings to allow administrators to optimize the site for better performance.
Configuring Publishing Cache Profiles
Cache profiles are sets of options that are applied in the configuration of the site collection output cache. A cache profile describes the type of caching behavior that SharePoint should use to treat the content that users are viewing in a site depending on whether they are accessing the site anonymously or as an authenticated user. In order for cache profiles to apply, the site collection output cache must be enabled.
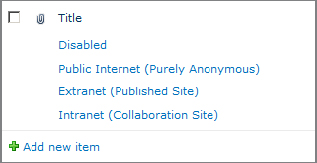
Four cache profiles are available in a SharePoint site collection by default. Each consists of a collection of settings that have been selected to improve performance for a typical network scenario.
Disabled This profile does not have any caching settings configured, so it can be assigned to the site collection output cache when caching is not desired over a specific connection type.
Public Internet (Purely Anonymous) This profile is optimized for connections that will be read-only and where users will have limited access to lists and libraries. This profile provides the highest caching performance but is only for anonymous access.
Extranet (Published Site) This profile is designed for scenarios where users are connecting to a site as authenticated users and are consuming content that changes infrequently. This scenario is common with an extranet or intranet portal. This profile provides the best caching performance for authenticated users.
Intranet (Collaboration Site) This profile is used for sites where authenticated users are consuming content that changes frequently and where it is important that they view the latest page versions every time they refresh. This setting is appropriate for a very dynamic intranet portal or a team site.
While you can edit any of the existing profiles, it is a best practice to create a new profile for any custom combinations of cache settings that you wish to use.
To create a cache profile:
1. Open the root site in a site collection.
2. From the Site Actions menu, select Site Settings.
3. In the Site Collection Administration section, click Site Collection Cache Profiles.
4. On the Cache Profiles page, shown in Figure 13.12, click Add New Item.
Figure 13.12: Cache Profiles page
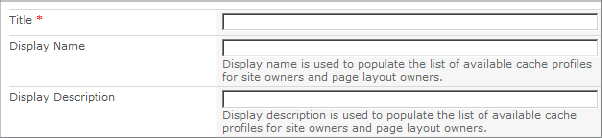
5. In the Cache Profiles – New Item page, shown in Figure 13.13, enter information in the Title, Display Name, and Display Description sections. The latter two fields are displayed to site owners and page layout owners if they are allowed to override the output cache settings at the site collection level. Entering information in these fields is optional.
Figure 13.13: New Cache Profile settings
6. Choose whether to enable Perform ACL Check, shown in Figure 13.14. This setting is typically unchecked when it can be assumed that most users will have the same level of permissions on the site.
Figure 13.14: More New Cache Profile settings

7. Make sure that the Enabled check box is selected to activate caching in this profile. This would normally only be unchecked in the Disabled profile.
8. Enter a value in the Duration box. This is the number of seconds that items will remain in cache before being reloaded from the database. The default value is 180 seconds, or 3 minutes.
9. Choose whether to enable the Check For Changes option. This option is typically enabled only when content on a site changes frequently and users want to see the latest updates at all times.
10. If desired, enter information in one or more of the Vary By fields, shown in Figure 13.15:
Figure 13.15: Vary By settings
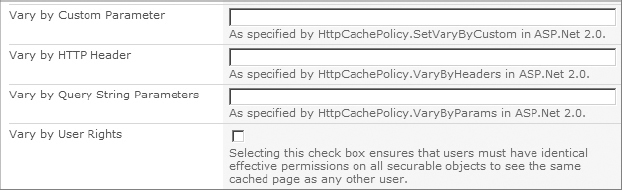
Vary By Custom Parameter This field allows administrators to configure SharePoint to take advantage of any value that is passed to SharePoint by the client. For example, the Public Internet (Purely Anonymous) profile has the value of Browser in this setting to ensure that different browser versions receive different cached output. This matters if you are using browser-specific versions of CSSs and JavaScripts.
Vary By HTTP Header This field accepts a value matching a standard HTTP request header passed to SharePoint by the browser. For example, if your site has pages in different languages and you enter Accept-Language, the browser receives the language that the user’s browser is configured for, such as “de-lu” or “en-us.” All the requests that have the same header will receive the same set of cached output.
Vary By Query String Parameters This field allows SharePoint to use a parameter that is submitted after a question mark (?) in the request URL. For example, if your site has different results for different locations, the parameter CustomerCity might be used as a query string parameter in a custom list filter on a page. This would allow the results for “New York” to be cached separately from the results for “Los Angeles.”
Vary By User Rights This field allows SharePoint to cache separate content for each distinct set of permissions so that users only see cached content that they have the right to see.
11. Choose an item in the Cacheability drop-down, shown in Figure 13.16, to control where the cached content will be stored.
Figure 13.16: Cacheability settings
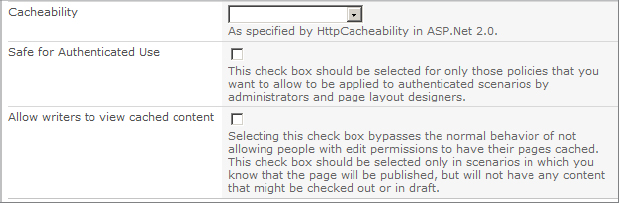
The options are as follows:
NoCache Forces each request to get fresh content from the server. This setting is used when the content caching is not the primary focus of the cache profile.
Private Caches content only on the client. This effectively means that the first request from any user will cause a full download of content. After that, a refresh of the page may use the existing cache to display it.
Server Caches content only on the server. No content is cached on the client. This setting is equivalent to the ServerAndNoCache setting.
Public Allows content to be cached by both clients and proxy servers.
ServerAndPrivate Specifies that content can be cached on both the SharePoint server and on the client but not on proxy servers. Proxy servers will respect the Cacheability setting and only cache content when allowed to by SharePoint.
12. Choose options for the Safe For Authenticated Use and Allow Writers To View Cached Content settings, as shown in Figure 13.16.
13. Click Save.
Configuring the Output Cache
The page output cache controls the caching settings that are applied to pages in a site collection. The output cache is disabled by default. It can improve overall performance, but some pages that users see might not show all the latest updates to the site. In addition to the site collection settings, page output caching can be configured at the subsite and page layout levels. When a page executes, all of the controls on the page render their output from the SharePoint content database into the HTML that makes up the page. For example, the navigation menus on a SharePoint page do not exist as static HTML; however, each time the page is refreshed, the menus are constructed by an ASP.NET control that reads the current navigation structure from the database and creates the appropriate HTML to display tabs and menus. When output caching is turned on, that control does not need to execute again the next time the page is requested and the fully rendered navigation menus can be loaded from cache, a process that is much faster than regenerating the menus from the control.
You should keep a number of considerations in mind when deciding to enable output caching. The primary benefit is that rendering a page with cached content will take less time and therefore the page can be delivered to the user’s browser more quickly. Not only will this increase the responsiveness of the server as far as users are concerned, but it can also reduce the overall load on the server and free up processing time for other tasks. This same benefit applies to the SQL server as well because cached items do not require queries to the database to retrieve content. However, the price that is paid for this will be in the form of additional memory consumed by the SharePoint server to store the cached versions of the pages. Also, if the cache is stored on the SharePoint server and there are multiple load-balanced front-end servers, each server could, temporarily, end up displaying a different version of the cached page.
To configure the page output cache:
1. Open the root site in a site collection.
2. From the Site Actions menu, select Site Settings.
3. In the Site Collection Administration section, click Site Collection Output Cache.
4. To enable output caching, click the Enable Output Cache check box, shown in Figure 13.17.
Figure 13.17: Output cache settings
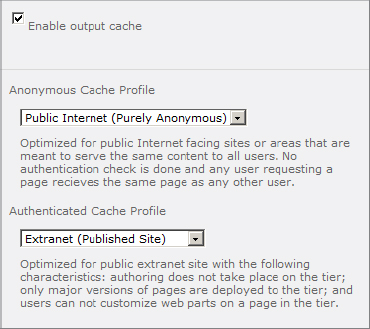
5. Choose which cache profiles will be applied to users depending on their authentication to the site collection. A web application can support multiple authentication methods. For example, visitors can initially connect to the site as anonymous users and then click a Log In link and be authenticated. In this scenario, the caching profile applied to the user would change.
The Anonymous Cache Profile drop-down controls which cache profile will be applied to anonymous users.
The Authenticated Cache Profile drop-down controls which cache profile will be applied to authenticated users.
6. In the Page Output Cache Policy section, shown in Figure 13.18, choose whether to allow subsites that are publishing sites to apply policy settings that are different from the site collection settings and whether to allow page layouts to apply specific cache profiles by checking the appropriate boxes.
Figure 13.18: Page Output Cache Policy
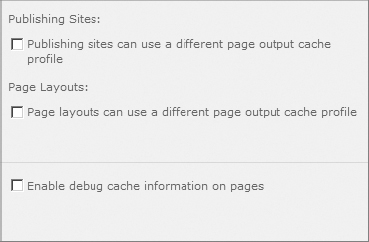
7. In the Enable debug cache information on pages section, choose whether to enable information such as the date and time that the page contents were last rendered.
8. Click OK.
Configuring the Object Cache
The object cache operates separately from the page output cache. The object cache is designed to reduce the traffic between the SharePoint server and the SQL server by capturing in memory, data objects such as lists and libraries, site settings, and page layouts.
To configure the site collection object cache:
1. Open the root site in a site collection.
2. From the Site Actions menu, select Site Settings.
3. In the Site Collection Administration section, click Site Collection Object Cache.
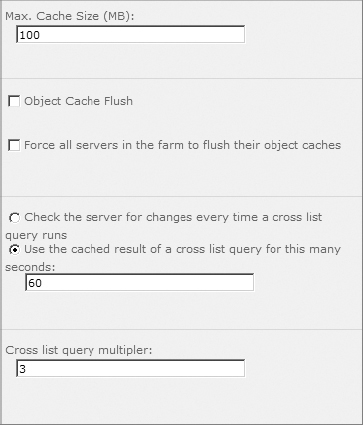
4. In the Object Cache Size section, shown in Figure 13.19, enter the number of megabytes of memory that the object cache will be allowed to use. The amount should be set high enough to ensure that the most commonly used objects will be frequently found in cache. If your system has more than 8 GB of RAM, then it may make sense to increase the object cache size based on the measured performance of the server.
Figure 13.19: Object Cache page
5. Do not make any changes to the Object Cache Reset section at this time. These options are covered later in this section.
6. The Cross List Query Cache Changes section relates to web parts such as the Content Query web part that aggregate content from multiple lists and sites into one view. This operation can be very processor intensive if the query must iterate through many lists. To ensure that the full query is run every time and to display the most accurate results, check the option labeled “Check the server for changes every time a cross list query runs.” In cases where the list content is not likely to change as often, check the box labeled “Use the cached result of a cross list query for this many seconds” and enter the number of seconds to cache the data for. The default value is 60.
7. Use the Cross List Query Results Multiplier value to control the number of results that SharePoint must query to get a valid data set when security trimming is applied. The number represents the multiplier factor of results retrieved above those that will be shown to the user. Larger numbers will return better results if many lists and sites have unique security permissions applied. The default is 3 and valid numbers are 1 to 10.
8. Click OK.
The object cache may need to be cleared at times to ensure that a user is looking at the live data rather than cached data or for testing and troubleshooting purposes. To clear the object cache, do the following:
1. From the Site Actions menu, select Site Settings.
2. In the Site Collection Administration section, click Site Collection Object Cache.
3. In the Object Cache Reset section, check the Object Cache Flush check box to flush the cache for the server that you are currently connected to without affecting other servers in the farm. To clear the cache for all SharePoint servers, check the box labeled “Force all servers in the farm to flush their object caches.” These settings will take effect as soon as you click OK.
4. Click OK.
Configuring the BLOB Cache
The term BLOB stands for Binary Large Object and refers to any file that is stored as a single object and not converted to text. In most cases, BLOB files are images, audio files, or video files, but a BLOB could also be a document or a spreadsheet. When these types of files are uploaded into a SharePoint site as images on a page, they are stored inside the SQL server content database in BLOB data fields. Because these files tend to be larger in size than the text on the page, retrieving them from the database every time the page loads represents a potential bottleneck in SharePoint performance. The BLOB cache setting can be used by SharePoint to store copies of these files on the file system of the SharePoint web front-end server and to retrieve them from there whenever they are requested as part of a page. A file retrieved in this way can load much faster than when retrieved from the database. While it is possible to enable the BLOB cache for all types of files, this cache is rarely used for documents in collaboration sites because it is important that the latest version of the document always be retrieved from the database. Therefore, BLOB caching is most often used for anonymous websites or sites where most of the users will have read-only permissions.
NOTE BLOB caching is not enabled by default and must be manually configured.
To configure the BLOB cache:
1. Log onto the SharePoint server as a member of the Administrators group.
2. From the Administrative Tools menu, open Internet Information Services (IIS) Manager.
3. On the left side of IIS Manager, expand the server object, then the Sites container, and then expand the web application that you want to configure.
4. Right-click the web application and click Explore to open the file system directory for the web application.
5. Right-click the web.config file and open it with Notepad.
6. In the web.config file, locate the following line:
<BlobCache location="C:BlobCache14"
path=".(gif|jpg|jpeg|jpe|jfif|bmp|dib|tif|tiff|
ico|png|wdp|hdp|css|js|asf|avi|flv|m4v|mov|mp3|
mp4|mpeg|mpg|rm|rmvb|wma|wmv)$" maxSize="10"
enabled="false" />
There are several parts to the BlobCache tag that may be modified:
- location indicates the file system directory on the SharePoint server where the cached files will be stored. This should be set to a folder on a drive that has free space equal at least to the value of the maxSize setting (in GB).
- path lists all the file extensions that will be cached by the server. The default list can be added to or extensions removed by editing the line. Ensure that there is a vertical pipe character in between each file type.
- maxSize sets the value in gigabytes (GB) of the amount of disk space that the BLOB cache will use. When it exceeds this limit, SharePoint will delete older items in the cache to make room for newer items.
- enabled allows SharePoint to use the BLOB cache for this web application when set to "true".
7. Save and close the file.