Site collections can be created in a number of ways. This section covers creation of site collections using either Central Administration or PowerShell.
TIP Planning site collections is an important step and should be part of an overall governance strategy. Planning is beyond the scope of this chapter. For more information on planning, see the article “Plan Sites and Site Collections (SharePoint Server 2010)” at http://msdn.microsoft.com/en-us/library/cc263267.aspx.
Defining Managed Paths
A managed path is the site collection portion of the URL that is appended to the web application URL. Each site collection must have a unique managed path. An example of where the managed path fits in with a complete URL is shown in Figure 3.1.
Figure 3.1: Breakdown of a SharePoint URL

The managed path to be used for a new site collection must exist prior to creating the site collection. SharePoint supports two different types of managed paths: explicit and wildcard.
Explicit Managed Path This type of path contains a fixed value that can be used once for a single site collection—for example, HR.
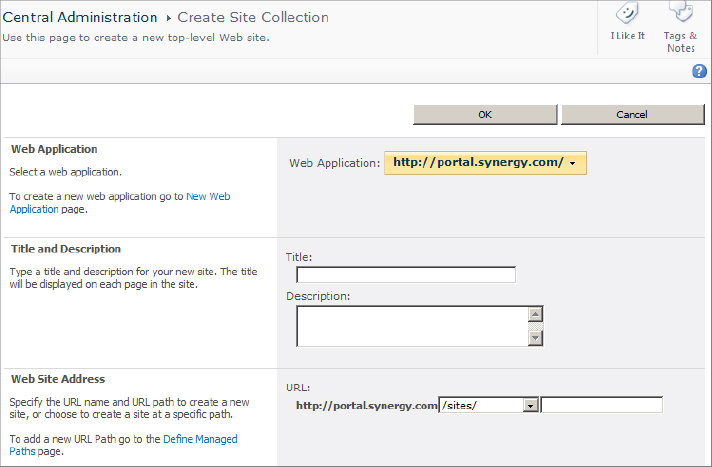
Wildcard Managed Path This type of path allows you to define a portion of the URL that applies to multiple site collections in this web application. A precreated wildcard path with the name sites already exists for each web application, and it functions like sites/*, where * is specified when the site collection is created, as shown in Figure 3.3. For example, you could create a site collection with the complete managed path of sites/projects. In this case the projects portion is the wildcard. The complete managed path must be unique in the web application.
NOTE Despite the existence of a managed path named (root), all site collections exist at the same level and there is no hierarchy among the site collections. So, http://intranet/ (the root site collection) and http://intranet/HR are all peer site collections associated with the http://intranet web application.
Creating and Deleting Managed Paths Using Central Administration
You can create managed paths easily by using Central Administration. Here are the steps:
1. Click Application Management, then select Manage Web Applications.
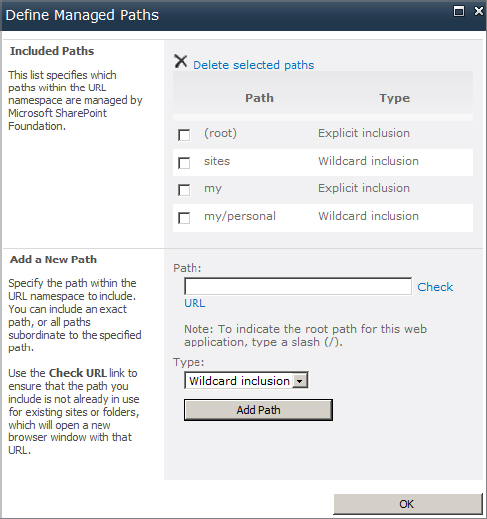
2. Select the desired web application and click Managed Paths in the ribbon. You are taken to the dialog box shown in Figure 3.2.
Figure 3.2: Creating a managed path

3. In the Add A New Path section, enter the path to be used. You can use forward slashes if desired.
4. Specify the type: wildcard or explicit.
5. Click the Add Path button to add the path.
6. Optionally, repeat steps 3–5 to add more managed paths.
7. Click OK when you’ve finished.
The Define Managed Paths dialog box can also be used to delete managed paths:
1. In the Included Paths section, select the managed paths you want to delete.
2. Click the Delete Selected Paths link at the top of the dialog box.
WARNING Be careful to avoid deleting managed paths that are in use. SharePoint will let you do this, and doing so will immediately cause all sites in that site collection to display 404 errors. If this happens, just re-create the managed path exactly how it existed previously.
Creating Managed Paths Using PowerShell
To create a managed path using PowerShell, use the New-SPManagedPath cmdlet. Here is the basic syntax:
New-SPManagedPath <relative path> -WebApplication<URL> [-Explicit]
The following example creates a new explicit managed path that is mounted at http://intranet/projects:
New-SPManagedPath projects -WebApplication
http://intranet -Explicit
Creating a Site Collection Using Central Administration
Creating a site collection using Central Administration is quite easy. Here are the steps:
1. Start Central Administration. (Start ⇒ All Programs ⇒ Microsoft SharePoint 2010 Products ⇒ SharePoint 2010 Central Administration.)
2. In the Application Management section, click Create Site Collections. You are taken to the screen to create a new site collection; the upper half of this screen is shown in Figure 3.3.
Figure 3.3: Creating a site collection

3. Before filling out anything else, be sure that the correct web application is selected.
4. Provide the title and description. When you create a site collection using Central Administration, a top-level website is created automatically, and these settings become the title and description for that website. The title and description can also be changed after the site collection has been created.
5. Enter the website address. You can specify either an explicit managed path or a wildcard managed path. (See the section “Defining Managed Paths” for more information.)
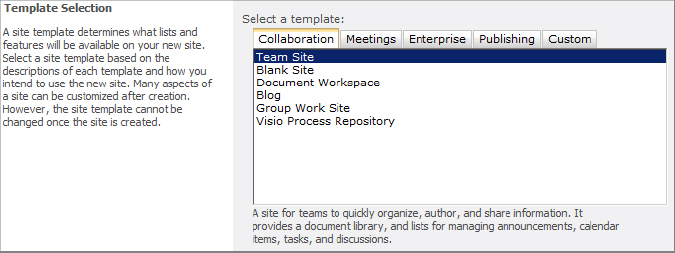
6. Select the website template to be used for the top-level website. (See Figure 3.4.) As with creating any website in SharePoint, the template cannot be changed after creation, so choose carefully. The templates available are based on the site definitions that have been installed. If you are not sure which template, you can choose Select Template Later from the Custom tab.
Figure 3.4: Selecting the top-level website template

NOTE Choosing Select Template Later is handy when the farm administrator doesn’t know which template to use for the top-level website. This issue is common in situations when the farm administrator is creating the site collection for another site collection administrator. After the site collection is created, one of the designated site collection administrators must specify the template to use when first accessing the site collection.
7. Specify the primary site collection administrator and, optionally, a secondary site collection administrator. (See Figure 3.5.) It is a best practice in most situations to have a secondary site collection administrator. SharePoint allows you to have more than two site collection administrators, but you can specify a maximum of two when you create the site collection. The site collection administrator must be an individual and cannot be a security group or role. Once the site collection has been created, you can add additional administrators by choosing Site Collection Administrators from the Site Settings menu.
Figure 3.5: Specifying site collection administrators

8. Specify whether you want to use a quota template. (See Figure 3.6.) A quota controls two facets of site collection usage: how much space can be used and how many resources are available for sandboxed solutions. The quota can be changed after the site collection has been created. Quotas are covered in more detail later in the “Configuring Quota Templates Using Central Administration” section.
Figure 3.6: Specifying a quota template

9. Click OK to create the site collection.
Creating a Site Collection Using PowerShell
The main cmdlet to create a new site collection is New-SPSite. It is a powerful command and you can use it in many ways. Here is the syntax with the most common switches:
New-SPSite <absolute URL> -OwnerAlias <String>-OwnerEmail <String> [-ContentDatabase
<String>] [-Description <String>]
[-Name <String>] [-QuotaTemplate
<SPQuotaTemplatePipeBind>] [-Template <String>]
TIP To learn more about the various parameter values that you can include, use the following PowerShell cmdlet: Get-Help New-SPSite -detailed.
Here are some examples showing how the command can be used:
- Create a site collection that uses the team site template (STS#0) for the top-level website:
New-SPSite http://intranet/HR -OwnerAlias
domainuser -OwnerEmail [email protected]
-Name "HR Portal" -Template STS#0
 - This example creates a site collection and stores it in a specific content database (the content database must already exist):
New-SPSite http://intranet/ITS -OwnerAlias
domainuser -OwnerEmail [email protected]
-Name "ITS Projects" -ContentDatabase
ITS_Content
To identify the list of web templates, use the Get-SPWebTemplate cmdlet.
Configuring Quota Templates Using Central Administration
A quota template is a reusable definition for limiting space and resource usage in a site collection. Assigning a quota template ensures that consistent limits are applied to site collections and also allows you to easily adjust these limits. Without using a quota, site collections and content databases can balloon to unmanageable sizes. Thus, we highly recommend that you use quotas for site collections.
TIP Having a default quota template is recommended to ensure that newly created site collections have a quota applied. To specify a default quota template when creating site collections, go to the General Settings for a web application, as covered in Chapter 2, “Creating and Managing Web Applications.”
A quota template can be assigned during site collection creation or at any point after. Here are the steps to create a quota template using Central Administration:
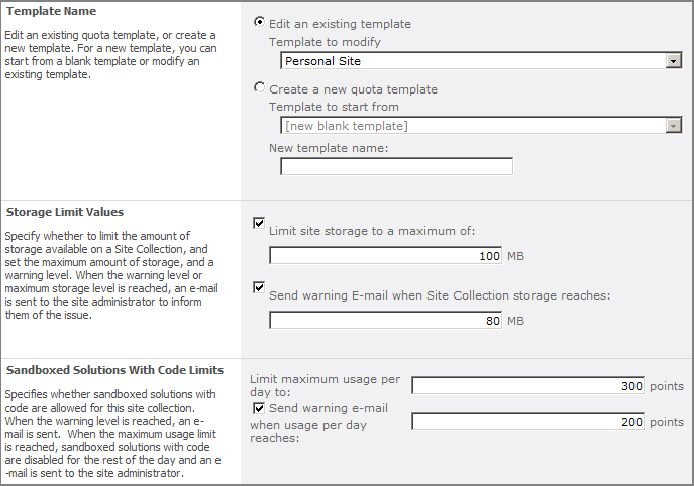
1. Select Application Management, and then choose Specify Quota Templates. You are taken to the screen shown in Figure 3.7.
Figure 3.7: Managing quota templates

2. Click the Create A New Quota Template radio button.
3. Optionally, in the Template To Start From menu, select an existing template to copy the settings.
4. Type a new name for the template. Template names must be unique in the farm.
5. Optionally, in the Storage Limit Values section, enable and enter the maximum amount of space in MB to be used in the quota template. When this limit is reached, no new items can be added and most changes to websites throw an error.
6. Optionally, enable and enter a warning limit. When space exceeds this value, emails are sent to the primary and secondary site collection administrators advising them that the limit has been exceeded.
7. In the section Sandboxed Solutions With Code Limits, enter the number of resource points that are allowed in the site collection. More details on sandboxed solutions are covered in the “Managing the Solutions Gallery” section later in this chapter.
8. Click OK to save the new quota template.
NOTE Space used by items in the end-user recycle bin (associated with each website) counts as part of the site collection quota. When users see the storage quota limit error, many decide to delete files (i.e., move them to the end-user recycle bin), assuming that will resolve the problem. However, items must also be deleted from the end-user recycle bin to resolve the problem. For more information, see “Managing Recycle Bins” later in this chapter.
Specifying the Content Database
Managing the size of content databases is an important task for a SharePoint farm administrator. Content databases were introduced and defined in Chapter 2, and one of the recommendations is to keep the size of each content database under 200 GB. Unfortunately, when using Central Administration to create a site collection, you cannot directly specify in which content database the site collection will be created. This means SharePoint automatically selects the content database when creating a new site collection. As you will learn, this isn’t always the best option.
To help explain, look at an example web application’s four content databases, as shown in Figure 3.8.
Figure 3.8: Content databases

Let’s suppose that Red_Content’s single site collection is very large, totaling 100 GB. Blue_Content and Green_Content have several small site collections, each totaling less than 1 GB. Yellow_Content has no site collections, and it has been taken offline, as shown by the label Stopped in the Database Status column.
NOTE In SharePoint, when a database is labeled “Offline” or “Stopped,” it only means that SharePoint does not select this content database when creating (or restoring) a site collection. Any existing site collections currently stored in a content database marked Stopped are not affected in any way.
When SharePoint selects the content database, it selects the one that is “most available,” determined by the number of new site collections that can be stored in the content database. This is calculated by subtracting the current number from the warning level. If the warning level has been reached, it is calculated from the maximum level.
In this example, Red_Content is considered the most available since, of the databases that are not stopped, it has the fewest site collections.
TIP To summarize, SharePoint doesn’t look at the size of the content database but the number of site collections stored to determine which database is most available.
A better way to manage space is to set the content database yourself, especially if you expect this new site collection to grow large. Although you cannot do this directly using Central Administration, here are some workaround steps that achieve the same goal:
1. Decide which content database to use.
2. Using Central Administration, select all the other content databases and set them as Offline (or Stopped). This prevents SharePoint from creating new site collections in those databases.
3. Create the site collection.
The content database can be selected directly when creating the site collection using PowerShell. This is a better option if you have many content databases, and it becomes too tedious to manually set them as Offline. We covered this topic in the “Creating a Site Collection Using PowerShell” section earlier in this chapter.
Enabling Self-Service Site Creation
Self-service site creation is a way of granting regular users the ability to create their own site collections. It’s a very special capability and we do not usually recommend that you use it. Although there are some advantages, such as the convenience factor, here are some of the notable drawbacks:
- No approval process
- Difficulty in controlling site collection sprawl
- Difficulty in setting the content database for new site collections
- Difficulty in limiting who has permissions to create new site collections
Here are the steps to enable this ability for a web application in Central Administration:
1. Click Application Management, then select Manage Web Applications.
2. Select the desired web application and click Self-Service Site Creation in the ribbon.
3. In the dialog box, click the On radio button and then click OK.
For users to create a site collection, they must access the _layouts/scsignup.aspx page from within a web application—for example, http://intranet/_layouts/scsignup.aspx.
When Self-Service Site Creation is enabled, any user who has at least Read permissions in any site collection can create another site collection in the web application. This is because the Read permission level automatically includes the Self-Service Site Creation permission.
TIP A more viable option would be to develop custom code and use that as an alternative. How to accomplish this is beyond the scope of this book.
WARNING If you opt to use Self-Service Site Creation, we strongly advise you to set a default quota template for your web application. Doing so ensures that space is restricted for the new site collection.
