
One of the core functions of any effective content management system is to provide a centralized list of values that can be used as the source for metadata properties. This is particularly important in scenarios where the system is used for compliance purposes such as meeting the requirements of the Sarbanes-Oxley act and the Health Insurance Portability and Accountability Act (HIPAA). In SharePoint 2010, the Managed Metadata Service introduces the term set, which is a managed list of values stored in a central location in the farm, and which can be used to create columns that use the same sets of values.
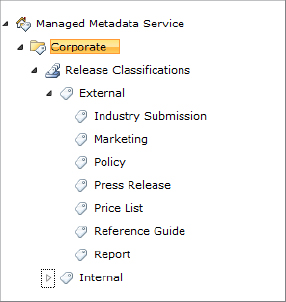
The term set supports a hierarchical model of related terms—terms can have child terms and grandchild terms, creating a layered taxonomy suitable for structured classification. An example of a term set is shown in Figure 11.5. Terms can be added to and removed from the list, and these changes will be propagated out to all columns that consume the term set. Terms can also be locked so that they appear in the list but cannot be selected by users as values in the column. This approach is appropriate when a term represents a general class of values and not a value itself.
Figure 11.5: Hierarchical term set
Term sets are designed to be managed by nontechnical users. While they are hosted in a shared service administered through Central Administration, control of the entire Managed Metadata Service or groups of term sets can be assigned to any site administrator. With this capability for delegation, an organization can delegate to business users the responsibility for managing term set values and maintaining them on a daily basis. This flexible model can be responsive to the way in which business needs change over time, dictating new uses for metadata.
Using the Term Store Tool
To create a term set, you can access the Managed Metadata Service either from Central Administration or from the Site Settings page of any site.
To access the term store tool from Central Administration:
1. From SharePoint 2010 Central Administration, under Application Management, click Manage Service Applications.
2. On the Manage Service Applications page, click the row for the Managed Metadata Service application, then from the ribbon, click the Manage button.
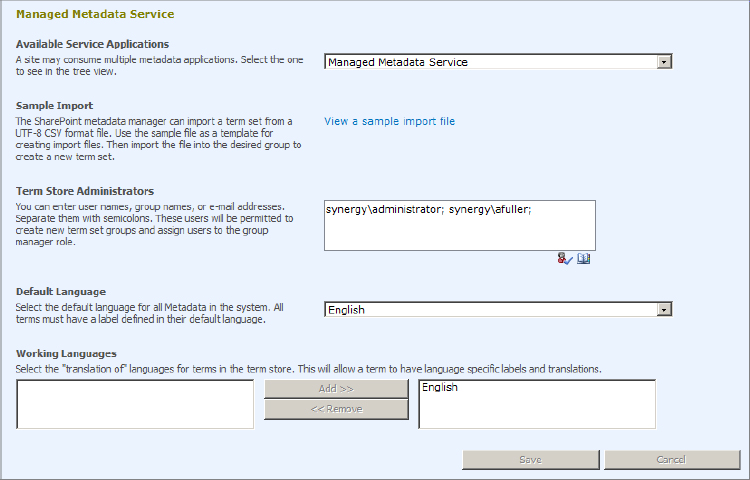
3. The Term Store Management Tool page opens, shown in Figure 11.6.
Figure 11.6: Term Store Management Tool page
To access the term store tool from Site Settings:
1. In any site, from the Site Actions menu, select Site Settings.
2. Under Site Administration, click Term Store Management
3. The Term Store Management Tool page opens.
The Term Store Management Tool page allows for the centralized administration of all term sets. You can perform the following tasks:
- Select from the Available Service Applications drop-down to choose which Managed Metadata Service to administer.
While most organizations will only need one Managed Metadata Service, it is possible to host multiple services and to segregate the term sets into different services in order that different divisions or departments in the organization have access to different groups of terms.
- Create new term set groups and modify the list of term store administrators. In the Term Store Administrators box, enter the Active Directory user or group accounts for those who will be managing this term store.
- Manage the languages used by term sets.
SharePoint 2010 supports multiple languages in term sets. A term represents the meaning of the information being stored and can be associated with multiple labels in different languages (e.g., “house,” “casa,” “maison”). If you have configured multiple languages on the server, you can use the Default Language setting to define which language is considered mandatory. Every term created must have an entry in the default language. If no label is available in an alternate language, the default label is used. If multiple language packs have been installed on the server, the languages appear on the left of the Working Languages section. To make a language available for labeling on a term, select the language and click Add to add it to the list on the right.
Creating a Term Set Group
Within the Managed Metadata Service, all term sets are organized into term set groups. Some organizations may only need one group for their term sets; others will find it convenient to organize term sets into separate groups. A term set group acts as a security boundary and allows for the administration of all term sets within the group to be delegated to one or more users. A term set group can hold multiple term sets. To create a term set group, do the following:
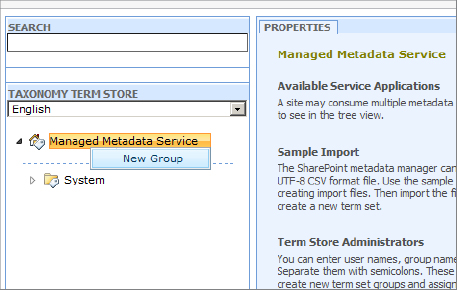
1. From the Term Store Management Tool page, click the drop-down context menu on Managed Metadata Service on the left, shown in Figure 11.7, and select New Group. Type a name for the group in the text box.
Figure 11.7: Creating a new term set group
2. In the Properties area, shown in Figure 11.8, you can enter an optional description to document the purpose of the group.
Figure 11.8: Term set group properties
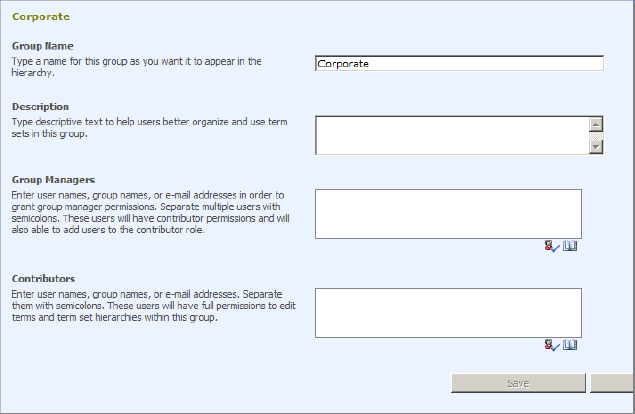
3. In the Group Managers field, enter the Active Directory users or groups who will administer this term set group.
Group managers can add, edit, and delete term sets and also change the Term Store Contributors list. Delegating control of the group to others is particularly useful when the term store is used for mission-critical purposes that require a highly trained set of users who are responsible for all the terms in the group.
4. Enter the Active Directory users or groups who will be designated as Term Store Contributors.
Contributors have the right to add, edit, and delete term sets. Granting this right is beneficial when terms have highly specific meanings and uses that would not necessarily be familiar to a SharePoint administrator. Delegating control to one or more users who are familiar with the terms minimizes the chance of error and misrepresenting the values.
Creating a Term Set
Each term set can have multiple child terms in a hierarchical structure. Term sets can be created either manually or by importing a term set stored in a .csv file. The manual approach may be preferred in smaller-scale environments with simple needs. The import method is recommended for environments with larger term set needs.
To create a term set manually:
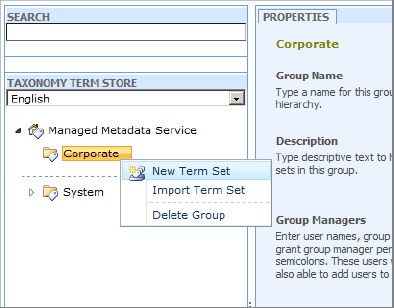
1. In the Term Store Management Tool page, locate the term store group in which you want to create the term set and click the context menu on the group; then select New Term Set from the menu, as shown in Figure 11.9, and enter a name for the term set.
Figure 11.9: Creating a new term set
2. In the Properties area for the term set, shown in Figure 11.10, specify the following:
Figure 11.10: Term set properties
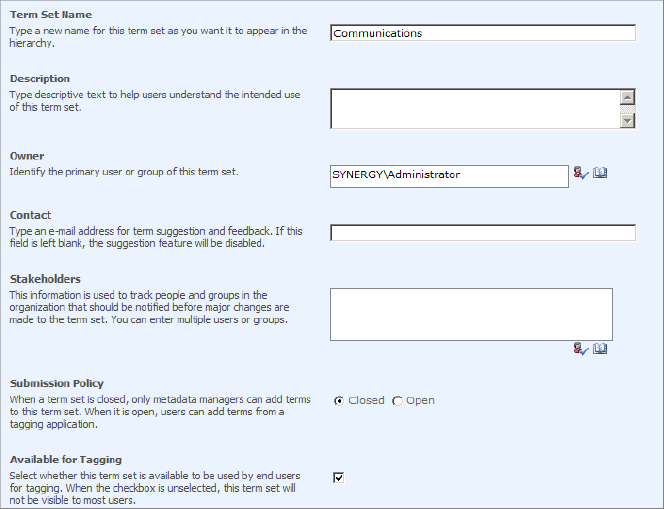
- The Description field should be populated with information about the purpose of the term set and where it is expected to be used.
- The Owner field is mandatory and it specifies the person or group who controls the information related to the term set. The Owner is not granted any permissions on the term set. The field is used to document the person who is the subject matter authority on the terms.
- The Contact field is optional and can be populated with an email address that will allow users to provide feedback or suggestions on the term set.
- The Stakeholders field contains users and groups in the organization who should be notified of changes to the term set.
- Submission Policy is an important setting. By default, term sets are closed and only group managers, contributors, and administrators can modify the terms. If you want all users to be able to add to the term set or change terms within it, click Open. (Later in this chapter in the “Manage Enterprise Keywords” section, we will discuss keywords, which are a specific type of term set that is open.)
- Uncheck Available For Tagging to prevent this term set from being accessed by users.
Importing and Exporting a Term Set
Importing a term set allows for much easier population and administration of term sets during the initial design and testing phases of a project. Microsoft provides a sample of the CSV file format for building a term set that can be imported into SharePoint. To view the sample file, from the Term Store Management Tool page, click the link View A Sample Import File. Doing so allows you to open or save the ImportTermSet.csv file. This file contains a sample term set that demonstrates how to populate the columns with hierarchical terms. Once you have completed a new term set file, you can import it by clicking the context menu of any term set group and selecting Import Term Set from the menu.
One function that is missing from SharePoint 2010 is the ability to export content from the term store. However, developers can write code to export terms, and there are several free utilities for exporting term sets posted on the CodePlex site (www.codeplex.com).
Creating and Configuring a Term
Individual terms represent the values that will be selected by users when referencing the term set in metadata.
To create a term manually:
1. Right-click the term set and select Create Term from the context menu; then type the name of the term.
2. On the term’s properties page, shown in Figure 11.11, specify the following settings:
Figure 11.11: Term’s properties
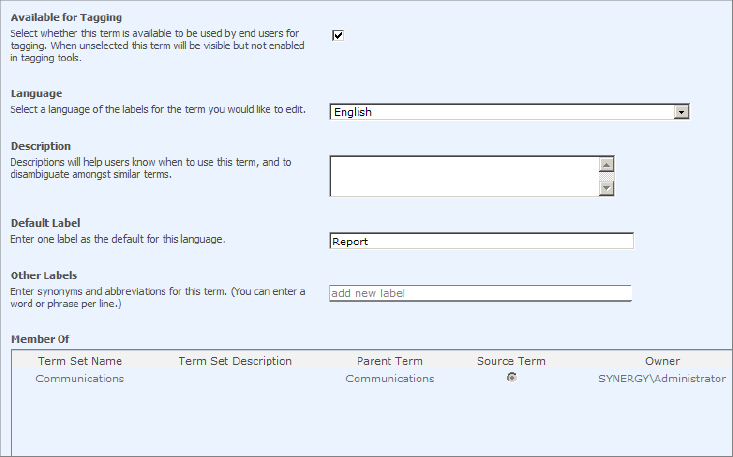
- Uncheck the Available For Tagging option to prevent users from selecting an option that exists only in the term set for hierarchical classification purposes. For example, in the sample Release Classifications term set (Figure 11.5 earlier in this chapter), the term External exists only to separate the internal release terms from the external release terms.
- Enter text in the Description field that will help users distinguish between similar terms.
- The remaining settings on the term’s properties page appear if the server is configured with additional language service packs. You can select a language from the Language drop-down, add or change the default label, and enter other labels associated with the term in that language.