
One of the challenges with searching in large organizations is that many times there are multiple SharePoint farms in distributed geographic locations. In previous versions of SharePoint, farm administrators had to configure cross-farm crawls, which were both time-consuming and resource-intensive on the servers. SharePoint 2010 incorporates a feature called Federated Search, which allows a search page to query additional data sources beyond the local SharePoint Search Service. This feature makes use of the open standard OpenSearch 1.1 to query any compliant search server and retrieve results for the same keyword or phrase that has been entered on the search page. This not only eliminates the need for cross-farm crawling but also minimizes the amount of traffic across the WAN because only the query is being sent and a limited number of result links are returned.
To view the existing federated locations installed with SharePoint, from within the Search Service Administration site, under Queries And Results, click the Federated Locations link. The Manage Federated Locations page shown in Figure 9.15 appears.
Figure 9.15: Manage Federated Locations page
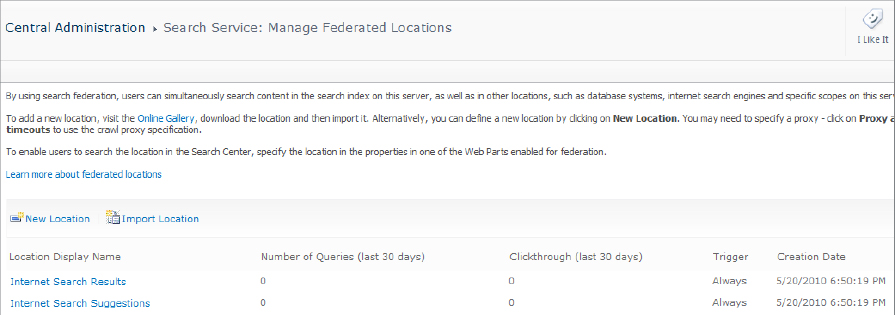
There are two methods for creating federated locations:
- Manually configure the settings that direct SharePoint 2010 to the remote search service (described in the next section).
- Import a configuration file that contains all the federated location details (described in “Importing a Federated Location,” later in this chapter).
Creating a Federated Location
To create a new federated location, follow these steps:
1. From the Manage Federated Locations page, click the New Location link. This will open the Add Federated Location page shown partially in Figure 9.16.
Figure 9.16: Add Federated Location page
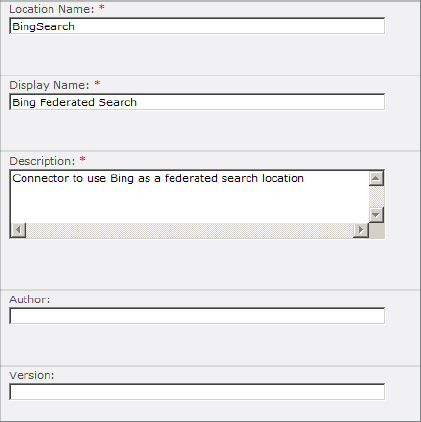
2. Enter the required information as follows:
- Location Name uniquely identifies this location to SharePoint.
- Display Name is visible in the administrative interface.
- Description explains to others what the purpose of this location is.
- The Author and Version fields are optional and can help administrators manage the search locations.
3. In the Trigger section, shown in Figure 9.17, determine how this location will be executed on the search page.
Figure 9.17: Trigger section, Add Federated Location page
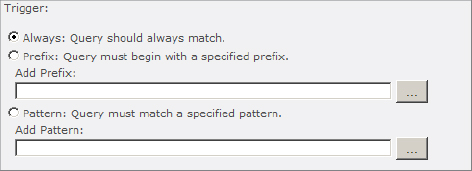
The options are:
- Always ensures that this location will be queried during every search.
- Prefix allows you to specify a keyword that will trigger this particular location to be called. A search page may be configured to call multiple different locations depending on what prefix is supplied. Note that only the term following the prefix will be submitted to the federated location, which could produce skewed results. For example, if the prefix is “power” and a user enters the term “power solar” in the search box, the local search will be executed using the full phrase but only “solar” will be sent to the remote location for querying.
- Pattern uses a .NET regular expression capture group to store part of the query in a variable. For example, the pattern power(?<type>.*) would match when a user enters “power solar” and would capture the word “solar” in the variable <type> and send it to the search location.
4. Choose the Location Type setting for the search:
- Search Index On This Server shows results from the SharePoint index managed by this search service. You can filter the search by targeting a custom shared scope or a managed property value.
- FAST Index shows results from a specific FAST server index.
- OpenSearch 1.0/1.1 queries any external search engine that complies with the OpenSearch standard. This standard provides a common XML format for search queries and results that are then formatted and displayed by SharePoint.
5. If you chose the OpenSearch option for the Location Type setting, configure the query template for the federated location. The query template is equivalent to the URL template in OpenSearch. It references the location’s URL and includes the parameter placeholder for the query terms that will be passed to the location in the query. The template will contain a case-sensitive parameter, {searchTerms}, which will hold the search terms entered by the user. The template can also include other parameters used to filter the query using managed properties. For example, the following is the query template for a Bing search:
http://api.bing.com/rss.aspx?source=web&query={searchTerms}&web.count={count}&
6. In the “More Results” Link Template box, enter a link to the full search results page on the federated location that can be queried directly, along with the replacement parameters. The following example will open the Bing search results page and pass the keyword parameters to it:
http://www.bing.com/search?q={searchTerms}&FORM=MO0001
7. In the Display Information section, shown partially in Figure 9.18, customize how the federated search results will appear.
Figure 9.18: Display Information section
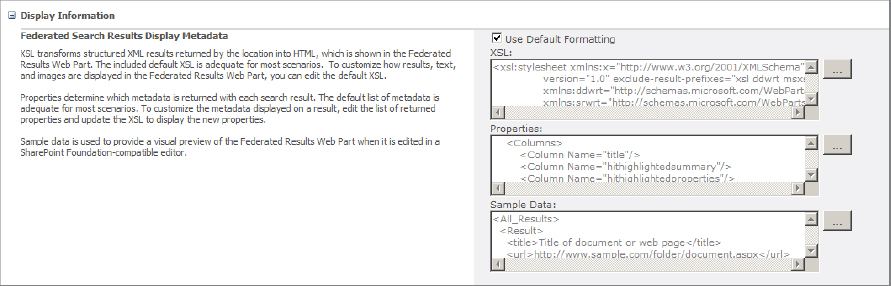
There are three subsections, each for its associated web page:
- Federated Search Results Display Metadata
- Core Search Results Display Metadata
- Top Federated Results Display Metadata
Each section has three boxes for formatting the appearance:
- The XSL box contains a template that transforms SharePoint XML search results into valid HTML.
- The Properties box holds the list of metadata that will be returned from the federated location for use in the XSL transformation.
- The Sample Data box helps designers lay out the appearance of the web part results.
8. In the Restrict Usage section, shown in Figure 9.19, select whether you want to control which sites can use this location. The No Restriction option allows any site to use the location. The Use Restriction option will limit the sites to the list specified in the Allowed Sites field. Separate the URLs entered with a semicolon.
Figure 9.19: Restrict Usage and Specify Credentials sections
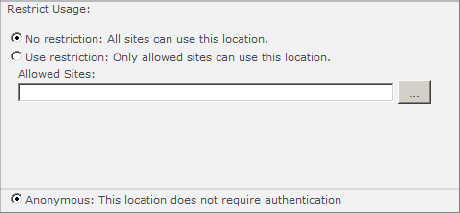
9. If you selected either the FAST Index or OpenSearch options, then select an authentication method in the Specify Credentials section:
- Anonymous authentication does not require a username and password and works for public Internet search engines that do not authenticate users.
- Common authentication allows you to provide a single username and password that will be used for all users. This method is useful when the location requires authentication but the users do not have logins to the remote server or they are on an untrusted domain. The disadvantage of this approach is that all users will see the same results with no permissions filtering applied.
- User authentication allows users to authenticate to the remote server using their own accounts. This works best if Kerberos authentication has been enabled so that user credentials can be passed through.
10. Click OK.
Importing a Federated Location
SharePoint supports importing a predefined search connector file that contains most or all of the appropriate location settings already configured. These files either have the extension .fld (Federated Location Definition file) or .osdx (Windows Search Connector), and you can download samples of both from Microsoft at
http://technet.microsoft.com/en-us/enterprisesearch/ff727944.aspx
To use a location file, open the Manage Federated Locations page and click the Import Location link. On the Import Federated Location page, browse to the file and click OK. You can then edit the definition to customize the settings.
Editing, Copying, Deleting, or Exporting a Federated Location
From the Manage Federated Locations page, click the context menu for any of the existing locations. From here you can edit or delete a location. You can also create a new location by copying an existing one. Doing so duplicates all the settings except the name, which must be unique. The last option is to export the location as an .osdx file for use on another server.
Configuring a Federated Search Web Part
There are three web parts shipped with SharePoint 2010 that support consuming federated locations and displaying the results:
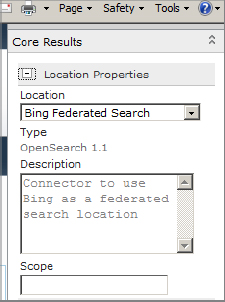
Core Results Web Part This web part is not commonly used to display federated results, but it fully supports locations. The web part Location Properties pane, shown in Figure 9.20, is normally set to the Local Search Results location but can be configured for any federated location. In Figure 9.20 the Bing Federated Search location, which was previously configured, has been selected.
Figure 9.20: Core Results web part Location Properties pane
Federated Results Web Part This web part is similar to the Core Results web part but is specifically designed to support passing a search query to a remote location and displaying the results in a sidebar format on the page. In the web part Properties pane, select the Location property in the same way you did for the Core Results web part. Under Display Properties you can specify the number of results to be displayed on the page (the default is 3). The setting Retrieve Results Asynchronously allows the web part to load the search results after the main page has been loaded. This option is checked by default. A Federated Results web part is automatically added to the standard search results page as the People Matches web part.
Top Federated Results Web Part This web part is almost identical to the Federated Results web part except that it can be configured with multiple federated locations. It will query all of the locations but only loads the first set of results returned.