
SharePoint 2010 Content Deployment enables administrators to copy, or propagate, the contents of an entire source site collection into a destination site collection. The first time a deployment is performed, all objects and contents are copied. In subsequent deployments, only the changes are deployed, making it fast and efficient. Content deployment allows organizations to host an editable “staging” site collection, accessible only to content managers, that is separate from the read-only “production” site collection that most users connect to. The source and destination site collections can be in different farms and even in different domains, allowing for propagation of content from a development or testing environment to a live network environment.
A common content deployment scenario involves an Internet-facing farm that hosts an anonymous site collection on a publicly accessible URL. This farm receives content deployed from a separate, intranet farm that is secured behind a firewall. All content is created and updated on the intranet farm and periodically synchronized to the Internet farm. If the Internet farm fails or is hacked, it is a relatively simple matter to rebuild the SharePoint server and deploy a fresh copy of the content.
In addition to deploying entire site collections, it is also possible to deploy individual subsites and even single pages.
The destination site collection must be created as an empty site collection—that is, a site collection with no site template applied. This is different from the Blank Site template, which is simply a site with no default objects. You can create an empty site collection from within Central Administration by selecting the <Select template later. . .> template choice on the Custom tab of the Create Site Collection page. Once the deployment has been established, content deployment is always a one-way replication from the source to the destination site collection. Because the replication of changes between the site collections depends on the tracking of specific object and version numbers, making changes to the destination site collection can break the deployment synchronization. Content deployment only copies objects stored in the SharePoint content databases, which includes lists, libraries, pages, images, and so forth. It does not copy any objects or files stored on the file system of the servers, which includes code assemblies and site definitions, as well as features. When items are deployed, the most recent Major and Minor versions are deployed to the destination site.
When setting up the servers that will participate in content deployment, ensure that both the source and the servers in both farms have exactly the same service packs and updates installed on them. While any server in a SharePoint farm can be designated as an export server or an import server, these servers must have the Central Administration Web Application deployed to them in order to process connections. To begin the process of content deployment, both the source and destination farms need to be configured with appropriate settings.
To configure content deployment settings:
1. From SharePoint 2010 Central Administration, click General Application Settings.
2. Under Content Deployment, click Configure Content Deployment.
3. At the top of the Content Deployment Settings page, shown in Figure 13.20, choose Accept Incoming Content Deployment Jobs if you want to allow deployment to this farm. If this server will only be a destination server, then choose Reject Incoming Content Deployment Jobs, which is the default.
Figure 13.20: Accept Content Deployment Jobs settings
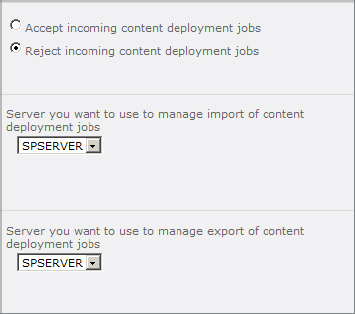
4. Depending on whether this server will be receiving or deploying content, select an import server or export server. This server must be running Central Administration.
5. Under the Connection Security section, shown in Figure 13.21, the Require Encryption (Recommended) setting is selected by default. This setting requires that Central Administration be configured with an SSL certificate and is recommended when the deployment will make use of the Internet for transferring content. If the deployment will be over a secure network or on the intranet, then encryption may not be required. To disable this option, select Do Not Require Encryption.
Figure 13.21: More Content Deployment settings
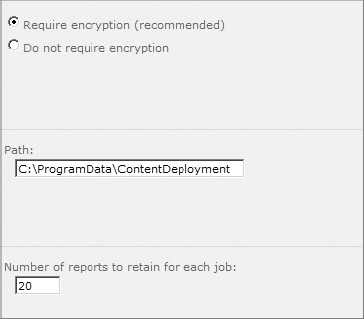
6. Under the Temporary Files section, in the Path box, enter the directory path that will hold the temporary files that contain the compressed content that will be transferred either into or out of this server.
7. In the Reporting section, enter the number of reports that SharePoint will keep for each deployment job. The default value is 20. When this number is reached, the oldest reports will be deleted to make room for newer ones.
8. Click OK.
Configuring Content Deployment Paths
A content deployment path specifies the location of both the source and the destination site collections in a deployment configuration. There may be multiple paths configured that replicate different source site collections to different destinations. The path identifies the authentication method that will be used for connecting to the destination server and the security and identity attributes to deploy.
To configure a content deployment path:
1. From SharePoint 2010 Central Administration, click General Application Settings.
2. Under Content Deployment, click Configure Content Deployment Paths And Jobs.
3. On the Manage Content Deployment Paths And Jobs page, click New Path.
4. On the Create Content Deployment Path page, shown in Figure 13.22, enter a name and description for this path.
Figure 13.22: Create Content Deployment Path page, name and source settings

5. In the Source Web Application drop-down list, select the web application that contains the site collection you want to deploy.
6. In the Source Site Collection drop-down list, select the source site collection.
7. In the Destination Central Administration Web Application section, shown in Figure 13.23, enter the URL of the destination Central Administration server. This is required for the source Central Administration server to establish a connection and retrieve a list of available site collections.
Figure 13.23: Specifying the destination Central Administration server
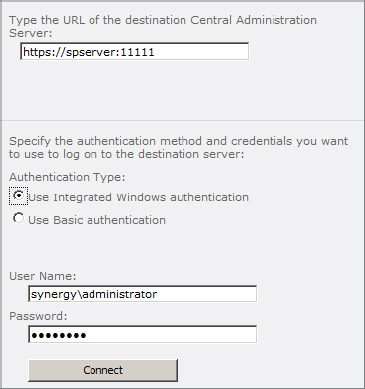
8. In the Authentication Information section, choose the authentication method you want to use. Integrated Windows is the default and most common option. Basic authentication is required if you are establishing a connection through a firewall or proxy server that blocks Windows authentication.
9. Enter the User Name and Password of an account with permissions in the destination Central Administration site, and then click Connect.
If the authentication is successful, the message Connection Succeeded will appear and the Destination Web Application and Destination Site Collection drop-down lists will be populated.
10. In the Destination Web Application drop-down list, shown in Figure 13.24, select the destination web application.
Figure 13.24: Destination Web Application and Destination Site Collection drop-down lists
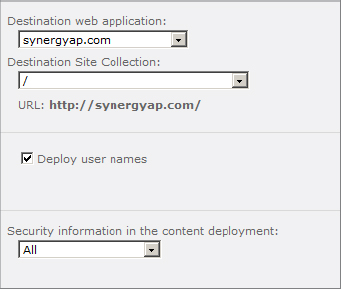
11. In the Destination Site Collection drop-down list, select the destination site collection.
12. Select the Deploy User Names check box to include usernames assigned to content when this path is used for content deployment jobs.
13. In the drop-down list labeled “Security information in the content deployment,” you can select what type of security information will be copied along with the content. If the content is being deployed to a server in a different domain that is not trusted by the source server’s domain, then any users and groups that are transferred will be unrecognized by the destination domain. The options are as follows:
All The default option; includes all of the security information that is associated with the content.
Role Definitions Only Deploys only permission levels, not users and groups.
None Deploys no security information.
14. Click OK.
Configuring Content Deployment Jobs
A content deployment job defines a schedule for deploying the content from a specific path and determines whether to deploy the entire path content or specific sites within it, the frequency of deployment, and the notifications that will be sent on completion. There are three types of deployment jobs:
Full This deployment type copies all of the content from the source to the destination site collection and overwrites the previously deployed content. Because this job type does not check for changes, it may not delete content from the destination site that was deleted from the source site. This type of job is required in order to deploy new columns and views.
Incremental This type propagates only new, changed, or deleted content. It requires that a full deployment has previously been completed. All content is tracked and updated according to the internal GUID of the object.
Quick Deploy This type is used by SharePoint to deploy individual web pages in between scheduled incremental jobs. Whenever you create a new full or incremental job, a Quick Deploy job is automatically created and scheduled to run every 15 minutes. When a content editor or content manager designates a page for quick deployment, it will be automatically included in the next Quick Deploy execution. Members of the Quick Deploy users group have permissions to flag a web page for quick deployment.
To configure a deployment job:
1. From SharePoint 2010 Central Administration, click General Application Settings.
2. Under Content Deployment, click Configure Content Deployment Paths And Jobs.
3. On the Manage Content Deployment Paths And Jobs page, click New Job.
4. On the Create Content Deployment Job page, shown in Figure 13.25, enter a name and description for this job.
Figure 13.25: Setting the path and scope for a content deployment job
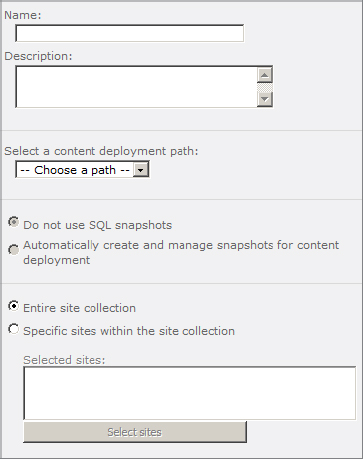
5. In the Select A Content Deployment Path drop-down list, select the path for this job.
6. The SQL Snapshots setting takes advantage of the new Snapshot feature of SQL Server 2008 and 2008 R2. When this option is enabled, a temporary copy of the source content database is created and used by SharePoint during the export phase. This ensures that deployment will not affect, or be affected by, any users currently editing content. To enable this feature, select the option Automatically Create And Manage Snapshots For Content Deployment.
7. In the Scope section, configure the job to deploy either the entire site collection (the default) or to deploy specific sites within the site collection. To specify sites, select the option Specific Sites Within The Site Collection and click the Select Sites button to choose the sites you want to include.
8. In the Frequency section, shown in Figure 13.26, check the box labeled “Run this job on the following schedule,” and choose a schedule.
Figure 13.26: Job Frequency options
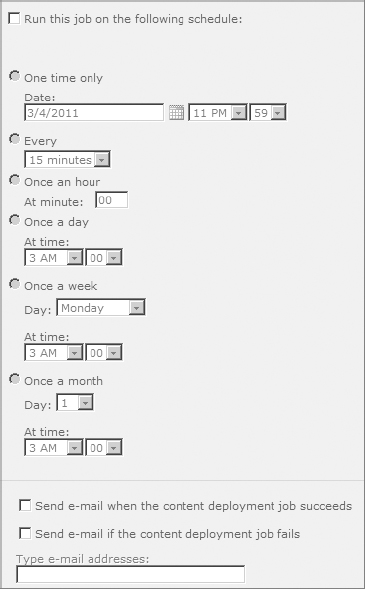
9. Choose the notification emails you want generated. Email can be generated when the content deployment job succeeds and if the content deployment job fails. Then enter an email address for the notification to go to.
10. Click OK.