
After a site collection is created, and certainly during its lifetime, there are additional configuration settings that need to be adjusted. This section covers the settings commonly managed using Central Administration and PowerShell.
Managing Site Collections Using Central Administration
This section explores common administrative tasks using Central Administration and covers managing quotas, using locks, and deleting site collections.
Managing Quotas and Locks
Once you create a quota template, you can assign it to one or more site collections in the farm. Here are the steps to assign a quota template using Central Administration:
1. Select Application Management, then choose Configure Quotas and Locks. You are taken to the screen shown in Figure 3.9.
Figure 3.9: Assigning a quota template
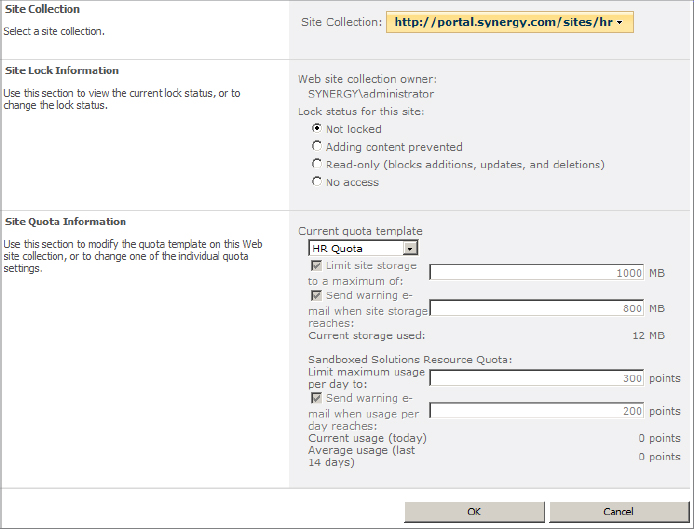
2. Select the site collection.
3. Under Site Quota Information, select a quota template from the Current Quota Template drop-down list.
4. Click OK to save.
You can also create a one-time quota for a single site collection. This allows you to set a limit without first having to create a quota template. To do this, select the Individual Quota template and fill in the quota values as needed.
From the same screen in Figure 3.9, you can also place a lock on one of the site collections. A lock is used to temporarily suspend certain types of activities and is usually done in special cases such as troubleshooting corruption or performing a migration. In some cases, SharePoint also places a read-only site collection lock when doing a site collection backup.
SharePoint is smart enough to detect when a content database has been marked read-only. When this happens, SharePoint treats all site collections in that content database as read-only until the read-only option for the database is set back to False.
Deleting a Site Collection Using Central Administration
Site collections can be deleted when they are no longer needed. Site collection administrators can delete the site collections they own, and farm administrators can delete any site collection. Site collections that are deleted can only be recovered by doing a restore, as covered in Chapter 16, “Managing Backup and Restore.”
When you delete a site collection, SharePoint initially flags the site collection as deleted by removing it from the site map. For all practical purposes, the site collection is removed. However, since the complete removal of data can be an intensive operation, SharePoint creates a timer job that is run at a later time. This allows SharePoint to remove the data gradually, preventing performance problems. The timer job is called Gradual Site Delete and, by default, is scheduled to run daily. This and other timer jobs can be run on demand using Central Administration as covered in Chapter 15, “Managing Auditing, Monitoring, and Analytics.”
For a farm administrator to delete a site collection from Central Administration, follow these steps:
1. Select Application Management, then choose Delete A Site Collection.
2. Select the web application and site collection.
3. Double-check that you have selected the correct one and then click the Delete button.
For a site collection administrator to delete a site collection, follow these steps:
1. Log into the site collection and connect to the top-level site.
2. Click Site Actions ⇒ Site Settings.
3. Under Site Actions category, select Delete This Site.
4. Confirm the URL is correct and click Delete.
You can also delete a site collection using PowerShell. See “Deleting a Site Collection Using PowerShell” later in this chapter.
Automatically Deleting Unused Site Collections
SharePoint is able to detect when site collections go unused and then email site collection administrators asking if the site should be kept or deleted. Emails are sent to the primary and secondary site collection administrators. The email contains links to confirm the site is in use or to approve its deletion.
SharePoint can also automatically delete unused site collections if these email notices go unanswered. These settings are managed at the web application level and, by default, are turned off.
Follow these steps to turn on and configure this setting from Central Administration:
1. Click Application Management, then choose Confirm Site Use And Deletion. You are taken to the screen in Figure 3.10.
Figure 3.10: Configuring site use confirmation and deletion
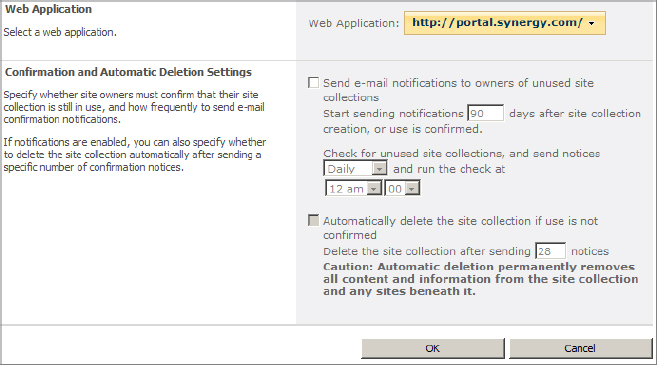
2. Select the web application.
3. To enable SharePoint to send email when site collections are not being used, select the check box labeled “Send e-mail notifications to owners of unused site collections.”
4. Configure the number of days that the site collection should be unused prior to sending out notifications. By default, this is 90 days, as shown in Figure 3.10.
5. Adjust the frequency and time of day that site collections are checked for use. This can be daily, weekly, or monthly.
6. Optionally, enable automatic deletion by selecting the check box labeled “Automatically delete the site collection if use is not confirmed.” If this is enabled, configure the number of notices that will be sent prior to automatic deletion.
For more details and other recommendations on how to handle unused site collections, see the article “Manage Unused Web Sites (SharePoint Server 2010)” at http://technet.microsoft.com/en-us/library/cc262420.aspx.
Managing Site Collections Using PowerShell
PowerShell provides a near endless amount of administrative control. The following PowerShell commands are supported when directly working with site collections:
Backup-SPSite, Get-SPSite, Get-SPSiteAdministration,
Move-SPSite, New-SPSite, Remove-SPSite, Restore-SPSite,
Set-SPSite, Set-SPSiteAdministration
This section covers common administrative tasks. For more examples of using PowerShell to administer SharePoint 2010, see SharePoint MVP Gary Lapointe’s blog, SharePoint Automation, at http://blog.falchionconsulting.com.
Enumerating Site Collections
The cmdlets that list site collections are Get-SPSite and Get-SPSiteAdministration. These commands are very similar, but farm administrators should use Get-SPSiteAdministration to ensure all site collections properties can be returned, even those you may not have direct access to.
Here are some of the primary parameters:
Get-SPSiteAdministration [-AssignmentCollection<SPAssignmentCollection>] [-Filter <ScriptBlock>]
Here are some useful examples:
- List all site collections URLs associated with a certain web application:
Get-SPSiteAdministration http://intranet/*
-Limit all - List all properties for all site collections in a particular content database:
Get-SPSiteAdministration -ContentDatabase
SP_Portal_Content -Limit all | Select * - Show the space used for all site collections in the current farm:
Get-SPSiteAdministration -Limit all |
select Url, @{Name="Space";expression=
{$_.Usage.Storage/1MB}} - Show the first 10 site collections owned by a particular user:
Get-SPSiteAdministration -Limit 10
-Filter {$_.Owner -eq "domainuser"}
Moving a Site Collection to a Different Content Database
Moving a site collection from one content database to another is a snap with the Move-SPSite PowerShell cmdlet. Here are a couple examples on how it can be used:
- Move one site collection to a different content database (provided both databases are on the same SQL Server):
Move-SPSite http://intranet/HR
-DestinationDatabase HR_Content_DB - Use the pipe command combined with Get-SPSiteAdministration to move multiple site collections from one content database to another:
Get-SPSiteAdministration -ContentDatabase
Old_Content_DB | Move-SPSite
-DestinationDatabase New_Content_DB
Deleting a Site Collection Using PowerShell
To delete a site collection using PowerShell, here is the basic syntax:
Remove-SPSite <URL> [-Confirm]
Unlike Central Administration, PowerShell will not automatically create a timer job and delete the site collection gradually. Instead, it begins the deletion immediately. To issue a timer job and match how the Central Administration executes a deletion, include the -GradualDelete switch. This switch is recommended if you are deleting a large site collection during peak hours. Here is an example of deleting a site collection gradually and suppressing confirmation:
Remove-SPSite http://intranet/sites/projects -GradualDelete -Confirm:$false