Manage Email and Text Messages (SMS)
SharePoint can integrate with email platforms, enabling you to either send email messages with attachments to SharePoint, or receive email and Short Message Service (SMS) text notifications from SharePoint.
Configuring Incoming Email
If you set up incoming email, SharePoint can process and store email messages in a list or library. It is a useful feature that can be used for messages originating from internal or external users. For example, a company can use the [email protected] email address to store resumes from interested job applicants in a designed HR document library.
When storing messages in a document library, you have some control over how the message is stored, in particular over how the attachment is saved. You can also restrict who has permissions to email the list or library.
To use incoming email in SharePoint, you must have the SMTP (Simple Mail Transport Protocol) service running on at least one server in the farm.
Configuring incoming email involves four main steps. These are covered in the four following sections:
1. Enabling incoming email.
2. Installing SMTP service.
3. Configuring Exchange or another messaging server to forward messages. This chapter assumes that you are using Exchange Server but other messaging systems can be used.
4. Configuring list and libraries to receive email.
Enabling Incoming Email
To enable incoming email, follow these steps:
1. Start Central Administration.
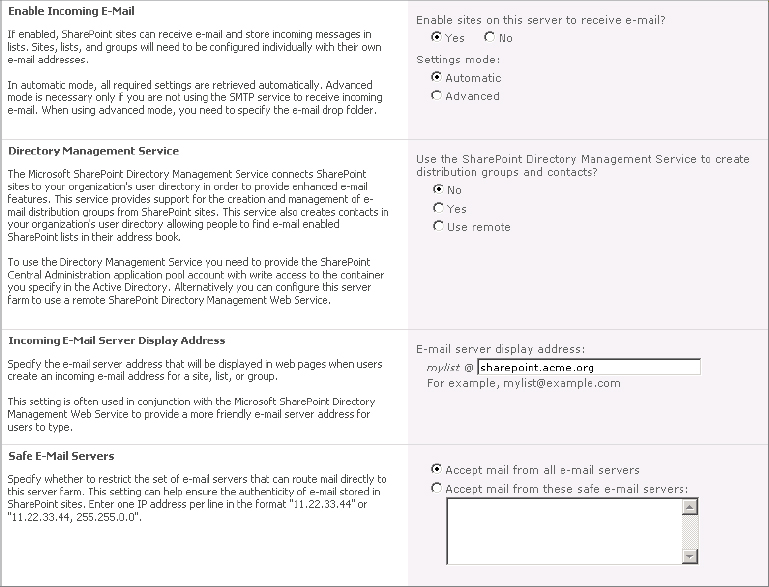
2. Click System Settings and then select Configure Incoming Email Settings. You are presented with the page shown in Figure 6.2.
Figure 6.2: Enabling incoming email
NOTE If you are not a local Windows administrator on the server that is running Central Administration, you will not have the incoming email settings link. Only local administrators who are also farm administrators can enable incoming email.
3. In the Enable Incoming E-Mail section, choose Yes to enable sites on this farm to receive email.
4. For Settings Mode, in most cases you will pick Automatic, which is the most common choice. This setting tells SharePoint to work with a locally installed SMTP server.
5. Specify whether you want to use Directory Management Service to automatically create contacts and maintain distribution lists within your Exchange global address list (GAL). This feature is useful as it allows any list or library that is email enabled to be automatically published in the GAL. The drawback, however, is that server administrators have no control over what contact name is used, and an inappropriate name could be easily published into the address list for all to see. More details on configuring this service are available in the article “Configure Incoming E-mail (SPF 2010)” at http://technet.microsoft.com/en-us/library/cc287879.aspx.
6. In the Incoming E-mail Server Display Address section, choose the domain name you want to use for email. To simplify the routing of mail from Exchange or another messaging system, prefix this entry with a subdomain name. For example, if the regular domain is acme.org, use a name like sharepoint.acme.org.
7. Optionally, in the Safe E-mail Servers section, enter one or more IP addresses of the Exchange or other messaging server(s) that will be forwarding email to SharePoint. Doing so helps prevents unauthorized SMTP servers from delivering mail to SharePoint.
8. Click OK to save changes.
Installing and Configuring SMTP Service
SharePoint’s incoming email engine uses a local SMTP service to receive messages from an external messaging system such as Exchange. The SMTP service does very little—it simply writes the message into a drop folder where a timer job can pick it up and store the message in the correct list or library.
You need at least one SMTP service to use incoming email. For redundancy, you can add multiple SMTP servers, but you need to separately configure load balancing. This section only covers how to configure a single server.
To install the SMTP service for incoming email, follow these steps:
1. Choose one of the WFE or application servers to become the SMTP server.
2. Log into the server as a local administrator and run Server Manager.
3. In the left navigation panel, click Features.
4. In the right panel, click Add Features.
5. In the list of features, select SMTP Server.
6. The SMTP Server feature requires ODBC Logging and SMTP Server Tools to be installed. If these components are not installed already, you will be prompted to add them.
7. Click Next three times and then click Install.
Once the SMTP service is installed, you must change the local domain name so that the service recognizes incoming messages. Here are the steps:
1. Start Internet Information Services (IIS) 6.0 Manager (Start ⇒ Administrative Tools ⇒ IIS 6.0 Manager).
2. In the navigation panel on the left, expand down through the server name and the SMTP virtual server listed.
3. Click Domains and a default domain should be listed in the right panel.
4. Right-click this default domain name entry (initially configured as the fully qualified domain name for this server) and select Rename.
5. Type the domain name that you specified when enabling incoming email in the previous section—for example, sharepoint.acme.org.
Configuring Exchange to Forward Messages
You can configure Exchange to forward appropriate messages to the SharePoint SMTP server. Technically, you are not required to use Exchange or any other email system to forward messages to SharePoint. However, it is a best practice to route SharePoint’s messages through an external system first. The primary advantage is to make use of features such as spam filtering and antivirus protection.
TIP If you don’t intend to route SharePoint’s messages through an external system, then at this point you just need to create an MX record in the authoritative DNS zone for your email domain name that SharePoint is configured to use. This record points to the fully-qualified domain name (FQDN) of the SharePoint(s) running SMTP services (e.g., sharepoint.acme.org).
If you use Exchange as the external system, Exchange receives all incoming messages. Messages that should go to SharePoint are routed via a send connector to your SharePoint SMTP sever. The steps that follow assume you are using Exchange 2010, but the process is similar for previous versions.
1. In Exchange Management Console, expand through Organization Configuration and select Hub Transport.
2. In the Actions pane, click New Send Connector. A wizard is launched.
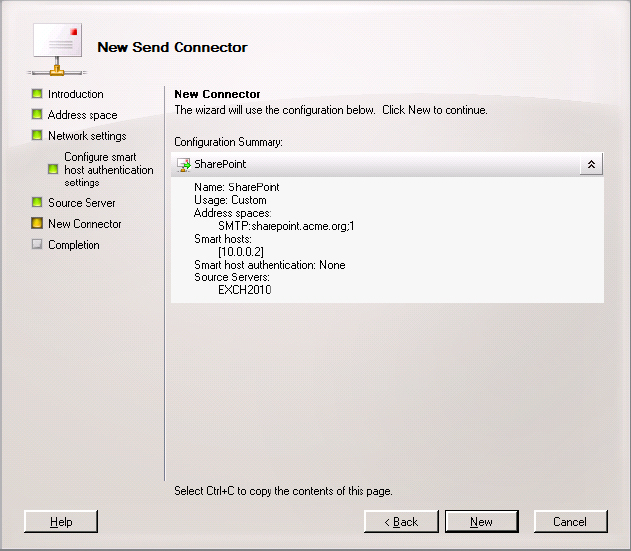
3. Give the connector an intuitive name such as SharePoint.
4. For Address Space, click Add. In the dialog box, enter the domain name that SharePoint is configured to use (e.g., sharepoint.acme.org).
5. For Network Settings, select Route Mail Through The Following Smart Hosts and click Add.
6. Enter either the IP address of the SMTP server or the FQDN that directs Exchange to SharePoint’s SMTP server.
7. For Smart Host Authentication, accept the default of None.
8. For Source Server, ensure that your Exchange Server name is listed.
The final settings should resemble those in the summary screen shown in Figure 6.3.
Figure 6.3: Configuring a New Send Connector
Configuring a Library to Receive Email
The final step in setting up incoming email is configuring which lists and libraries will receive incoming email.
All libraries can be configured to receive incoming email, but not all lists can. For example, tasks, contacts, and custom lists do not support incoming email.
To configure a list or library to use incoming email, follow these steps:
1. Navigate to the list or library.
2. Above the ribbon, click the List or Library tab.
3. Click the List Settings or Library Settings button in the ribbon.
4. In the Communications category, click Incoming Email Settings. (If you do not see this link, either incoming email was not enabled or this list does not support incoming email.) You are presented with the screen shown in Figure 6.4.
Figure 6.4: Enabling a library to receive incoming email
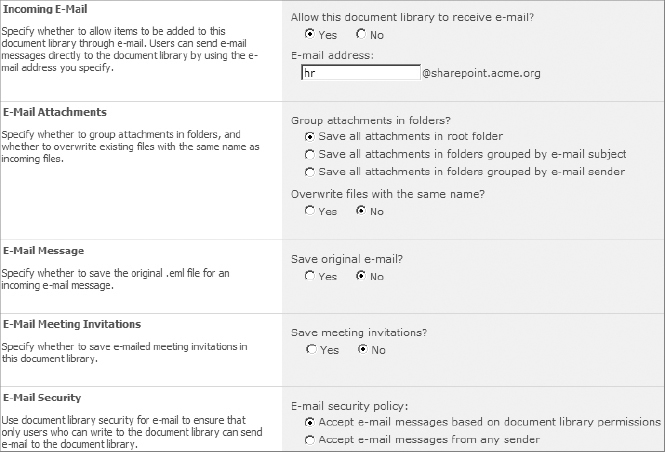
5. Configure the list or library as needed, including adding the name portion of the email address. For lists, the settings vary slightly from those shown in Figure 6.4, depending on the type of list.
6. Optionally, set the email security policy to control who can send email to this list or library. By default, only users that have Contribute permissions are able to send email to the list or library. (This is the setting labeled “Accept e-mail messages based on document library permissions.”)
NOTE Another optional step is to create either an AD contact or an Exchange recipient. This helps users find this account when browsing the GAL. This is not required if users are entering the email address directly, or if the email address is included in a distribution list that users will be using instead.
Configuring Outgoing Email
Outgoing email is used by SharePoint for numerous reasons, including alerts and other notifications, such as those sent when a disk space quota is reached or when new access has been granted to a user. Configuring outgoing email is easy. All that is needed is to specify which SMTP server will deliver the messages. However, you must remember two important details about configuring outgoing email:
- Outgoing email can be configured on the farm as a whole or on individual web applications. If you configure outgoing email for both, the web application setting will override the farm setting. Configuring it for a web application is useful if you want that application to be able to send messages in a different language.
- SharePoint is not able to authenticate to the SMTP server when sending email. That means that the receiving SMTP server (e.g., an Exchange Server) must be configured to allow messages from anonymous users. If this presents a security problem, you can install a local SMTP server. You then configure SharePoint to send messages to this server which are then forwarded (using authentication) to your destination SMTP server.
To configure outgoing email using Central Administration, follow these steps:
1. To configure outgoing email at the farm level, click System Settings, and then select Configure Outgoing Email Settings.
To configure outgoing email at the web application level, click Application Management, and then choose Manage Web Applications. Select the web application and in the ribbon, select General Settings ⇒ Outgoing Email.
You are presented with the screen shown in Figure 6.5.
Figure 6.5: Configuring outgoing email
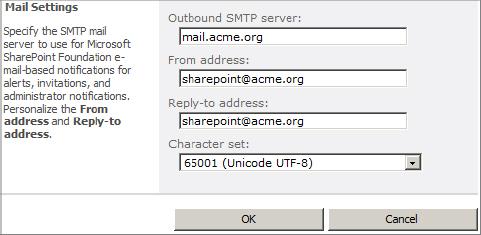
2. Specify the name of the SMTP server to be used. If you require a fault-tolerant design, ensure this host is configured to use load balancing.
3. Provide the From Address. This does not need to be a real address; it’s simply used as the From field for each SMTP message.
4. Provide the Reply-To Address. Again, this does not need to be a real address.
5. Optionally adjust the language (Character Set) for messages to be sent.
6. Click OK.
Configuring SMS Messaging
In addition to email alerts, SharePoint supports SMS for the texting generation. To use SMS, you must first sign up with a hosting provider that supports Office Mobile Service (OMS). You can quickly find many such providers by going to http://messaging.office.microsoft.com/HostingProviders.aspx?src=O14&lc=1033.
When an SMS message needs to be sent, SharePoint contacts the hosting provider via a secure web service call. To encrypt message contents, the provider must support Secure Sockets Layer (SSL).
To configure SMS messaging using Central Administration, follow these steps:
1. To configure SMS messages at the farm level, click System Settings and then choose Configure Mobile Account.
To configure SMS messages at the web application level, click Application Management and then click Manage Web Applications. Select the web application and in the ribbon, choose General Settings ⇒ Mobile Account.
You are presented with the screen shown in Figure 6.6.
Figure 6.6: Configuring SMS service settings
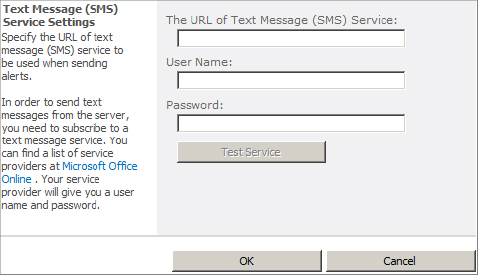
2. For the URL, enter in the external web service URL given to you by the OMS hosting provider.
3. Enter the User Name and Password for your subscription.
4. Click OK to save.
NOTE If the SSL certificate used by the hosting provider is not from a trusted certificate authority (CA), you will need to download and install the certificate in to the trusted root CA store on each WFE server.
Now that SMS messaging is configured, users can optionally choose to receive certain alerts via SMS. Here is how a user configures it:
1. Navigate to the list or library.
2. Above the ribbon, click the List or Library tab.
3. Click the Alert Me button in the ribbon and choose “Set alert on this library.”
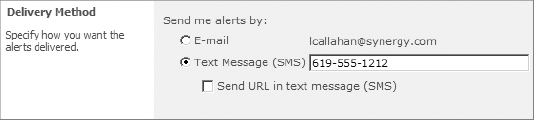
4. In the dialog box shown in Figure 6.7, enter the mobile number to use for sending the alert.
Figure 6.7: Configuring delivery of alerts via SMS message