
Perform Postinstall Operations
Now that your installation is complete, there are a few additional operations that you should do to ensure your farm is properly configured from the start. Some of these are covered in later chapters in more detail. Here is a list of what should be done:
- Adjust diagnostic logging path to ensure your C: drives don’t get filled up with SharePoint log entries.
- Resolve the problematic HTTP 401.1 Unauthorized error (aka loopback fix).
- Create a web application and site collection to host content.
- Install language packs. This step is optional.
- Install Office Web Apps to view and edit Office documents from SharePoint. This step is optional.
- Apply the fix for WCF Data Services. This step is optional and provides support for certain types of custom applications.
Adjusting Diagnostic Logging
By default, SharePoint will store its text-based trace log files (also called Unified Logging System [ULS] logs) in the following folder: Program FilesCommon FilesMicrosoft SharedWeb Server Extensions14LOGS. The problem is that for busy environments, you can fill up your C: drive with these log entries.
The solution is to move these log entries off your C: drive and onto a different partition such as D:. To do so:
1. On all WFE and application servers, create a new folder to store your trace logs (for example, D:LogsSharePoint).
2. Start Central Administration (Start ⇒ All Programs ⇒ Microsoft SharePoint 2010 Products ⇒ SharePoint 2010 Central Administration).
3. Click Monitoring and then select Configure Diagnostic Logging.
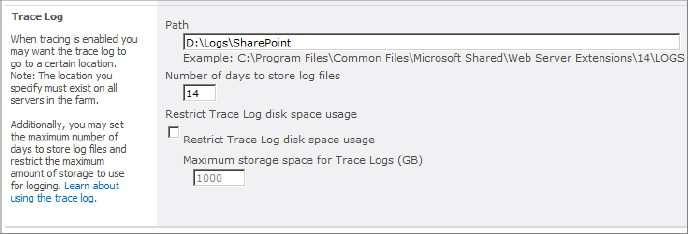
4. In the Trace Log setting, adjust the path to match the one you defined in step 1, as shown in Figure 1.15.
Figure 1.15: Changing the path for the trace log
Configuring diagnostic logging is covered in more detail in Chapter 15, “Managing Auditing, Monitoring, and Analytics.”
Resolving the HTTP 401.1 Unauthorized Error
Windows Server 2008 and 2008 R2 have a security feature that prevents the WFE itself from browsing to FQDN server names (i.e., intranet.company.com) it hosts. This is only an issue from the web server and does not affect external clients.
This feature, while worthwhile from a security posture, wreaks havoc with SharePoint by breaking a number of regular operations. Microsoft has posted two methods to solve the problem: http://support.microsoft.com/kb/896861. For a production server, you are advised to go with method 1 and push out this setting with a Group Policy. For a development or test environment, method 2 is acceptable and an easier fix.
Creating a Web Application and Site Collection
Before SharePoint can be used by regular users, you must create a web application and a site collection. The web application defines the URL and how users will authenticate (e.g., Windows, Forms). The site collection holds the content (e.g., websites, documents, list items) users store in SharePoint. Chapter 2, “Creating and Managing Web Applications,” explains how to create web applications, and Chapter 3, “Creating and Managing Site Collections,” describes site collections.
Installing Office Web Apps
Office Web Apps is an optional add-in that lets you view and edit Word, Excel, PowerPoint, and OneNote files right from the browser. To use Office Web Apps, you must download and install it separately. It’s easiest to install Office Web Apps before creating the farm, but you can do it afterward as well.
Installing Office Web Apps Before Creating The Farm
To install Office Web Apps before creating the farm, follow these steps:
1. After installing the SharePoint binaries, install Office Web Apps by running the setup program.
2. Accept the Software License Terms.
3. Enter your license key.
4. Choose a file location.
5. When the installation completes, proceed to create the farm as described in “Creating a Server Farm,” earlier in this chapter.
6. When adding new servers to the farm, be sure to install Office Web Apps before joining the server to the farm.
Installing Office Web Apps on an Existing Farm
If you are installing Office Web Apps to an existing farm, follow these steps. Steps 1–6 must be done on each WFE and application server in the farm.
1. Install Office Web Apps by running the setup program.
2. Accept the Software License Terms.
3. Enter your license key.
4. Choose a file location.
5. Close the installation program.
6. Run the SharePoint Configuration Wizard to register the new components.
These final two steps need to be done only once for the farm:
7. From Central Administration, create new service applications for Word Viewing Service, PowerPoint Service Application, and Excel Service Application. Details are covered in Chapter 4.
8. Designate the server(s) in the farm on which you want to run the services provided by Office Web Apps. Details are covered in Chapter 5.
NOTE When you install Office Web Apps, SharePoint will modify its default behavior to start opening Office documents in the browser. This can cause problems if Office Web Apps is installed but not fully configured yet. When installing Office Web Apps into an existing farm with active users, consider scheduling downtime to complete the installation and configuration. For more details and other workarounds, see http://technet.microsoft.com/en-us/library/ff431687.aspx#bkmk_addtl_conf.
Installing Language Packs
SharePoint has built-in multilingual capabilities. You can even have individual websites configured to support multiple languages. For example, you can have a team site that some users use in English and others use in German.
NOTE SharePoint doesn’t automatically translate content between languages—it only adjusts the menu commands and built-in application pages to display in that language.
For SharePoint to support multiple languages, you must download and install each additional language pack that you intend on using. Unlike the previous version of SharePoint, you do not need to install both the Foundation and Server language packs if you are running SPS.
- Download SPS 2010 language packs from
www.microsoft.com/downloads/details.aspx?FamilyID=046f16a9-4bce-4149-8679-223755560d54
- Download SPF 2010 language packs from
www.microsoft.com/downloads/en/details.aspx?FamilyID=646E311A-AAF3-4D30-B03C-2F3C70D19A22
Here are the steps to install a language pack in your farm. These steps must be done on every WFE and application server in your farm. The order of the servers is not important, and you can install language packs on multiple servers at the same time.
1. Install the language pack (ServerLanguagePack.exe).
2. Run the SharePoint Configuration Wizard to register the language pack for the server. There are no inputs that you need to provide.
NOTE For some languages such as Arabic or Chinese, you must download and install additional files for the OS. To install, go to Control Panel, click Region And Language, choose Keyboards And Languages, and then select Install/Uninstall Languages.
To learn more about installing language packs for SharePoint, see
http://technet.microsoft.com/en-us/library/cc262108.aspx
Installing a Fix for WCF Data Services
SharePoint 2010 has built-in support for Representational State Transfer (REST)-based web services. REST is a type of web service that allows you to easily read and write from SharePoint lists and libraries from client programs. In SharePoint, this ability is provided by software called WCF Data Services (formerly called ADO.NET Data Services). SharePoint does not use this as a built-in capability, but if you will be writing and deploying custom applications for SharePoint, you might need to apply a hotfix to correct a problem. This problem only exists on Windows Server 2008 R2 and Windows 7.
Download the hotfix here:
You will need to install the hotfix on each WFE server.