
While SharePoint manages most of the settings used for the IIS website, a few settings must be changed using IIS Manager. The most common ones that you need to adjust are covered in this section.
WARNING The web application settings that SharePoint allows you to configure (TCP Port, Application Pool, and others) should not be changed directly in IIS. Why? SharePoint keeps track of these settings in the configuration database. If the settings are changed directly in IIS, SharePoint and IIS become out of sync and problems will result.
Configuring the IIS Logging Path
IIS logs all requests made by clients and writes them in a series of text-based log files. It captures each web page request, such as default.aspx, and all of the resources found on the page—including images, scripts, and CSS files. A single page request can result in 20 or more lines in the log file. Multiply this by hundreds of requests by thousands of users and the result is millions of lines for just a single day!
By default, IIS stores the logs on the C: drive of your WFE server. If SharePoint receives a lot of requests, a major disk space problem for your system partition can quickly develop. You should change this log path in any environment, such as production, which is expected to have a large number of requests. This change needs to be done only once for each WFE server. Here are the steps:
1. Go into IIS Manager for each WFE server.
2. In the Connections panel on the left, select the server name.
3. In the Features view shown in the middle panel, select Logging.
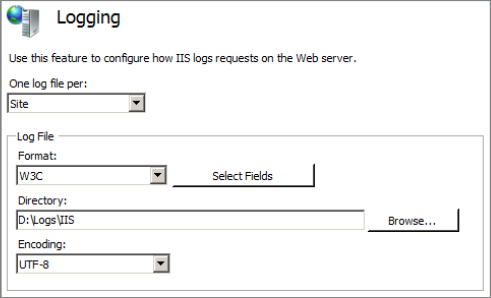
4. For the log file, change the directory to a more suitable drive and folder. For example, in Figure 2.12 we’ve changed the path for the log files to D:LogsIIS.
Figure 2.12: Configuring the IIS logging path
5. Click Apply in the Actions panel on the right to save. This change will be applied to all current IIS websites and any new ones created in the future.
NOTE IIS does not have a built-in way to archive old log files. You can either manually delete old IIS log files periodically, or you can use a script to automate deletion. You will find many scripts available online, such as “Simple PowerShell script to clean up IIS log files” at http://codeasis.com/ShowArticle.aspx?ID=152.
Configuring the SSL Certificate
If SSL was enabled when you created the web application, you will need to load and bind a certificate to the IIS website. There are three parts to this process: creating the certificate request, loading the certificate into IIS, and binding it to the IIS website.
NOTE Incidentally, this process is the same with any IIS website, so it’s not specific to SharePoint.
To create a certificate request, follow these steps:
1. Start IIS Manager on any one of the WFE servers.
2. In the Connections panel on the left, select the server name.
3. In the Features view (the middle part of the screen), double-click Server Certificates.
4. In the Actions panel on the right, select Create Certificate Request.
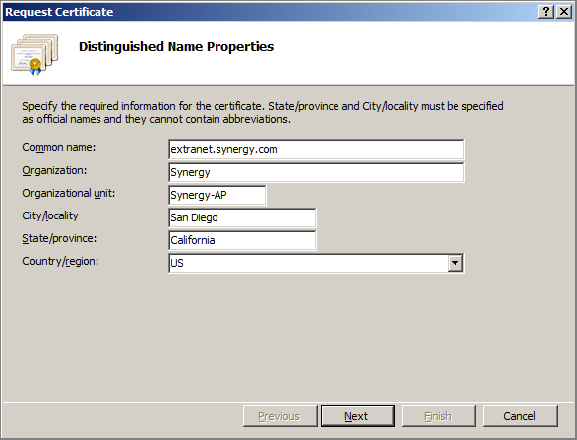
5. Fill out the Request Certificate form as shown in Figure 2.13. Ensure that the entry in the Common Name field matches the host header you specified when you created the web application. When you are finished, click Next.
Figure 2.13: Creating an SSL certificate request
6. Select the appropriate cryptographic setting and bit length. Which settings you use depends on which third-party provider (such as VeriSign or Thawte) or other service (e.g., Microsoft Certificate Services) you are requesting the certificate from. Click Next.
7. Enter a filename and click Finish to save the certificate request as a file. This request is a Base64 encoded text file and must be submitted to the certificate provider. In most cases, you can paste the text file’s contents into the web page where you order/request the certificate.
The certificate you receive back from the provider is a single file, usually with a .cer extension. The next task is to load this certificate on each of the WFE servers. Once the certificate is obtained, go into IIS Manager for each WFE server and follow these steps:
1. In the Connections panel on the left, select the server name.
2. In the Features view, double-click Server Certificates.
3. In the Actions panel on the right, select Complete Certificate Request.
4. In the dialog box, browse to the CER file and provide a friendly name for the certificate (that is, a name that will help you recognize the certificate later).
Now that the certificate is loaded, the final procedure is to bind it to the IIS website. These steps must also be done on each WFE server within IIS Manager.
1. In the Connections panel on the left, expand the current server name.
2. Expand Sites and select the correct IIS website.
3. In the Features view, double-click SSL Settings.
4. If you are requiring an SSL connection (that is, you are not allowing unencrypted HTTP sessions), select the check box and click Apply.
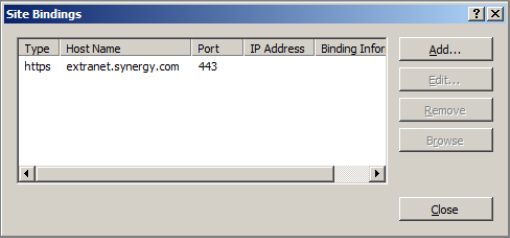
5. Return to the Features view and select Bindings in the Actions panel. The Site Bindings dialog box shown in Figure 2.14 appears.
Figure 2.14: Configuring IIS Website Bindings
6. Select the binding entry and click the Edit button.
7. In the SSL Certificate drop-down, select the certificate and click OK.