
Extend or Delete a Web Application
The ability to extend or delete a web application is very useful in a number of situations. This section covers:
- Extending web applications
- Defining alternate access mappings and zones
- Solving various administrative challenges involving your web applications
Benefits of Extending a Web Application
Extending a web application is one of the true versatilities of SharePoint. Extending a web application allows you to expose the same set of content to a different set of users, typically with a different URL and form of authentication.
For example, say that Acme Corp. has been using SharePoint as their intranet for the past year. Their internal URL is http://acme-intranet and it uses Windows Authentication. Management then decides that external suppliers must be able to collaborate with Acme on some of the same content. In other words, they want to create an extranet.
A solution to this requirement is to extend the current web application to a new URL—perhaps https://extranet.acme.com—and use FBA. Acme site administrators can then grant access to external users so that both internal and external users can collaborate on the same content. Of course, there are DNS, firewall, and a number of security issues that need to be addressed, but SharePoint supports the core requirement.
When you extend a web application, another IIS website is created with new binding information, but the content databases (and site collections contained therein) and application pool are shared. You also specify which form of authentication will be used for the extended instance.
NOTE When extending a web application, the extended instance will always use the same authentication type (i.e., Claims or Classic). This presents problems if you want to use FBA for external users but your intranet is currently configured using Classic authentication. You can migrate from Classic to Claims using a PowerShell script, but there are some known issues. Note that once the web application is set to Claims, it cannot be migrated back to Classic. See the article “Migrate from Classic-Mode to Claims-Based Authentication (SharePoint Server 2010)” at http://technet.microsoft.com/en-us/library/gg251985.aspx for more information.
Extending a Web Application
From SharePoint’s perspective, extending a web application is surprisingly easy. In the following steps, the scenario is based on the one used earlier, extending Acme Corp’s intranet to an extranet. Here are the steps using Central Administration:
1. Choose Application Management, then select Manage Web Applications.
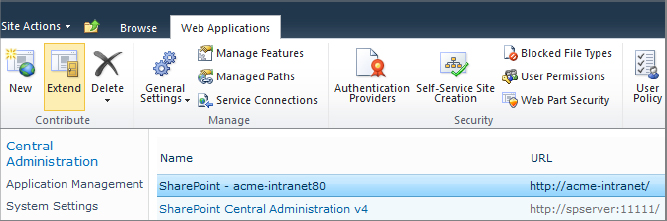
2. Select the web application you want to extend and click the Extend button in the ribbon, as shown in Figure 2.18.
Figure 2.18: Extending a web application
3. The dialog box that appears is similar to the one you see when creating a new application but with fewer options. Fill out the options for the new IIS website. The top half is shown in Figure 2.19.
Figure 2.19: Configuring the extended IIS website

4. For authentication types, configure as appropriate. The options presented here depend on whether the original web application was created with Claims or Classic. For Acme’s requirement, only FBA has been enabled.
SharePoint will generate a public URL that can be changed if needed. The public URL is covered in the “Managing Alternate Access Mappings” section later in this chapter.
5. Specify the zone for this extended instance. Zones are also covered in the “Managing Alternate Access Mappings” section. For this scenario, Extranet has been selected, as shown in Figure 2.20.
Figure 2.20: Configuring the public URL and zone

This process creates a new IIS website and a new web.config file. Entries in the SharePoint configuration database point this website to the same content database(s) that are used by the original web application. From SharePoint’s perspective, it is still one web application with an alternate form of access.
NOTE When extending the web application, SharePoint does not copy the web.config file from the original IIS website. Instead, it creates a new one, adding settings that it is aware of, such as custom SharePoint Solution Packages (WSP files) that have been deployed. If you have manually made any changes to the web.config file, you will have to apply them manually to the newly created web.config file as well.
Managing Alternate Access Mappings
Alternate access mappings (AAMs) provide additional URLs that can be used as part of a web application. When you extend a web application, SharePoint automatically creates a new AAM. In the previous scenario, both http://acme-intranet and https://extranet.acme.com are access mappings for the same web application. Assuming that http://acme-intranet/ProjectA/Documents is a valid URL, then so is https://extranet.acme.com/ProjectA/Documents.
Understanding Alternate Access Mappings
Each web application supports up to five different access mappings. This means that each web application can only be extended a maximum of four times. When creating an access mapping, you use a label to categorize what type of mapping you are using. This label is called a zone. The five zones are Default, Intranet, Internet, Extranet, and Custom. The zone is just a label and has no noticeable impact on functionality. The Extranet zone was chosen as shown in Figure 2.20 since it is the most reasonable category, but another zone could have been chosen.
NOTE When you create a new web application, the URL provided becomes the first access mapping and is labeled as the default zone. While the zone name is just a label, the default zone is a bit special because it’s used for some internal functions. Therefore, you must always have a default zone for each web application.
Understanding Public and Internal URLs
In addition to allowing multiple URLs to point to a single content database, an AAM also ensures that links on SharePoint’s web pages are correct for the type of user. This is the purpose of the public URL. In other words, the public URL is used to set the base URL for links on the web pages that are returned. For example, when viewing the list of documents in a library from the default zone (i.e., http://acme-intranet), the URL for a file is http://acme-intranet/ProjectA/Documents/RocketLauncher.docx. This same document for an extranet user becomes https://extranet.acme.com/ProjectA/Documents/RocketLauncher.docx. Each zone has its own, unique public URL.
Each AAM zone also has an internal URL. The internal URL is the address that is used when making an HTTP request. For example, in the browser’s address bar when requesting a page, you see http://acme-intranet. In this case, the internal URL is http://acme-intranet. At this point you’re probably wondering why do we need another URL? That is, wouldn’t the internal URL and public URL be the same? In most cases, yes, but there are some useful exceptions.
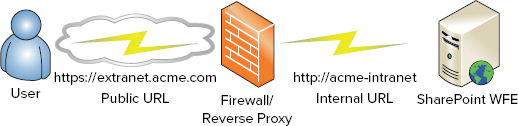
The most common situation where these URLs are different is when you are using a firewall as a reverse proxy, as depicted in Figure 2.21. In this case, the user connects to https://extranet.acme.com. This request is received by the reverse proxy device and repackaged as a new internal request using http://acme-intranet. When the SharePoint WFE replies with the response, it structures the links in the correct URL for the user. The reverse proxy receives the response from SharePoint and repackages again back as the response for the user.
Figure 2.21: Public and internal URLs
Editing Alternate Access Mappings
Central Administration provides a special page for viewing and editing the AAMs for each web application. This page is mostly used to add or edit internal URLs or edit public URLs for your web application zones. You access this screen by going to System Settings, then selecting Configure Alternate Access Mappings. Initially, this screen will show you the mappings for all web applications, but the mappings can be filtered by selecting a single web application (called a mapping collection in this screen). Figure 2.22 shows the filtered view of the mappings for the Acme intranet and extranet.
Figure 2.22: AAM entries for Acme

You can perform the following tasks on the AAM page:
- To edit a public mapping, click the Edit Public URLs link and change as needed.
- To change the internal URL for a zone, click the internal URL link.
- To add additional internal URLs, click the link as shown in Figure 2.22.
NOTE The excellent article “Plan Alternate Access Mappings (Windows SharePoint Services)” at http://technet.microsoft.com/en-us/library/cc288609(office.12).aspx describes AAM and how to configure SharePoint for a reverse proxy scenario. While it’s written for SharePoint 2007, it still applies to 2010.
Unextending and Re-extending a Web Application
You might want to unextend and re-extend a web application. The most common need is to change the bindings (e.g., TCP port or host header) for a web application’s zone. SharePoint doesn’t provide a simple way to do this, so it involves removing (or unextending) SharePoint from an IIS website and then re-extending it with the new settings.
Here are the steps to unextend and re-extend a web application’s zone:
1. Start Central Administration.
2. Go to Application Management and click Manage Web Applications.
3. Select the web application you want to unextend.
4. Click the down arrow under the Delete button in the ribbon.
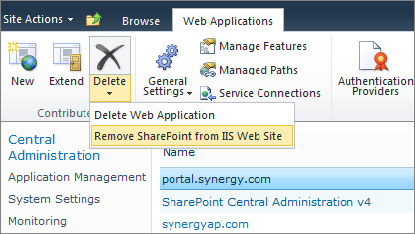
5. Select Remove SharePoint From IIS Web Site, as shown in Figure 2.23.
Figure 2.23: Unextending a SharePoint web application
6. Select the zone you wish to unextend and click OK.
If you unextend the default zone, SharePoint still recognizes this URL and keeps track of it in the configuration database, but the zone becomes inactive. If you unextend any other zone, the zone is removed from SharePoint.
Now that the zone has been unextended, the steps to re-extend are the same as extending any web application:
1. From the same Manage Web Applications screen, select the web application that you wish to re-extend.
2. Select the Extend button in the ribbon.
3. For the IIS website section, you can either reuse the previous website (assuming you didn’t delete it), or re-create it with the new and correct bindings. Either way, the result is the same.
Deleting a Web Application
Deleting a web application removes all references to the web application, its zones, and its configuration settings. When deleting a web application, you have the option of also deleting all the content databases and IIS websites.
To delete a web application, follow these steps:
1. Start Central Administration.
2. Go to Application Management, and then select Manage Web Applications.
3. Select the web application you want to delete.
4. Select the Delete button from the ribbon.
5. Choose whether to keep the content databases and IIS websites, as shown in Figure 2.24.
Figure 2.24: Deleting a SharePoint web application

WARNING Deleting a web application, its content databases, and its IIS websites is an irreversible action when using these steps. To re-create the configuration you must restore from backup.
You can also use the Remove-SPWebApplication PowerShell cmdlet to delete a web application.
TIP One not-so-obvious advantage of deleting a web application and preserving the IIS websites and content databases is if you want to change the application pool associated with a web application. While SharePoint lets you change the application pool identity easily (select Security, then choose Configure Service Accounts), you are unable to change the application pool itself. Thus, the only way to do this is to delete the web application, re-create it, and reapply the settings, including re-associating all of the content databases.