
Create and Delete Service Applications
Service applications can be created in one of two ways. There are advantages and disadvantages to each method.
Running the Farm Configuration Wizard The wizard automates the creation of service applications. Using the wizard has the advantage of being fast and simple, but the wizard will assign all service applications to one application pool with a single service account. The wizard will also create all the service databases using an automatic naming convention, which includes a GUID in the name.
Manually Creating Each Application This approach is more time consuming than using the wizard but offers you greater flexibility in configuring and naming the applications.
Creating a Service Application
You can run the Farm Configuration Wizard immediately after the completion of the farm installation process or at any point after that.
Running the Farm Configuration Wizard
To run the Farm Configuration Wizard, follow these steps:
1. From the SharePoint 2010 Central Administration Web Application, under Application Management, click Configuration Wizards.
2. On the Configuration Wizards page, click Launch The Farm Configuration Wizard.
3. Click the Start The Wizard link.
4. On the Configuration page, either select an existing managed account (covered in detail in Chapter 14, “Managing Security”) or enter credentials to create a new managed account. This account will act as the service account for the application pool and will be granted ownership rights on all the service databases. The account should be an Active Directory domain account but does not require any explicit permissions assigned to it. Select the services you want to configure and click Next. The process may take several minutes to complete.
Creating a Service Application Manually
Some service applications have unique configuration steps and will be covered in detail individually in later sections of this chapter or in other chapters. These steps can be used to manually create each service application:
1. From the SharePoint 2010 Central Administration Web Application, under Application Management, click Manage Service Applications.
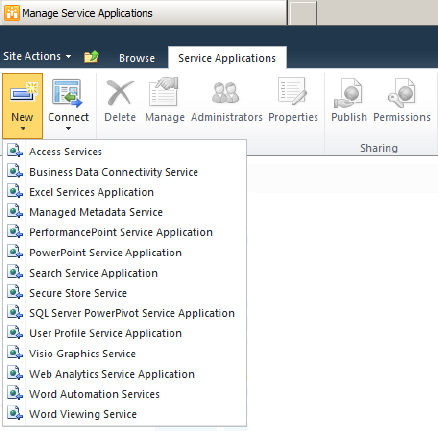
2. From the ribbon, click the New menu and select the type of service application you want to create, as shown in Figure 4.1. For this example, choose Access Services.
Figure 4.1: Choosing a service application to create
3. In the dialog box shown in Figure 4.2, enter a name for your service.
Figure 4.2: Create New Access Services Application dialog box
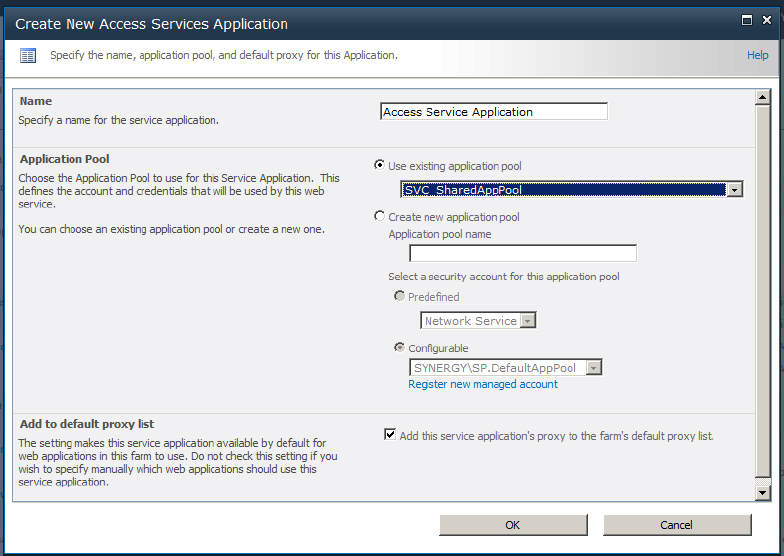
4. All services require an application pool to be created or assigned. (Application pools—the process spaces within which SharePoint code executes—are covered in detail in Chapter 2.) Select an existing application pool to share process resources between web applications or create a new one to isolate the web service application resources. To create a new application pool, enter a name and select a managed account as its service account.
5. Some service applications provide the option Add To Default Proxy List, which is selected by default. Uncheck this option if this application will be used for only one web application.
6. A few service applications create databases during their initial configuration. These are the Business Data Catalog, Managed Metadata Service, Secure Store Service, and User Profile Service Application. For these, include the following information:
- Enter the server name of the SQL server that will host the database.
- Enter the name of the database.
TIP It is a good idea to use a consistent naming convention for all databases.
- Select either Windows Authentication or SQL Authentication (used generally for Internet-facing farms with a firewall in front of the SQL server).
- For fault-tolerant farms that use mirrored database servers, enter the failover database server that will host the mirror.
Deleting a Service Application
When you no longer need a service application, you can delete it. Deleting the service application will remove it from the proxy group that it is a part of but does not stop the associated server service from running if there is one. Only farm administrators can delete a service application.
Follow these steps to delete a service application:
1. From SharePoint 2010 Central Administration, under Application Management, click Manage Service Applications.
2. Click the row of the service application to be deleted.
3. From the ribbon, click Delete.
4. In the resulting dialog box, you have the option to delete the service database by checking the option Delete Data Associated With The Service Applications. If there is no data associated with the service application or it is no longer going to be used then it makes sense to delete the unused databases. In cases where the service application may be re-created again or the databases are being relocated to a different SQL Server then leave the box unchecked.
5. Click OK.
Managing Service Application Administrators
You can delegate management of a service application to someone who is not a farm administrator. This approach allows you to distribute the maintenance of services to several staff members while restricting their access to specific services. Service application managers can open the Service Applications page (_admin/ServiceApplications.aspx) but will only see those service applications that they have permissions to manage. Only farm administrators can delegate service applications to others.
1. From SharePoint 2010 Central Administration, under Application Management, click Manage Service Applications.
2. Click the row of the service application for which you are changing the administrators.
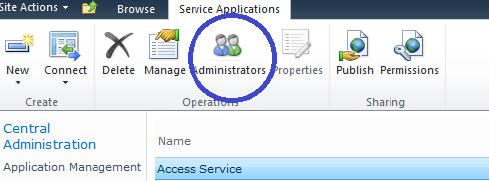
3. From the ribbon, click Administrators, as shown in Figure 4.3.
Figure 4.3: Click Administrators on the ribbon
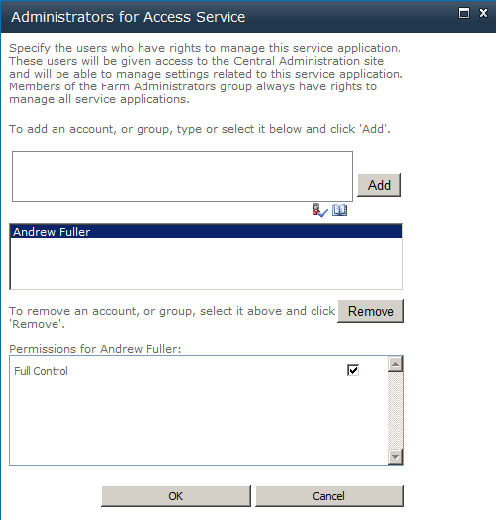
4. In the resulting dialog box, browse for or type the username of the person you want to add; then click Add.
5. To complete the delegation, check the Full Control option for the user, as shown in Figure 4.4.
Figure 4.4: Check the Full Control in this dialog box
6. Click OK.