
Scaling the application tier is incredibly flexible when you’re working with SharePoint’s application services. In the context of this chapter, scaling application services involves these two areas:
- Improving performance and availability by running multiple service instances
- Consuming application services from other farms
Improving performance and availability is easily achieved in a multiserver farm by starting the appropriate services as needed on the farm servers. The load balancing is provided automatically by SharePoint. For example, if two servers are running the Excel Calculation Services service, requests are automatically distributed to both in an active/active design. If one server goes offline, the other server processes all the requests.
As the number of farm servers increases, try to work toward having only dedicated servers for each of the three roles. That is, WFE servers are dedicated to being web application servers; application servers are dedicated to running application services; and, as always, database servers are dedicated to running SQL Server. What the server count is when servers become dedicated will depend on your requirements, but in general this point is reached when you approach the medium-server farm size, as covered in the “Understand Farm Topologies” section earlier.
In addition to providing very scalable application services within one farm, SharePoint supports consuming application services from other farms. How this works and is configured is covered in the next two sections.
Understanding Cross-Farm Services
While a single farm can scale to support tens of thousands of users, it is not always practical to deploy everything in just a single farm. Recall that all farm servers must be in close proximity, usually in one datacenter. For multinational firms that have large teams located around the globe, one farm is not feasible. Many opt for deploying a farm in each major region. Some of the benefits include faster performance, improved business continuity, less bandwidth consumed, and the ability to decentralize farm administration tasks.
When multiple farms are deployed, there is often a need to share application services among farms. For example, all farms must use a single User Profile service application. SharePoint supports cross-farm services, which enables one farm to call into services made available by another farm. However, this feature is not supported for all service applications. The following is a list of built-in service applications that can be shared cross-farm (all others can only be used in a single farm):
- Business Data Connectivity
- Search
- Managed Metadata
- Secure Store
- User Profile
- Web Analytics
The farm that is making a service available is called the publishing farm. The farm that is requesting service is called the consuming farm. One farm can be both a publishing farm and a consuming farm, just not on the same service application.
NOTE A valid topology for environments with multiple farms is to have one farm that is dedicated to providing one or more service applications to other farms. For example, to implement an enterprise-wide search solution, a dedicated search farm can be deployed that publishes search services to multiple consuming farms.
Configuring Cross-Farm Services
There are four primary steps to enable and configure cross-farm services:
1. Configure a trust relationship between farms.
2. Configure a publishing farm.
3. Publish a service application.
4. Consume a service application.
All of these steps can be configured using PowerShell, and some of them must be done using PowerShell. Since this is not something that is usually scripted, those steps that can be done using Central Administration are shown that way.
Configuring a Trust Relationship Between Farms
Before any service applications can be published, a trust relationship must be established between the publishing and consuming farm. Despite the term “trust,” do not confuse this with an Active Directory (AD) trust relationship. The trust relationship between farms is specific to SharePoint, and farms in separate AD domains or forests can trust each other. However, some service applications, such as User Profile, also require an AD domain-level trust relationship to be in place. For more details on AD trust relationships, see the article “Share Service Applications Across Farms” at http://technet.microsoft.com/en-us/library/ff621100.aspx
To create a relationship between publisher and consumer, root certificates on each farm must be exchanged with each other. Also, the Security Token Service (STS) certificate from the consuming farm must be installed on the publishing farm. Doing so allows requests to be authenticated and passed securely between farms.
Some of these steps of this task require PowerShell and some can be done with Central Administration. In the steps that follow, Central Administration is shown where it can be used. When using PowerShell, the command can be run from any server in the farm.
1. On the consuming farm, export the root certificate from a server. Here is the PowerShell script:
$rootCert = (Get-SPCertificateAuthority).RootCertificate
$rootCert.Export("Cert") |
Set-Content <C:ConsumingRoot.cer> -Encoding byte
Replace <C:ConsumingRoot.cer> with the filename path to where you want the file saved.
2. On the consuming farm, export the STS certificate using the following PowerShell script:
$stsCert = (Get-SPSecurityTokenServiceConfig).
3. On the publishing farm, export the root certificate using the following PowerShell script:
$rootCert = (Get-SPCertificateAuthority).RootCertificate
$rootCert.Export("Cert") |
Set-Content <C:PublishingRoot.cer> -Encoding byte
4. Copy these files so that a server on the publishing farm has the two consuming farm certificates, and one server on the consuming farm has the one publishing farm certificate.
5. On the publishing farm, import the two certificates from the consuming farm. In Central Administration, click Security, then click Manage Trust.
6. In the ribbon, click New.
7. The Establish Trust Relationship dialog box appears (Figure 5.18). For Name, enter a friendly name for the consuming farm (e.g., Europe Consumer).
Figure 5.18: Create a trust relationship on the publishing farm
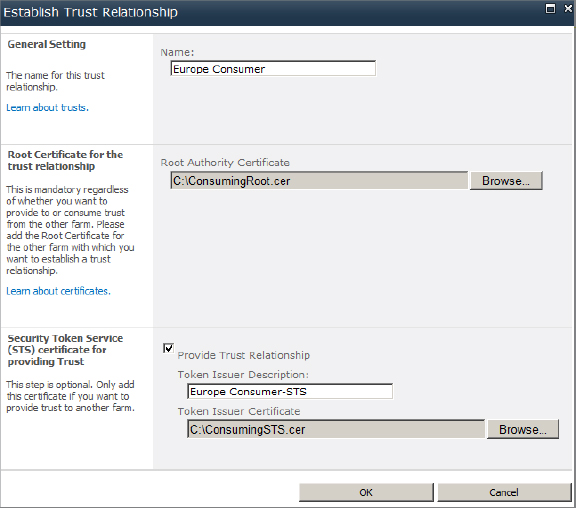
8. For Root Authority Certificate, select the root certificate file from the consuming farm (i.e., ConsumingRoot.cer).
9. For Token Issuer Description, enter a friendly name for the consuming farm STS (e.g., Europe Consumer-STS).
10. For Token Issuer Certificate, select the STS certificate from the consumer farm (i.e., ConsumingSTS.cer).
11. Click OK to save.
12. On the consuming farm, import the root certificate from the publishing farm. In Central Administration, click Security, then click Manage Trust.
13. In the ribbon, click New.
14. For Name, enter a friendly name for the publishing farm (e.g., US Publisher).
15. For Root Authority Certificate, select the root certificate file from the publishing farm (i.e., PublishingRoot.cer).
16. Click OK to save.
Configuring a Publishing Farm
The next step is to grant permissions on the consuming farm. The first permission that must be granted is to the “Application Discovery and Load Balancer Service Application,” aka the topology service. Doing so allows the consuming farm to request services from the publishing farm. The second permission grants permission to the specific application service.
Here are the steps and corresponding PowerShell code:
1. On the consuming farm, obtain the globally unique ID (GUID) of the consuming farm by running this PowerShell script:
Get-SPFarm | Select id
2. On the publishing farm, grant permissions to the consumer farm. Here is the PowerShell script:
$security = Get-SPTopologyServiceApplication |
Replace <Farm GUID> with the GUID you obtained in step 1.
3. Grant application service-specific permissions to the consumer farm. The script for this is almost exactly the same as the script used in the previous step, but does vary slightly depending on the service application. Here is a sample script for granting permissions to the Managed Metadata Service application:
$security = Get-SPMetadataServiceApplication
4. Replace <Farm GUID> with the GUID obtained in step 1.
5. Replace <“Metadata Service Application Name“> with the name of the service application.
See the article “Set Permission to a Published Service Application” located at http://technet.microsoft.com/en-us/library/ff700211.aspx for more information and examples on how to configure permissions for other service applications.
Publishing a Service Application
Cross-farm service applications communicate via Windows Communications Foundation (WCF)-based web services. The web service can be configured to use either HTTP or HTTPS connections, and this is defined on the publishing farm when the service is enabled for publishing.
Here is how to publish a service application using Central Administration on the publishing farm:
1. Click Application Management, then select Manage Service Applications.
2. Highlight the desired service application and click the Publish button in the ribbon.
3. Set the connection type, either HTTP or HTTPS.
4. Click the check box to publish this service application to other farms.
5. Copy the published URL into the clipboard or to a temporary text file. (You will use this URL on the consuming farm, as described in the next section.)
6. Optionally, enter a description and information URL to provide guidance to the farm administrator on the consuming farm.
7. Click OK to save.
NOTE The published URL (technically a uniform resource name or URN) contains the path to the topology web service for one server on the publishing farm. This creates a single point of failure if this server is down. To make this service fault tolerant, see the article “Load Balancing the SharePoint 2010 Topology Service” located on the “Beside the Point” blog at http://blogs.msdn.com/b/besidethepoint/archive/2010/12/08/load-balancing-the-sharepoint-2010-topology-service.aspx.
Consuming a Service Application
Consuming a service application can be done with Central Administration on the consuming farm. Here are the steps:
1. Click Application Management, and then select Manage Service Applications.
2. In the ribbon, click Connect and then select the appropriate service application.
3. In the pop-up dialog box, enter the published URL that you captured when publishing the service application (described in the previous section).
4. Click OK to save. A new service application connection entry is now shown on the consuming farm.
5. If necessary, add entries in the firewall to allow traffic through the designated TCP port (by default, 32,844).
Scaling the Search Service
Scaling the search application role is handled somewhat differently than scaling other application services due to the search engine’s architecture. The degree of scalability depends on which search application engine is used. Microsoft makes five different search applications that can be used in SharePoint:
- SharePoint Foundation Search
- Microsoft Search Server 2010 Express
- Microsoft Search Server 2010
- SharePoint Server 2010 Search
- FAST Search Server 2010 for SharePoint
To learn more about the differences between each of these products, download the PDF document “Search Model 1 of 4 - Search Technologies from http://go.microsoft.com/fwlink/?LinkID=167733.
In this section, the focus is on SharePoint Server 2010 Search, which has the ability to scale up to 100 million search items.
Understanding Search Scalability
The search engine in SharePoint Server 2010 is very flexible, and while it may be a bit confusing when you’re first learning the moving parts, once you do, the configuration of the services is quite simple.
The search architecture can be divided into two parts:
Crawler The crawler is responsible for reading the items from each content source, extracting keywords and metadata, and storing them to make the index. The crawler runs based on defined crawl schedules.
Query Service The Query service searches this index when a search query is issued and returns matching items to clients.
To learn more about the basics of configuring the search service, see Chapter 8, “Configuring the Search Service” and Chapter 9, “Configuring Search Scopes and Search Results.”
Scaling Crawler Services
SharePoint’s crawler is very flexible. It has an active/active design where multiple application servers crawl simultaneously. This design delivers faster performance (i.e., crawling content in less time) and fault tolerance, something not available in previous versions of SharePoint. Crawlers in SharePoint 2010 are stateless, which refers to two different aspects of their behavior:
- Index files are not stored locally on the crawl server. Instead, index files are delivered directly to query server(s).
- A crawl database is used to log what has been crawled. This allows multiple crawl servers to remain in sync.
Scaling crawlers can be done by creating multiple crawl components and crawl databases. Each crawl component is an application server participating in crawling. Creating another crawl database is done when database contention becomes a bottleneck. Here are guidelines you should follow when configuring the crawler:
- Avoid having more than 25 million items per crawl database.
- Avoid having more than 10 crawl databases per search application.
- There should be at least 4 CPU cores on each server where a crawl component is running.
- Avoid having more than 16 crawl components in a single Search Service Application.
Here are the steps to create a new crawl component using Central Administration:
1. Go to the search topology screen. (Central Administration, click Application Management, and then click Manage Service Applications. Click the search service application you want to configure.)
2. Click the Modify button under Search Application Topology.
3. Click New ⇒ Crawl Component to display the Add Crawl Component window shown in Figure 5.19.
Figure 5.19: Creating a new crawl component
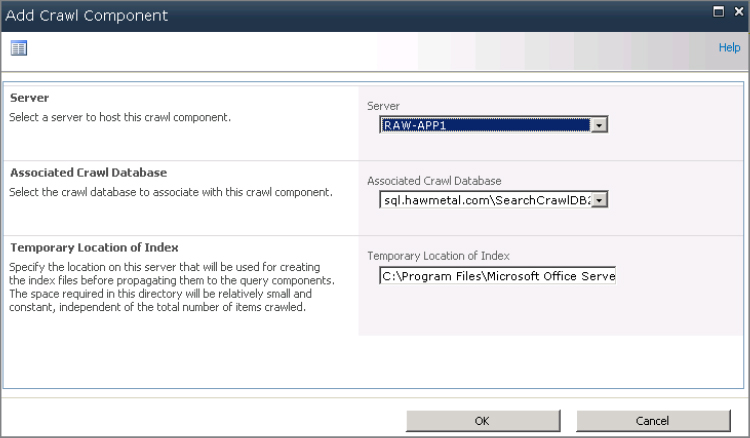
4. Select the application server to associate to this crawl component.
5. Select the crawl database to associate to this crawl component. Multiple crawl components can use a single crawl database, and a basic guideline is to have two crawl components per crawl database.
6. Optionally, for Temporary Location Of Index, change the local path. This is used to cache small portions of the index as it is being built. The default path is on the C: drive and only needs to be changed if space on this drive is very limited.
7. Click OK to save. This modification is now registered as a pending change. A pending change allows you to make multiple changes and apply them at one time.
8. To apply all changes, click the Apply Topology Changes button.
NOTE To avoid unintended outages, you should apply search application topology changes during scheduled downtime.
To create a new crawl database, follow these steps:
1. Go to the search topology screen. (Central Administration, click Application Management, and then click Manage Service Applications. Click the search service application you want to configure.)
2. Click the Modify button under Search Application Topology.
3. Click New ⇒ Crawl Database to display the Add Crawl Database window shown in Figure 5.20.
Figure 5.20: Creating a new crawl database
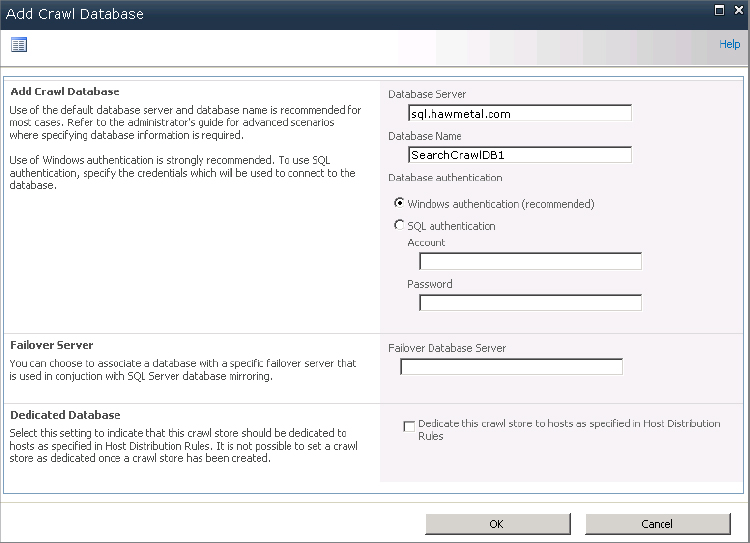
4. Specify the database server and name. This works the same way as creating any new database.
5. For Database Authentication, specify whether a Windows-authenticated (recommended) or SQL-authenticated login should be used when SharePoint queries this database.
6. Optionally, specify a failover server. This topic is covered in more detail in the “Scaling Using Database Mirroring” section later in this chapter.
7. Optionally, select the check box to specify that this will be a dedicated database—that is, this database will only be used for content from servers defined in host distribution rules.
A host distribution rule (introduced in Chapter 8) allows you to designate specific crawl components when crawling specific content. For example, you may wish to dedicate the crawling of a large file server to a single crawl component.
8. Once a crawl database has been flagged as dedicated, you can create a new host distribution rule.
Scaling Query Services
SharePoint’s query engine can be scaled in two primary ways:
Creating Multiple Query Components A query component runs on a WFE or application server. The component has a local copy of an index partition, which is searched when a query request is received. Having multiple query components for an index partition allows separate query requests to be load balanced across multiple servers. This design is called using query component mirrors.
Creating Multiple Index Partitions Having multiple query partitions can also optimize search requests. As introduced in Chapter 8, an index partition is a subset of the total index. Each index partition is associated with a separate query component. For example, if three index partitions exist, you have at least three separate query components and these components can run on three different servers. When a search request comes in, it is sent to three servers simultaneously, each component searching its own index partition. The results are then aggregated together. This design reduces the total time needed to process a search request.
To summarize, there is a one-to-many relationship between index partitions and query components. So, each index partition can be associated with multiple query components, but each query component is associated with only one index partition.
SharePoint also uses another search database called the property database. It is considered part of the index and stores metadata properties and item security details. Property databases are populated by crawl components when creating the index and read by query components when processing a search request. SharePoint supports multiple property databases. The property database is set when creating an index partition. Multiple index partitions can share the same property database.
Follow these guidelines when scaling query services:
- Use one index partition for each 10 million items crawled.
- Avoid having more than 10 index partitions per search application.
- SharePoint automatically distributes index items among the available index partitions. This distribution is not configurable.
- Avoid having more than 25 million items per each property database.
When you create a new index partition, you also create a new query component. Here are the steps:
1. Go to the search topology screen. (Central Administration, click Application Management, and then click Manage Service Applications. Click the search service application you want to configure.)
2. Click the Modify button under Search Application Topology.
3. Click New ⇒ Index Partition And Query Component to display the Add Query Component window shown in Figure 5.21.
Figure 5.21: Creating a new query component

4. Select the application or WFE server you want to host this query component.
5. Select the property database.
6. In the Location Of Index section, select where the file system portion of the index will be stored. This path must be a local one. If possible, store the file system portion of the index on a drive other than C: for space and performance reasons.
NOTE To estimate the amount of disk space needed, take the total amount of content that is being indexed, divide this amount by the number of index partitions, and then multiply by 0.035. For example, if you are indexing 500 GB of content and have two index partitions, the estimated amount of space is 8.75 GB (500 GB ÷ 2 × 0.035).
7. Optionally, set this component to be a failover query component. A failover query component uses an active/passive design, which means the failover server receives requests only if the primary query component is down. This option is not normally enabled when you’re creating a new query component.
8. Click OK to save. The new query component is now registered as a pending change.
Adding an additional query component mirror to an existing index partition improves query performance and fault tolerance. Here are the steps:
1. Go to the search topology screen. (Central Administration, click Application Management, and then click Manage Service Applications. Click the search service application you want to configure.)
2. Click the Modify button under Search Application Topology.
3. For the desired index partition, select any of the existing query components and choose Add Mirror from the context menu. See Figure 5.22.
Figure 5.22: Creating a query component mirror
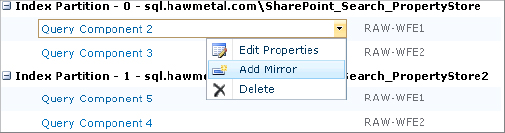
4. Select the application or WFE server you want to host this query component.
5. Select where the file system portion of the index will be stored.
6. Optionally, set this component to be a failover query component. If set as a failover query component, this server processes a query request only if other query components for the same index partition are offline. This arrangement doesn’t improve performance and only adds fault tolerance.
7. Click OK to save. This query component mirror is now registered as a pending change.
To add a new property database, follow these steps:
1. Access the search topology. (Central Administration, click Application Management, and then click Manage Service Applications. Click the search service application you want to configure.)
2. Click the Modify button under Search Application Topology.
3. Click New ⇒ Property Database.
4. Specify the database server and name as you would when creating any new database.
5. Click OK to save. This new property database is now registered as a pending change.
For more details on scaling search and several sample scenarios, see an excellent three-part series on the blog “A Static State.” The series starts here:
www.astaticstate.com/2010/12/sharepoint-2010-search-architecture.html