
Configure User Profile Properties
SharePoint 2010 supports customizing the details about users that are imported into user profiles by modifying the properties defined by the User Profile service. If your organization has created custom attributes in Active Directory, those attributes can be mapped onto custom properties in the user profile and imported along with the built-in attributes. SharePoint 2010 also supports the new capability of exporting property values from the user profile to update the attributes in Active Directory.
Configuring a Property for Import
You may need to modify the import settings of an existing property to change the attribute that the data is drawn from or to have it import from a different synchronization connection. To change the way that data is imported into an existing profile property, do the following:
1. From SharePoint 2010 Central Administration, under Application Management, click Manage Service Applications.
2. On the Manage Service Applications page, click the User Profile Service Application link.
3. From the Manage Profile Service page, shown partially in Figure 7.6, under the People section, click Manage User Properties.
Figure 7.6: Manage Profile Service commands
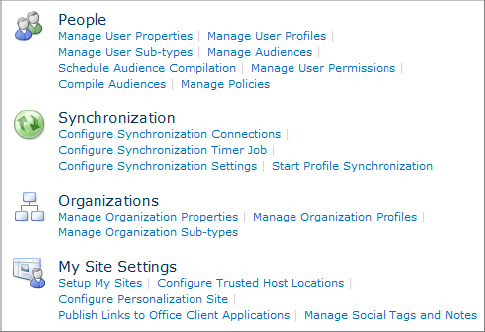
On the Manage User Properties page, the Property Name entry in the left column is the name that users see when they view a profile. The Mapped Attribute value is the Active Directory attribute that is being imported.
4. In the properties list, locate a property to configure and from the property’s context menu, select Edit. For example, the Mobile Phone property is not mapped to an Active Directory property by default.
5. In the Add New Mapping section, select the Source Data Connection (for more information on connections, see “Configure User Profile Synchronization,” later in this chapter).
6. Select the attribute you want to import from. For example, the Mobile Phone property could be mapped to the Active Directory attribute labeled mobile, as shown in Figure 7.7.
Figure 7.7: Configuring import mapping
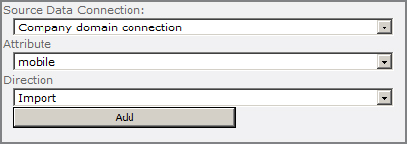
7. For the Direction option, select Import.
8. Click Add.
Configuring a Property for Export
You may want to export a property value from SharePoint 2010 into Active Directory to take advantage of details that users have modified in their profiles. For example, users can update the Picture property in their SharePoint profile but they normally have no access to this property in Active Directory. The Picture property is also designed specifically to be exported from SharePoint to Active Directory. To configure data to be exported from an existing Profile property, do the following:
1. From SharePoint 2010 Central Administration, under Application Management, click Manage Service Applications.
2. On the Manage Service Applications page, click the User Profile Service Application link.
3. From the Manage Profile Service page, shown partially in Figure 7.6, under the People section, click Manage User Properties.
4. In the properties list, locate a property to configure and from the property’s context menu, select Edit. For example, the Picture property is not configured for export by default, as shown in Figure 7.8.
Figure 7.8: Editing a profile property

5. In the Add New Mapping section, select the Source Data Connection (for more information on connections, see “Configure User Profile Synchronization,” later in this chapter).
6. Select the attribute you want to import from. For example, the Picture property is designed to be mapped to the Active Directory thumbnailPhoto attribute.
7. For the Direction option, select Export.
8. Click OK.
Creating a Custom Property Mapping
You can create a completely new property for the user profile. For example, a company might store a staff member’s employee ID in a custom attribute in Active Directory and might want to import this value into the user profiles. A new custom property can be created to hold the value.
To create a new property:
1. From SharePoint 2010 Central Administration, under Application Management, click Manage Service Applications.
2. On the Manage Service Applications page, click the User Profile Service Application link.
3. From the Manage Profile Service page, shown partially in Figure 7.5, under the People section, click Manage User Properties.
4. On the toolbar, click New Property.
5. In the Name box, enter an internal name for the property. This value is used by the User Profile service and cannot be changed once it is created.
6. In the Display Name box, enter a name for the property that users will see.
7. From the Type drop-down list, select the data type for the property and the length, if appropriate. Most of the types represent simple data types with no configuration options beyond the length. Selecting a String data type allows for the option to select a term set (new to SharePoint 2010) to use as the source for the values that users can enter into this property. For more details on term sets, see Chapter 11, “Configuring the Managed Metadata Service.”
8. The Default User Profile Subtype check box, selected by default, is the most commonly used option. If you intend to configure different sets of properties for different groups of users, then deselect this option to dissociate the property from the default subtype.
9. Enter a description to explain the purpose of this property.
10. In the Policy Settings section, choose whether data for this property will be Required, Optional, or Disabled. The Disabled setting will hide the property from users and only allow it to be edited by the User Profile service administrator. Also choose the default privacy of this property, which indicates who can see it in the user’s profile. The options are Only Me, My Manager, My Team, My Colleagues, or Everyone. To allow users to change the privacy setting, select the User Can Override check box.
11. In the Edit Setting section, select “Allow users to edit values for this property” to permit users to update this property. Generally, users should only be allowed to edit properties that are configured as an export mapping or are not mapped to an Active Directory attribute. The reason is that those configured for import will be overwritten with values from Active Directory each time synchronization occurs.
12. In the Display Settings section, check the appropriate visibility options:
- Show in the profile properties section of the user’s profile page
- Show on the Edit Details page
- Show updates to the property in newsfeeds
13. In the Search Settings section, select the options that affect how the property is indexed by SharePoint Search:
Alias Allows SharePoint to recognize the value as equivalent to the username and account name for searching purposes.
Indexed Allows this property to be indexed. That way, the SharePoint crawler can read the values of this property and incorporate it into search results.
14. Check the Property Mapping For Synchronization section; it displays any existing mappings between this property and Active Directory attributes and allows mappings to be removed if necessary.
15. In the Add New Mapping section, select the Source Data Connection (for more information on connections, see the next section, “Configure User Profile Synchronization”).
16. Select the attribute you want to import from or export to.
17. For the Direction option, select either Import, to bring values into the user profile from the data source, or Export, to push values from the user profile into the data source. In most cases, when you are intending to display values stored in Active Directory, you would select Import.
18. Click OK.